Mitsubishi Colt Ralliart. Manual - part 492


  Index      Mitsubishi     Mitsubishi Colt Ralliart - service repair manual


Search            


Content   ..  490  491  492  493   ..


Mitsubishi Colt Ralliart. Manual - part 492


RADIO AND CD PLAYER

CHASSIS ELECTRICAL

54A-113

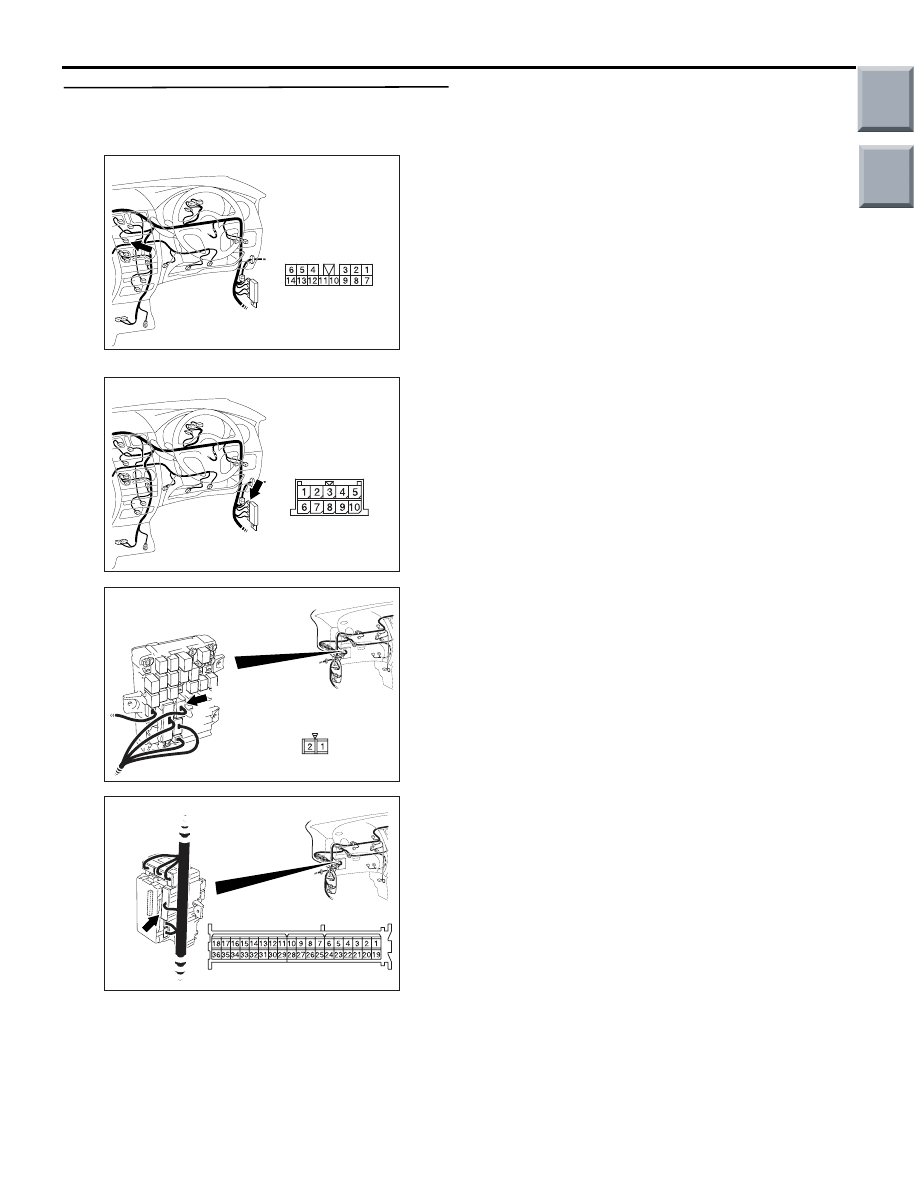
Step 3. Check the wiring harness between radio 
and CD player connector B-11 (terminal 11) and 
fusible link 1 (battery).

AC401055

AN

Connector: B-11

Harness side

NOTE: 

AC401055

Connector: B-22

AD

AC313870

Connector: B-108

BD

Junction block (Front view)

B-108(B)

Harness side

AC313872

Connector: B-131

BD

Harness side

Prior to the wiring harness inspection, check joint 
connector B-22, junction block connectors B-108 and 
B-131 and repair if necessary.

Q: Are the wiring harness between radio and CD 

player connector B-11 (terminal 11) and fusible link 
1 (battery) in good condition?
YES : 

Repair or replace the radio and CD player. 

Check that a memory is retained.

NO : 

Repair or replace the damage 
component(s). Check that a memory is 
retained.

Main

Index

Group

TOC

RADIO AND CD PLAYER

CHASSIS ELECTRICAL

54A-114

INSPECTION PROCEDURE 18: CD can Not be Inserted.

DIAGNOSIS PROCEDURE

Step 1. Check that a CD has been already loaded.

Q: Has a CD been already loaded?

NO : 

Go to Step 2.

YES : 

Take out the CD (If the CD can not be 

ejected, refer to INSPECTION 
PROCEDURE 22 

P.54A-116

). Check that a 

CD can be inserted.

Step 2. Check how a CD is inserted.

• Ensure that the ignition switch is at "ACC" or 

"ON".

NOTE: If you try to load a CD when the ignition 
switch is at the positions other than "ACC" or "ON", 
the CD will not be inserted completely and then 
rejected.

Q: If you try to load the CD, does the CD stops halfway 

and then rejected?
YES : 

Refer to INSPECTION PROCEDURE 22 

P.54A-116

.

NO : 

Go to Step 3.

Step 3. Check after the CD is loaded.
NOTE: . Even though the CD is loaded, "E" (error) is 
sometimes displayed with the CD rejected because 
of vibration/shock or dew on the CD face or optical 
lens.

Q: Though the CD is inserted completely, is "E" (error) 

displayed and the CD ejected?
YES : . 

Go to Step 4.

NO : . 

The procedure is complete.

Step 4. Check the CD.
Check the CD for the conditions below:

• Is the CD loaded with its label facing down?

• Is the recorded face dirty or scratched?

• Is there dew on the recorded face?

Q: Is the CD in good condition?

YES : 

Go to Step 5.

NO : 

The original CD is defective. Check that a 
CD can be inserted.

Step 5. Check again using a normal CD, which is 
not dirty or scratched. 

• Load another normal CD.

• Check that the CD player recognizes and play the 

CD. 

Q: When you substitute another normal CD, is the CD 

loaded correctly?
YES : 

The original CD is defective. Check that a 

CD can be inserted.

NO : 

Replace the radio and CD player. The 
procedure is complete.

INSPECTION PROCEDURE 19: No Sound. (CD only)

DIAGNOSIS PROCEDURE

Step 1. Check again using a normal CD, which is 
not dirty or scratched. 

Q:  When you substitute another normal CD, is the CD 

played normally?
YES : 

The original CD is defective. The CD player 

should sound normally.

NO : 

Go to Step 2.

Step 2. Check power supply to the CD player 
when the ignition switch is at "ACC" or "ACC".

Q: Is the radio and CD player energized when the 

ignition switch is turned to the "ACC" or "ON 
position?
YES : 

Replace the radio and CD player. The 

procedure is complete.

NO : 

Check the power supply circuit. Refer to 
Inspection Procedure 1 

P.54A-93

.

Main

Index

Group

TOC

RADIO AND CD PLAYER

CHASSIS ELECTRICAL

54A-115

INSPECTION PROCEDURE 20: CD Sound Skips.

DIAGNOSIS PROCEDURE

Step 1. Check the state in which the sound on the 
CD jumps.

Q:  Does the sound jump when the car is parked?

YES : 

Go to Step 2.

NO : 

Go to Step 4.

Step 2. Check the surface of the CD.

Q:  Are there any scratches or soiling on the CD?

YES : 

The CD is defective if there are any 

scratches. Clean the CD surface if it is dirty. 
Check that a CD sound skip is resolved.

NO : 

Go to Step 3.

Step 3. Check when replacing with a CD that can 
be played normally without any scratches or 
soiling.

Q:  Does the CD play normally when replaced with a 

CD that is not scratched or dirty and can play 
normally?
YES : 

Defective CD used. Check that a CD sound 

skip is resolved.

NO : 

Go to Step 4.

Step 4. Check by tapping the radio and CD player.
NOTE: Check by using a proper CD which is free 
from scratches, dirt or any other abnormality.

Q:  Does the sound jump when tapping the radio and 

CD player?
YES : 

Securely mount the radio and CD player. 

Check that a CD sound skip is resolved.

NO : 

Either repair or replace the radio and CD 

player. (Take the following measures if a 
servicing shop is closely).

1. Investigate in detail the state when 

the sound jumps while driving the 
car.

2. Describe the state to the service 

shop for consultation.

3. Either repair or replace the radio and 

CD player according to the 
instructions of the service shop.

 Check that a CD sound skip is resolved.

INSPECTION PROCEDURE 21: Sound Quality is Poor.

DIAGNOSIS PROCEDURE

Check to see that the CD can be played normally 
and that it is free of any scratches or soiling.
Replace with better sound quality CD.

Q:  Is the sound quality better replacing the CD with a 

clean CD without any scratches that can be 
played?
YES : 

Defective CD used. The sound quality 

should return to normal.

NO : 

Either repair or replace the radio and CD 
player. The sound quality should return to 
normal.

Main

Index

Group

TOC

RADIO AND CD PLAYER

CHASSIS ELECTRICAL

54A-116

INSPECTION PROCEDURE 22: CD can not be Ejected.

DIAGNOSIS PROCEDURE

Check the power of ignition switch "ACC".

Q:  Does the radio and CD player power turn ON when 

the ignition switch is in the "ACC" or "ON" 
position?
YES : 

Replace the radio and CD player. Check 

that a CD can be ejected normally.

NO : 

Check the power supply circuit. Refer to 
Inspection Procedure 1 

P.54A-93

.

ON-VEHICLE SERVICE

PROCEDURE FOR INPUT OF SECURITY 
CODE FOR ANTI-THEFT SYSTEM

M1544004400304

The radio and CD player do not work under the fol-
lowing conditions:

1.

P901

AC211319

Security indicator

AB

If the ignition key is removed, the security indicator of 

this radio and CD player flickers to prevent theft 
from happening.

2. Power supply to the radio and CD player has 

been suspended for more than an hour continu-
ously by removing the cable from the battery ter-
minal or disconnecting the harness connectors.

3. The power supply to the radio and CD player has 

been suspended for more than an hour due to a 
blown fuse or discharged battery.

4. If the radio and CD player do not work for these 

conditions, enter the security code as follows:

5. The radio and CD player has been replaced.

ANTI-THEFT SYSTEM

Do not keep this card in your car!
For information the function and  use of the
anti-theft coe see the owner's manual.

Code No.

Model

Serial No.

MITSUBISHI MOTORS CORPORATION

AC211321

CARD

Security code

AB

1. Confirm the security code using any of the 

following methods.
(1) Use the security code indicated on the cards 

retained in the vehicle.

AC211322AB

Typical name card

Serial No.

(2) If the security code is unknown owing to the 

owner's loss of the card:
a. Remove the radio and CD player referring 

to 

P.54A-119

.

b. Read the serial number stamped on the 

radio and CD player.

c. Look up the security code (anti-theft code 

table) corresponding to the serial number.

AC211323AB

Card

(3) When the radio and CD player is replaced: 

Use the security code on the cards attached to 
the upper surface of the replacement radio 
and CD player.

NOTE: Deliver the two cards to the owner.

2. Connect the radio to the vehicle harness.

Main

Index

Group

TOC


Content   ..  490  491  492  493   ..