Mitsubishi Canter (FE, FG). Manual - part 14


  Index      Mitsubishi     Mitsubishi Canter (FE, FG) - service manual 2013 year


Search            


Content   ..  12  13  14  15   ..


Mitsubishi Canter (FE, FG). Manual - part 14


56

5 Damage prevention 

5.1 Electrical system

MITSUBISHI FUSO body/equipment mounting directives for FE, FG  Issue date: 06. 07. 2012

!

 Only print out complete sections from the current version

i

5.1.3

Fuse

(a) Do not route power wiring from any fuse for 

unintended use. The existing fuse on the 
chassis side is of the optimum capacity for the 
service load, frequency of use, etc. When 
installing an additional electrical device 
associated with body equipment, do not 
connect parts or harnesses which may provide 
an error signal to the chassis power line or 
ground line.
Be sure to lead out power for body equipment-
related apparatus and lamps via designated 
appropriate connectors. For further details, see 
"Mounting Location of Optional Terminal Inside 
Cab" (

컄 page 103).

Fuses in the cab are provided on the signal 
detection and actuation module control SAM 
unit. When removing and reinstalling them, do 

so securely one by one. For other precautions 
on the SAM, see "5.1.1 Signal detection and 
actuation module-related parts" (

컄 page 53).

(b) Mid-point extension of existing wiring or the use 

of a larger capacity fuse could cause an 
excessive current to flow in the power fuse box, 
resulting in a fire.

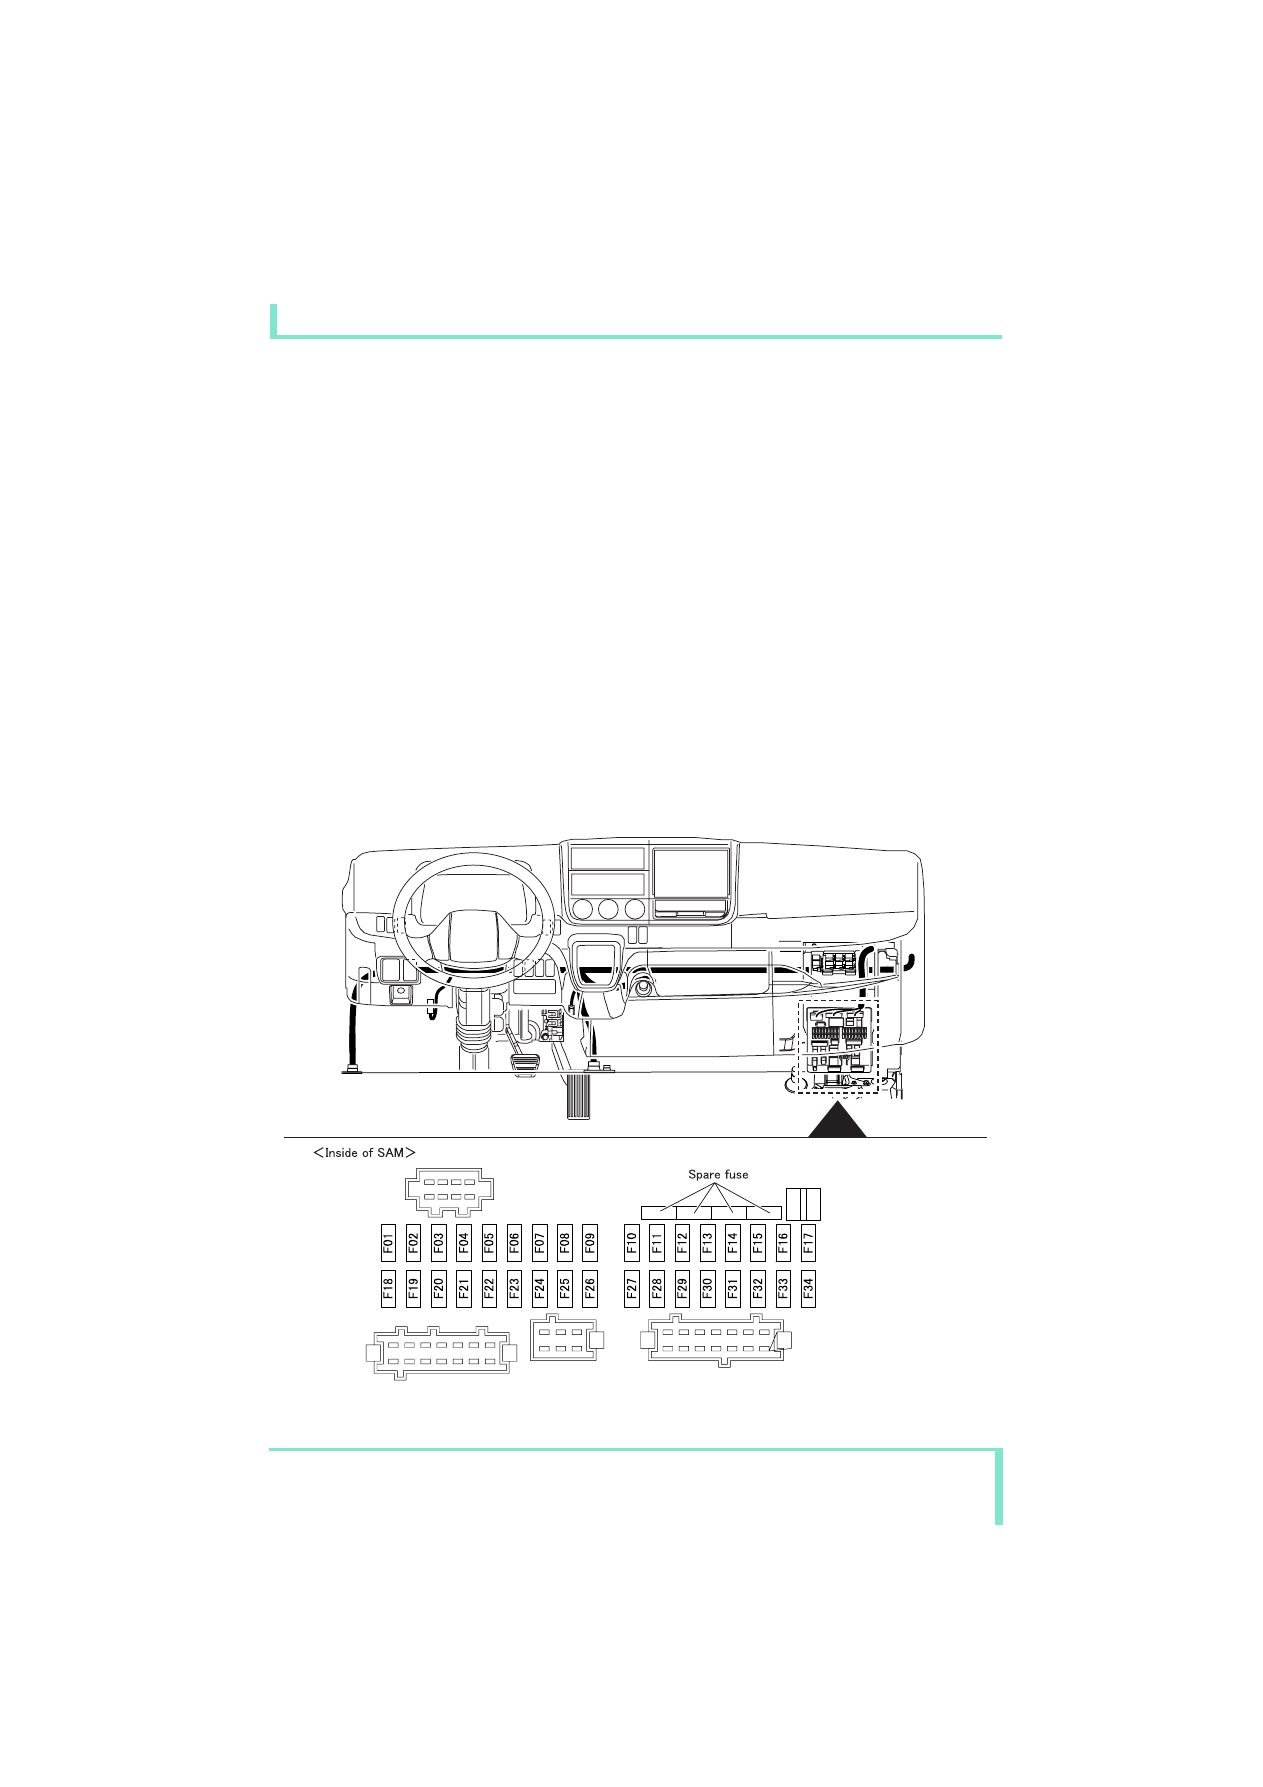
(c) Arrangement of power fuses, relay in the 

instrument panel, sensors and ECU
• Fuse layout drawing

57

5 Damage prevention 

5.1 Electrical system

MITSUBISHI FUSO body/equipment mounting directives for FE, FG  Issue date: 06. 07. 2012

!

 Only print out complete sections from the current version

i

• Removal of spare fuse

To remove the spare fuse, insert a fuse 
puller from outside the wall holding the 
spare fuse.

Do not insert the puller from inside the wall, 
as doing so could damage the fuse holder 
and cause electrical failure or fire.

Fuse

No.

Major load

Capacity

F01

10A

Starter

F02
F03
F04

10A

Optional power (IGN)

F05

30A

Power window (driver’s seat side)

F06

30A

Power window (passenger side)

F07

20A

ID lanp

F08

10A

Meter, diaphragm tachometer, diagnosis connecter

F09

-

-

F10

30A

Blower fan

F11

Audio, interior lamp

F12

15A
10A

Starter switch, ISS ECU

F13

10A

Horn

F14

10A

F15

20A

Power mirror, power socket (cigarette lighter)

Audio

Engine ECU

F16

20A

Fuel heater

F17

10A

ABS ECU

F18

Engine ECU

F19

4WD M/V

F20

15A
10A
10A

-

-

F21

15A

Meters, A/C control

F22

10A

F23

10A

DUONIC   ECU

F24

10A

Optional power supply (ACC)

F25

10A

Optional power supply (B+)

F26

20A

Van body dome lamp

F27

15A

Engine ECU

F28

20A

BlueTec   system

F29

20A

BlueTec   system

R

R

F30

20A

F31

15A

Fuel pump

F34

-

-

F33

10A

Air conditioner

F32

R

-

-
-

58

5 Damage prevention 

5.1 Electrical system

MITSUBISHI FUSO body/equipment mounting directives for FE, FG  Issue date: 06. 07. 2012

!

 Only print out complete sections from the current version

i

• Arrangement of relay in the instrument 

panel, sensors and ECU

59

5 Damage prevention 

5.1 Electrical system

MITSUBISHI FUSO body/equipment mounting directives for FE, FG  Issue date: 06. 07. 2012

!

 Only print out complete sections from the current version

i

5.1.4

Connecting additional power wiring

• Taking power from the existing wiring

(a) Source the power for the lamps and devices of 

the built body from the specified connector.
If an electrical device related to the built body is 
to be added, do not install a part or route a 
harness that can give a false signal to the power 
line and ground line of the electrical devices on 
the vehicle side.
Adding a wire to a midway point of the existing 
wire or increasing capacity by changing the fuse 
causes an excessive current to flow through the 
power supply and fuse box, leading to a fire. 
NEVER change or add electrical wires except for 
those contained in this manual.
Increase the number of lamps according to the 
table given below (load, power source, etc.).

(b) Typical faulty wiring

• Taking power via the onboard battery terminal

Take power by way of the onboard battery terminal 
only when doing that is absolutely necessary to 
achieve body building. If it is done unavoidably, 
observe the following precautions.

(a) Add a fuse of a correct type to any additional 

wire to thereby protect the circuit.

(b) Use a wire of 5.0 mm

2

 (0.2 in.

2

) or more for the 

additional wire ("between battery terminal and 
fuse" of the next figure (

컄 page 60). Set the 

wire as short as possible and make sure that its 
jacket is not damaged to result in a short.

(c) For the combination of the capacity of the 

additional fuse and the wire size between the 
fuse and the additional load, study those 
marked with 

앪 in "List of recommended 

combinations of fuse capacity and wire size" 
(

컄 page 60).

(d) Install the additional fuse in a waterproof cover 

(e.g. electric cover) or take an equivalent 
waterproofing measure for the additional fuse.
Do not add wires or fuses to the existing high-
current fuse box.

(e) Use of a directly connected power supply 

causes the onboard battery to tend to run down 
quickly. Make sure that the customer 
understands and observes the following 
handling precautions:
• It is prohibited to use the onboard battery for 

a long time with the engine stationary.
Do not use the onboard battery as a service 
power supply (for the clock, memory, etc.).

Battery

Switch

Existing wire

Additional wires

High-current fuse

The amount of current is increased by the 
additional lamps, which applies load on the 
switch, fuse, and wires, resulting in a fire.

Additional 
lamps

Existing 
lamp


Content   ..  12  13  14  15   ..