Mitsubishi 380. Manual - part 885
 

  Index      Mitsubishi     Mitsubishi 380 - service repair manual 2005 year


Search            


Content   ..  883  884  885  886   ..


Mitsubishi 380. Manual - part 885


COMBINATION METER ASSEMBLY

CHASSIS ELECTRICAL

54A-74

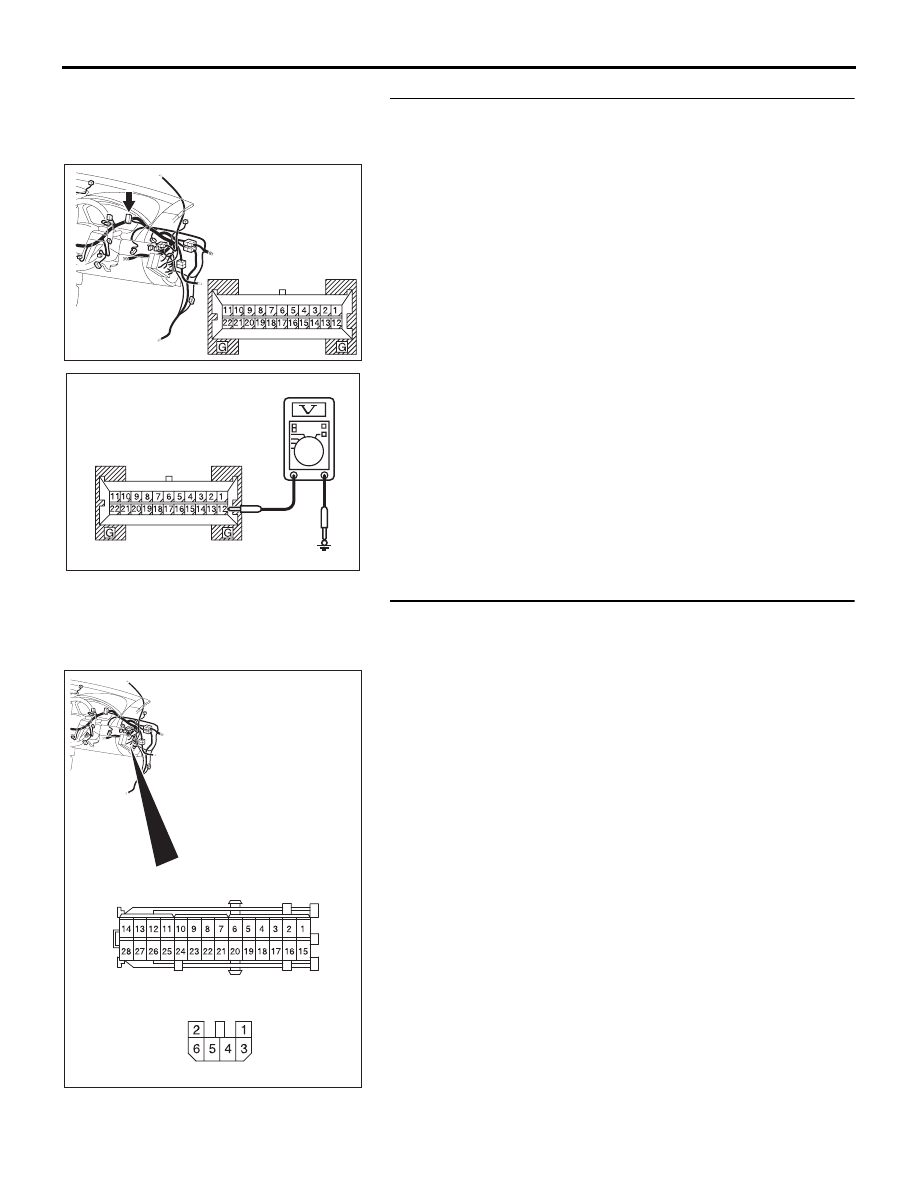
STEP 4. Measure the voltage at combination meter 
connector C-101 in order to power supply circuit to 
combination meter (IG1 power supply).
(1) Disconnect combination meter connector C-101, and 

measure at the wiring harness side.

(2) Turn the ignition switch to "ON" position.

(3) Measure the voltage between terminal 12 and ground. 

• The voltage should measure approximately 12 volts 

(battery positive voltage).

Q: Is the measured voltage approximately 12 volts (battery 

positive voltage)?
YES : 
Go to Step 6.
NO :  Go to Step 5.

STEP 5. Check the wiring harness between combination 
meter connector C-101 (terminal 12) and the ignition 
switch (IG1)

NOTE: Also check  junction block connector C-211 and C-215 
for loose, corroded, or damaged terminals, or terminals pushed 
back in the connector. If inspecting junction block connector 
C-211 or C-215 is damaged, repair or replace. Refer to 
GROUP 00E, Harness Connector Inspection 

P.00E-2

Q: Is the wiring harness between combination meter 

connector C-101 (terminal 12) and the ignition switch 
(IG1) in good condition?
YES : 
Retest the system.
NO :  Repair the wiring harness. Check that the 

combination meter is normally.

54DB019A

CONNECTOR: C-101

HARNESS SIDE

AC209365

CONNECTOR C-101 
(HARNESS SIDE)

HU

25DB096A

CONNECTORS: C-211, C-215

HARNESS SIDE

C-211

HARNESS SIDE

C-215

COMBINATION METER ASSEMBLY

CHASSIS ELECTRICAL

54A-75

STEP 6. Measure the resistance at combination meter 
connector C-101 in order to the ground circuit to the 
combination meter.
(1) Disconnect combination meter connector C-101, and 

measure at the wiring harness side.

(2) Measure the resistance value between terminal 3, 5 and 

ground.

• The resistance should be 2 ohms or less.

Q: Is the measured resistance 2 ohms or less?

YES : Go to Step 8.
NO :  Go to Step 7.

STEP 7. Check the wiring harness between combination 
meter connector C-101 (terminal 3 and 5) and ground.
Q: Is the wiring harness between combination meter 

connector C-101 (terminal 3 and 5) and ground in good 
condition?
YES : 
Retest the system.
NO :  Repair the wiring harness. Check that the 

combination meter is normally.

STEP 8. Retest the system.

Q: Is the check result satisfactory?

YES : The procedure is complete. (If no malfunctions are 

found in all steps, an intermittent malfunction is 
suspected. Refer to GROUP 00, How to Use 
Troubleshooting/Inspection Service Points 

− How to 

Cope with Intermittent Malfunction 

P.00-14

).

NO :  Replace the combination meter.

54DB019A

CONNECTOR: C-101

HARNESS SIDE

AC209364

CONNECTOR C-101 
(HARNESS SIDE)

JR

54DB019A

CONNECTOR: C-101

HARNESS SIDE

COMBINATION METER ASSEMBLY

CHASSIS ELECTRICAL

54A-76

INSPECTION PROCEDURE 6: Speedometer does not Work. INSPECTION PROCEDURE 7: The Fuel 
Gauge Needle Moves Excessively.

16DB402A

A-02 (GR)

CONNECTOR: A-02 

A-02 HARNESS CONNECTOR:

10DB076A

OUTPUT SHAFT

SPEED SENSOR

   (B-19) GR

BATTERY

AUTOMATIC

TRANSMISSION

16DB407A

COVER

ENGINE

CONTROL

UNIT

AIR

CLEANER

A/T

CONTROL

UNIT

MANUAL
TRANSMISSION


SPEED SENSOR

22DB018A

54DB025A

C-02

C-29

C-101

CONNECTORS: C-02, C-29, C-101

COMBINATION METER ASSEMBLY

CHASSIS ELECTRICAL

54A-77

CAUTION

When the battery cable is disconnected or the 
combination meter is removed, the fuel gauge 
learned value will be erased. To let the display 
unit re-learn it, enter the vehicle speed (by driv-
ing the vehicle or entering simulated vehicle 
speed) and then stop the vehicle.

.

CIRCUIT OPERATION

The output shaft speed sensor sends vehicle signal 
to the combination meter via the Engine ECU and 
the CAN bus line.

.

TECHNICAL DESCRIPTION (COMMENT)

If only the speedometer does not operate, the Engine 
ECU system, the combination meter, the wiring har-
ness or its connector may be defective. Furthermore, 
incorrect level of fuel is shown on the gauge, 
because the display unit can not learn the fuel 
gauge.

.

TROUBLESHOOTING HINTS

• Refer to circuit diagrams GROUP-

90

• Refer to configuration diagrams GROUP-

80

• Malfunction of the combination meter

• Malfunction of the Engine ECU

• The wiring harness or connectors may have 

loose, corroded, or damaged terminals, or termi-
nals pushed back in the connector.

DIAGNOSIS 

Required Special Tools:

• MB991958: Diagnostic Tool (MUT-III Sub Assembly)

• MB991824: Vehicle Communication Interface (V.C.I.)

• MB991827: MUT-III USB Cable

• MB991910: MUT-III Main Harness A (Vehicles with CAN 

communication system)

STEP 1. Using diagnostic tool MB991958, diagnose the 
CAN bus line.
(1) Connect diagnostic tool MB991958 to the data link 

connector.

(2) Turn the ignition switch to "ON" position.
(3) Diagnose the CAN bus line.

Q: Is the check result satisfactory?

YES : Go to Step 2.
NO :  Repair the CAN bus lines (Refer to GROUP 54C, 

Diagnosis-Can Bus Diagnostic Chart 

P.54C-15

). On 

completion, go to Step 4.

00DB076A

MB991910

DATA LINK

CONNECTOR

MB991824

MB991827


Content   ..  883  884  885  886   ..