Mitsubishi L200. Manual - part 567


  Index      Mitsubishi     Mitsubishi L200 - service repair manual 2012 year


Search            


Content   ..  565  566  567  568   ..


Mitsubishi L200. Manual - part 567


AC807299

8

3

1

2

9

10

7

9

AD

10

5

4

8

6

6

11

11

<Type2: Vehicles for Europe (Club and double cab)> 
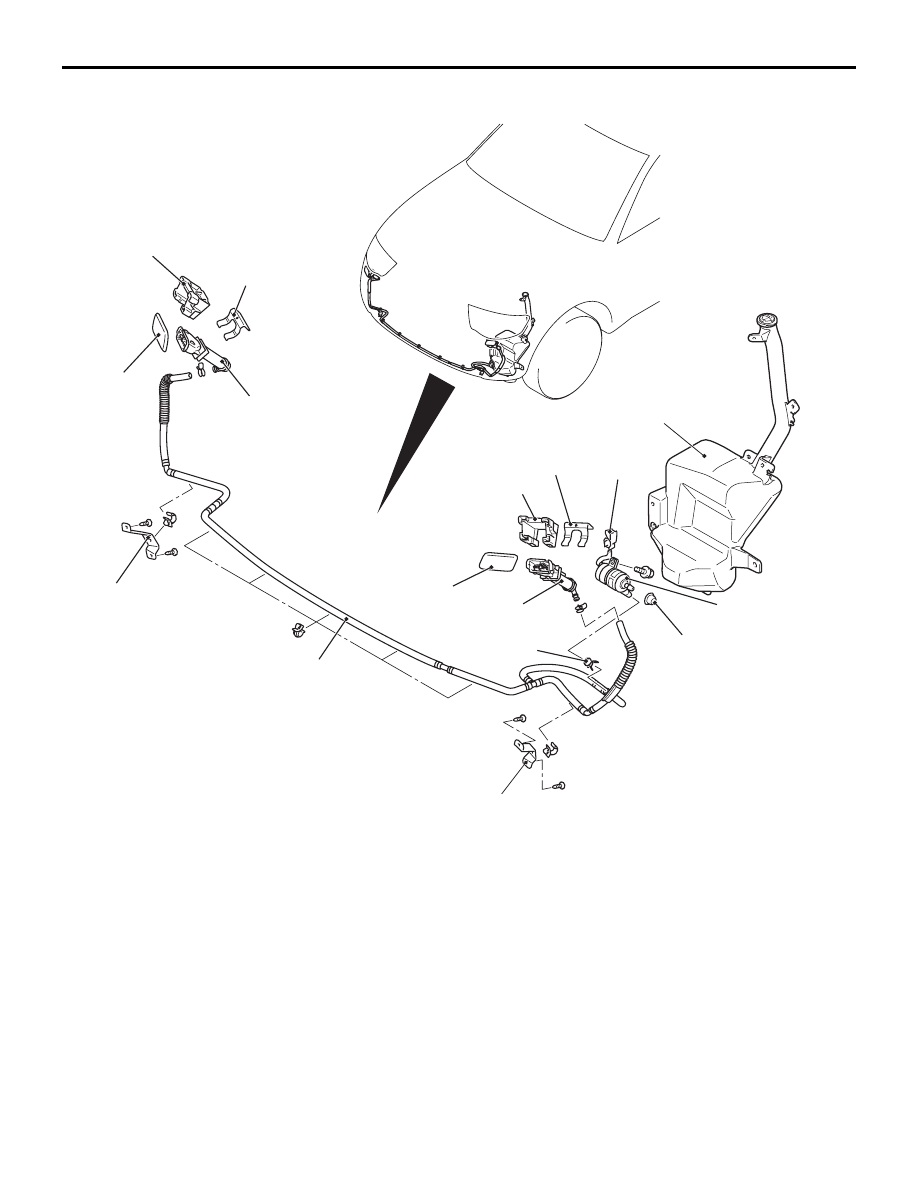
Removal steps 

Front bumper (Refer to 

P.51-3

)

Washer fluid draining

1.

Headlamp washer hose connection 
(headlamp washer motor side)

2.

Headlamp washer motor connector 
connection

3

Windshield washer tank (Refer to 

P.51-73

)

4.

Headlamp washer motor

5.

Packing

6.

Headlamp washer hose bracket

7.

Headlamp washer hose

8.

Headlamp washer clamp

9.

Headlamp washer collar

10. Headlamp washer actuator 

assembly

11. Headlamp washer cover

HEADLAMP WASHER

EXTERIOR

51-84

Removal steps (Continued)

STRIPE TAPE <VEHICLES FOR MOROCCO>

EXTERIOR

51-85

INSPECTION

M1511019103135

HEADLAMP WASHER MOTOR CHECK

1 2

AC509750

1. Remove the headlamp washer motor connector.
2. Check to see that the water is vigorously sprayed 

when connecting the positive battery terminal to 
terminal number 1 and terminal number 2 to the 
negative battery terminal.

STRIPE TAPE <VEHICLES FOR MOROCCO>

REMOVAL AND INSTALLATION

M1511012100168

ACB00488

C

1

3

A

4

2

AC

B

Removal steps  

>>

A

<<

1.

Front fender tape

>>

A

<<

2.

Front door tape

>>

A

<<

3.

Rear pillar tape

>>

A

<<

4.

Side gate tape

>>

A

<<

5.

Rear door tape

>>

A

<<

6.

Rear pillar tape

>>

A

<<

7.

Side gate tape

INSTALLATION SERVICE POINT

>>A<< STRIPE TAPES INSTALLATION
1. Clean the tapes installation surfaces on the body 

with the parts cleaner (MZ100387 or equivalent).

STRIPE TAPE <VEHICLES FOR MOROCCO>

EXTERIOR

51-86

CAUTION

AC600088

<Left side>

<Right side>

AB

Stripe tapes have different notches for identify-

ing the left or right side as shown besides 
tape mating notches.

• When attaching the tapes, the surrounding 

temperature should be 20 - 38

°C and air 

should completely free from dust.

• If the surrounding temperature is lower then 

20

°C, the tapes and the places on the body 

where the tapes are to be attached should be 
heated to 20 - 30

°C.

2. Peel off the backing paper from the reverse side 

of the tapes, and then attach them to the vehicle 
body so that they fit properly in position.

ACB00410

View A

: Align the tape mating notch to fender/front door end line

 : Align the tape end with the body press line

1

2

Fender end line

Front door end line

AB

1. Front fender tape  
2. Front door tape

ACB00411

View B

: Align the tape mating notch to front door/rear pillar/side gate end line

: Align the tape end with the body press line

2

4

Front door end line

Rear pillar end line

Side gate end line

3

2. Front door tape  
3. Rear pillar tape  
4. Side gate tape

AC

ACB00412

View C

: Align the tape end with the body press line

4

AB

4. Side gate tape LH

ACB00413

View C

: Align the tape end with the body press line

4

AB

4. Side gate tape RH

STRIPE TAPE <VEHICLES FOR MOROCCO>

EXTERIOR

51-87


Content   ..  565  566  567  568   ..