Mitsubishi L200. Manual - part 363


  Index      Mitsubishi     Mitsubishi L200 - service repair manual 2012 year


Search            


Content   ..  361  362  363  364   ..


Mitsubishi L200. Manual - part 363


Disassembly steps 

>>D<<

1.

Snap ring

>>C<<

2.

Reaction plate

>>C<<

3.

Clutch disc

>>C<<

4.

Clutch plate

<<A>>

>>B<<

5.

Snap ring

6.

Spring retainer

>>A<<

7.

D-ring

8.

Return spring

9.

Direct clutch piston

>>A<<

10. D-ring

>>A<<

11. D-ring
12. Direct clutch retainer

DIRECT CLUTCH

AUTOMATIC TRANSMISSION OVERHAUL <V5A5>

23D-67

DISASSEMBLY SERVICE POINT

<<A>> SNAP RING REMOVAL

AK602068AC

MB991630

MD998924

Sanp ring

1. Set the special tools as shown in the illustration.

• Spring compressor (MB991630)

• Spring compressor retainer (MD998924)

2. Compress the return spring, and remove the snap 

ring.

REASSEMBLY SERVICE POINTS

>>A<< D-RING INSTALLATION
1. Apply ATF to the D-ring.
2. Install the D-ring in the direct clutch piston and 

spring retainer groove. Make sure that the D-ring 
is not twisted or damaged when installing.

>>B<< SNAP RING INSTALLATION

AK602068AC

MB991630

MD998924

Sanp ring

1. Set the special tools as shown in the illustration.

• Spring compressor (MB991630)

• Spring compressor retainer (MD998924)

2. Compress the return spring, and install the snap 

ring.

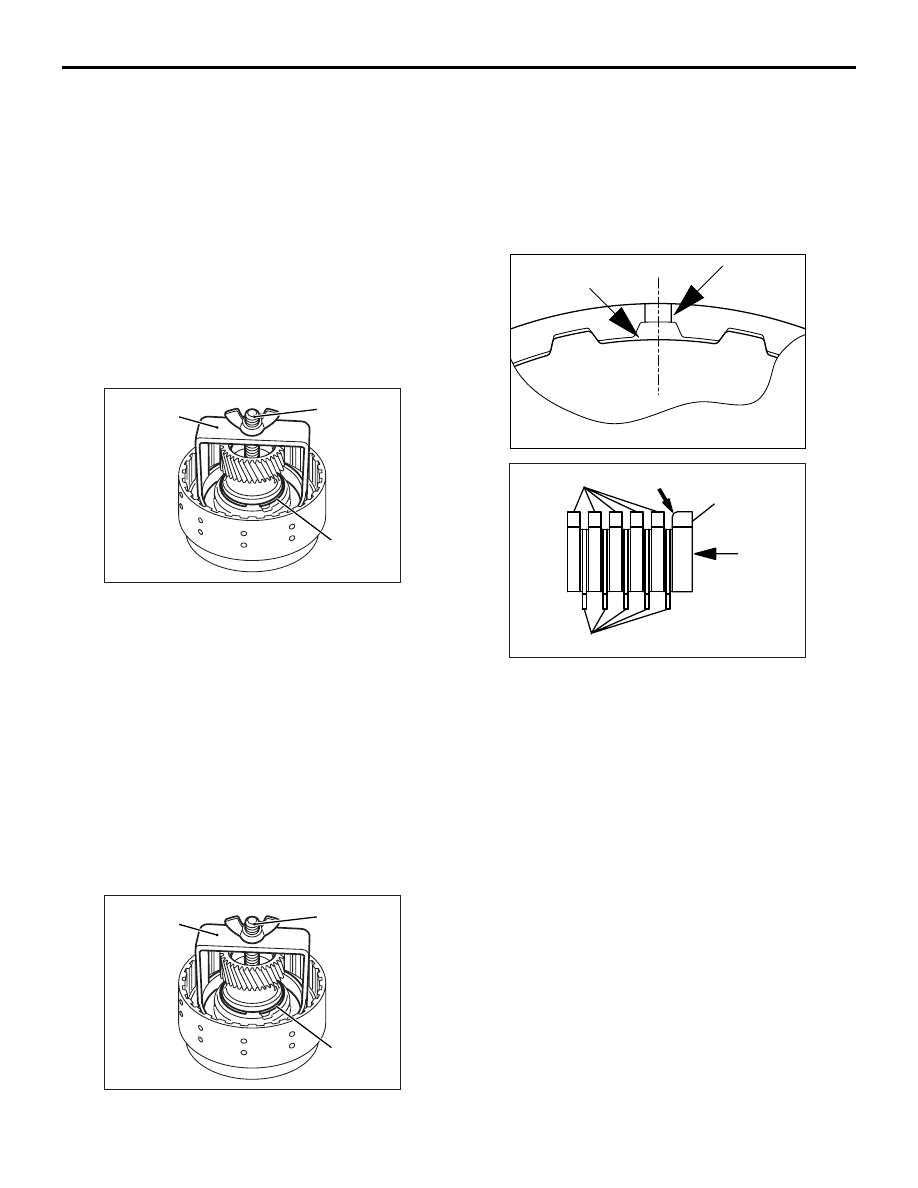
>>C<< CLUTCH PLATE / CLUTCH DISC / 
REACTION PLATE INSTALLATION

AK602069

B

A

AC

AK602070

R Stamp 

AC

Clutch plates

Reaction plate

Clutch discs

Rounded edge

1. Alternately assemble the clutch plates and clutch 

discs in the reverse clutch retainer. Align the 
section having no teeth of the clutch plates (A in 
the illustration) with the reverse clutch retainer 
hole (B in the illustration).

2. Install the reaction plate so that it is oriented as 

shown in the illustration. Assemble in the same 
manner as the clutch plate so that the section with 
no teeth (A in the illustration) matches the retainer 
hole (B in the illustration).

>>D<< SNAP RING INSTALLATION
1. Install the snap ring in the direct clutch retainer 

groove.

AK602071AC

Snap ring

AK602072AC

Snap ring

Standard value

Reaction plate

OUTPUTSHAFT SUPPORT

AUTOMATIC TRANSMISSION OVERHAUL <V5A5>

23D-68

2. Press the entire periphery of the reaction plate 

with a force of 49 N, and confirm that the 
clearance between the snap ring and reaction 
plate (direct clutch end play) is the standard value. 
If the clearance is not at the standard value, select 
a suitable snap ring and adjust so that the 
clearance is within the standard value.

Standard value: 1.0 

 1.2 mm

(For direct clutch end play)

OUTPUTSHAFT SUPPORT

DISASSEMBLY AND REASSEMBLY

M1233029000052

AK602073

1

2

3

4

AC

Apply automatic
transmission fluid
to all moving parts
before installation.

Disassembly steps 

1.

Snap ring

>>A<<

2.

One-way clutch

3.

Seal ring

4.

Output shaft support

OUTPUTSHAFT SUPPORT

AUTOMATIC TRANSMISSION OVERHAUL <V5A5>

23D-69

REASSEMBLY SERVICE POINTS

>>A<< ONE-WAY CLUTCH INSTALLATION

AK

602074 AC

One-way clutch

Output shaft 
supoort

Identification 
groove

Install the one-way clutch in such a way that it will be 
oriented in the direction shown.

VALVE BODY

AUTOMATIC TRANSMISSION OVERHAUL <V5A5>

23D-70

VALVE BODY

DISASSEMBLY AND REASSEMBLY

M1233005500600

AK602075

4

5

6

1

2

7

8

9

14

15

11

12

13

10

14

13

11 ± 1 N·m

11 ± 1 N·m

AC

11 ± 1 N·m

6.0 ± 1.0 N·m

3

Apply automatic
transmission fluid
to all moving parts
before installation.

Disassembly steps 

>>G<<

1.

Control shaft

>>F<<

2.

Damping valve

>>F<<

3.

Seal ring

>>F<<

4.

Damping valve spring

>>F<<

5.

Ball (orifice check ball)

>>F<<

6.

Steel ball (orifice check ball)

>>F<<

7.

Spring

8.

Upper valve body gasket

9.

Separating plate

10. Lower valve body gasket

>>E<<

11. Steel ball (line relief)

>>E<<

12. Spring

>>D<<

13. Knock bushing

Disassembly steps (Continued)


Content   ..  361  362  363  364   ..