Mazda MX-5 PRHT (2015 year). Instruction - part 23


  Index      Mazda     Mazda MX-5 PRHT - instruction 2015 year in english


Search            


Content   ..  21  22  23  24   ..


Mazda MX-5 PRHT (2015 year). Instruction - part 23


Black plate (360,1)

After rotation, inflate all tire pressures to
specification (page 10-7) and inspect the
lug nuts for tightness.

CAUTION

Rotate unidirectional tires and radial
tires that have an asymmetrical tread
pattern or studs only from front to
rear, not from side to side. Tire
performance will be reduced if
rotated from side to side.

CAUTION

Limited-Slip Differential system;
don't use the following:

Ø Tires not of the designated size

Ø Tires of different sizes or types at

the same time

Ø Tires not sufficiently inflated

If these instructions aren't followed,
the rotation of the left and right
wheels will be different and will thus
apply a constant load on the limited-
slip differential.
This will cause a malfunction.

qReplacing a Tire

WARNING

Always use tires that are in good
condition:

Driving with worn tires is dangerous.
Reduced braking, steering, and
traction could result in an accident.

Replace all four tires at the same time:

Replacing just one tire is dangerous.
It could cause poor handling and
poor braking resulting in loss of
vehicle control. Mazda strongly
recommends that you replace all four
tires at the same time.

CAUTION

(With Tire Pressure Monitoring
System)
When replacing/repairing the tires or
wheels or both, have the work done
by an Authorized Mazda Dealer, or
the tire pressure sensors may be
damaged.

NOTE

(With Tire Pressure Monitoring System)

l

When tires with steel wire reinforcement in
the sidewalls are used, the system may not
function correctly even with a genuine
wheel.
Refer to System Error Activation on page
5-34.

l

Be sure to install the tire pressure sensors
whenever tires or wheels are replaced.
Refer to Tires and Wheels on page 5-34.

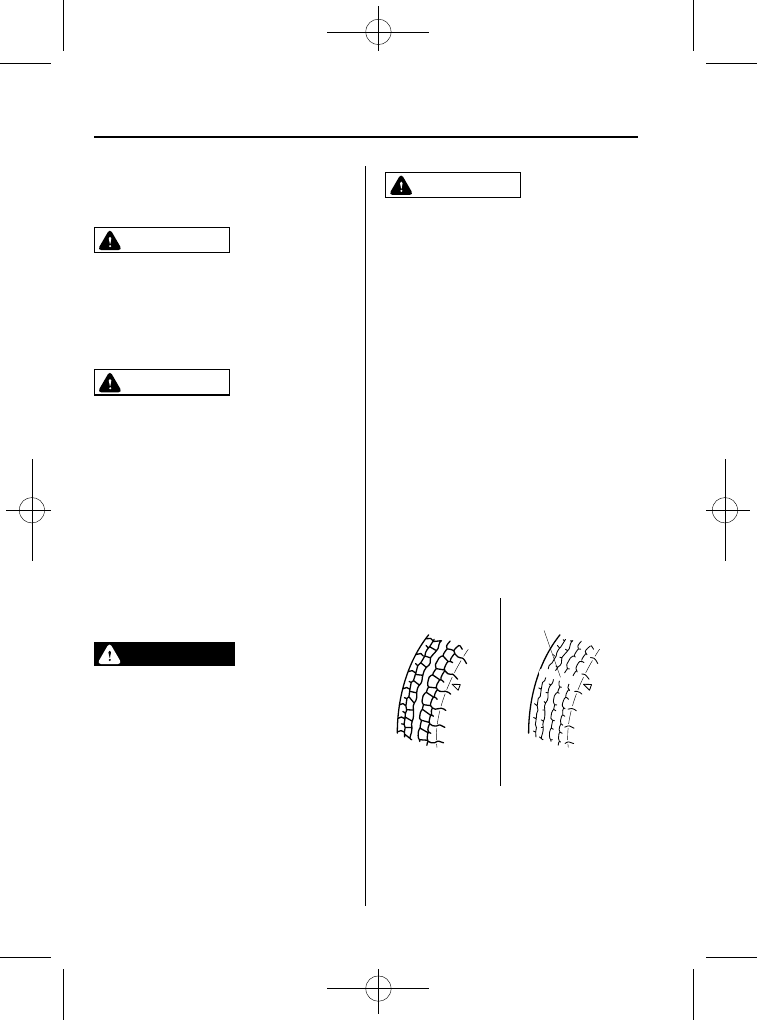
If a tire wears evenly, a wear indicator
will appear as a solid band across the
tread.
Replace the tire when this happens.

New tread

Tread wear indicator

Worn tread

You should replace the tire before the
band crosses the entire tread.

8-34

Maintenance and Care

Owner Maintenance

MX-5_8EN7-EA-14E_Edition1 Page360
Friday, March 28 2014 3:41 PM

Black plate (361,1)

NOTE

Tires degrade over time, even when they are
not being used on the road. It is recommended
that tires generally be replaced when they are
6 years or older. Heat caused by hot climates
or frequent high loading conditions can
accelerate the aging process. The period in
which the tire was manufactured (both week
and year) is indicated by a 4-digit number.
Refer to Tire Labeling on page 9-23.

qReplacing a Wheel

WARNING

Always use wheels of the correct size
on your vehicle:

Using a wrong-sized wheel is
dangerous. Braking and handling
could be affected, leading to loss of
control and an accident.

CAUTION

Ø A wrong-sized wheel may

adversely affect:

Ø

Tire fit

Ø

Wheel and bearing life

Ø

Ground clearance

Ø

Snow-chain clearance

Ø

Speedometer calibration

Ø

Headlight aim

Ø

Bumper height

Ø

Tire Pressure Monitoring
System

Ø

Limited-Slip Differential System

Ø (With Tire Pressure Monitoring

System)

Ø

When replacing/repairing the
tires or wheels or both, have the
work done by an Authorized
Mazda Dealer, or the tire
pressure sensors may be
damaged.

Ø

The wheels equipped on your
Mazda are specially designed
for installation of the tire
pressure sensors. Do not use
non-genuine wheels, otherwise
it may not be possible to install
the tire pressure sensors.

NOTE

Be sure to install the tire pressure sensors
whenever tires or wheels are replaced. Refer to
Tires and Wheels on page 5-34.

When replacing a wheel, make sure the
new one is the same as the original factory
wheel in diameter, rim width, and offset
(inset/outset).

Maintenance and Care

Owner Maintenance

8-35

MX-5_8EN7-EA-14E_Edition1 Page361
Friday, March 28 2014 3:41 PM

Black plate (362,1)

Proper tire balancing provides the best
riding comfort and helps reduce tread
wear. Out-of-balance tires can cause
vibration and uneven wear, such as
cupping and flat spots.

8-36

Maintenance and Care

Owner Maintenance

MX-5_8EN7-EA-14E_Edition1 Page362
Friday, March 28 2014 3:41 PM

Black plate (363,1)

MEMO

8-37

MX-5_8EN7-EA-14E_Edition1 Page363
Friday, March 28 2014 3:41 PM

Black plate (364,1)

Light Bulbs

High-mount brake light
License plate lights
Trunk light

Reverse lights
Rear turn signal lights

Brake lights/Taillights

Rear side-marker lights

Overhead light

Headlights (Low beam)

Headlights (High beam)

Fog lights

Front turn signal lights/Parking lights

Front side-marker lights

8-38

Maintenance and Care

Owner Maintenance

MX-5_8EN7-EA-14E_Edition1 Page364
Friday, March 28 2014 3:41 PM

Black plate (365,1)

WARNING

Do not replace the xenon fusion bulbs
yourself:

Replacing the xenon fusion bulbs
yourself is dangerous. Because the
xenon fusion bulbs require high
voltage, you could receive an electric
shock if the bulbs are handled
incorrectly. Consult an Authorized
Mazda Dealer when the replacement
is necessary.

Never touch the glass portion of a
halogen bulb with your bare hands and
always wear eye protection when
handling or working around the bulbs:

When a halogen bulb breaks, it is
dangerous. These bulbs contain
pressurized gas. If one is broken, it
will explode and serious injuries
could be caused by the flying glass.
If the glass portion is touched with
bare hands, body oil could cause the
bulb to overheat and explode when
lit.

Always keep halogen bulbs out of the
reach of children:

Playing with a halogen bulb is
dangerous. Serious injuries could be
caused by dropping a halogen bulb
or breaking it some other way.

qReplacing Exterior Light Bulbs

NOTE

l

To replace the bulb, contact an Authorized
Mazda Dealer.

l

If the halogen bulb is accidentally touched,
it should be cleaned with rubbing alcohol
before being used.

l

Use the protective cover and carton for the
replacement bulb to dispose of the old bulb
promptly and out of the reach of children.

Headlight bulbs

High-beam bulbs

1. Make sure the ignition is switched off,

and the headlight switch is off.

2. Lift the hood.

3. Disconnect the connector from the bulb

by pressing the tab on the connector
with your finger and pulling the
connector downward.

4. Turn the socket and bulb assembly to

remove it. Carefully remove the bulb
from its socket in the reflector by
gently pulling it straight backward out
of the socket.

5. Install the new bulb in the reverse order

of the removal procedure.

Maintenance and Care

Owner Maintenance

8-39

MX-5_8EN7-EA-14E_Edition1 Page365
Friday, March 28 2014 3:41 PM

Black plate (366,1)

Low-beam bulbs

(Xenon fusion bulbs)
You cannot replace the low beam bulbs by
yourself. The bulbs must be replaced at an
Authorized Mazda Dealer.
(Halogen bulbs)

1. If you are changing the right bulb, start

the engine, turn the steering wheel all
the way to the right, and turn off
engine. If you are changing the left
bulb, turn the steering wheel to the left,
and turn off engine.

2. Make sure the headlight switch is off.

3. Turn the center section of the plastic

retainer counterclockwise and remove
the retainers and partially peel back the
mudguard.

Removal

Installation

4. Disconnect the connector from the bulb

by pressing the tab on the connector
with your finger and pulling the
connector rear.

5. Pull off the sealing cover.

6. Unhook the bulb retaining spring.

8-40

Maintenance and Care

Owner Maintenance

MX-5_8EN7-EA-14E_Edition1 Page366
Friday, March 28 2014 3:41 PM

Black plate (367,1)

7. Remove the adapter.

8. Install the new bulb in the reverse order

of the removal procedure.

Fog light bulbs

1. Make sure the ignition is switched off,

and the headlight switch is off.

2. Turn the screws and the center section

of the plastic retainers
counterclockwise and remove them,
then partially peel back the mudguard.

Removal

Installation

3. Disconnect the connector from the bulb

by pressing the tab on the connector
with your finger and pulling the
connector downward.

4. Turn the socket and bulb assembly to

remove it. Carefully remove the bulb
from its socket in the reflector by
gently pulling it straight backward out
of the socket.

5. Install the new bulb in the reverse order

of the removal procedure.

Front side-marker lights

1. Make sure the ignition is switched off,

and the headlight switch is off.

Maintenance and Care

Owner Maintenance

8-41

MX-5_8EN7-EA-14E_Edition1 Page367
Friday, March 28 2014 3:41 PM

Black plate (368,1)

2. Turn the screws and the center section

of the plastic retainers
counterclockwise and remove them,
then partially peel back the mudguard.

Removal

Installation

3. Disconnect the connector from the bulb

by pressing the tab on the connector
with your finger and pulling the
connector downward.

4. Turn the socket and bulb assembly to

remove it. Carefully remove the bulb
from its socket in the reflector by
gently pulling it straight backward out
of the socket.

NOTE

(Replacing front-passenger side lamp bulb)
Turn the socket and bulb assembly screw
counterclockwise.

8-42

Maintenance and Care

Owner Maintenance

MX-5_8EN7-EA-14E_Edition1 Page368
Friday, March 28 2014 3:41 PM

Black plate (369,1)

5. Disconnect the bulb from the socket.

6. Install the new bulb in the reverse order

of the removal procedure.

Front turn signal lights/Parking lights

1. If you are changing the right bulb, start

the engine, turn the steering wheel all
the way to the right, and turn off
engine. If you are changing the left
bulb, turn the steering wheel to the left,
and turn off engine.

2. Make sure the turn signal switch is off.

3. Turn the center section of the plastic

retainer counterclockwise and remove
the retainers and partially peel back the
mudguard.

Removal

Installation

4. Turn the socket and bulb assembly

counterclockwise and remove it.

5. Disconnect the bulb from the socket.

6. Install the new bulb in the reverse order

of the removal procedure.

Rear turn signal lights, Reverse lights,
Brake lights/Taillights, Rear side
marker lights

Rear side marker lights

Due to the complexity and difficulty of
the procedure, the LED bulbs must be
replaced by an Authorized Mazda Dealer.

NOTE

LED bulb replacement is not possible because
it is built into the unit. Replace the unit.

Rear turn signal lights, Reverse lights,
Brake lights/Taillights

1. Make sure the ignition is switched off

and the applicable light switch is off.

2. Lift the trunk.

Maintenance and Care

Owner Maintenance

8-43

MX-5_8EN7-EA-14E_Edition1 Page369
Friday, March 28 2014 3:41 PM

Black plate (370,1)

3. Pull the center section of the plastic

retainers and remove them, then
remove the trunk end trim.

Removal

Installation

4. Remove the trunk light connector.

5. Remove the trunk lid release lock-out

button connector.

6. Pull the center section of the plastic

retainers and remove them, then
remove the trunk side trim.

Removal

Installation

7. Turn the socket and bulb assembly

counterclockwise and remove it.

8. Disconnect the bulb from the socket.

Rear turn signal lights

8-44

Maintenance and Care

Owner Maintenance

MX-5_8EN7-EA-14E_Edition1 Page370
Friday, March 28 2014 3:41 PM

Black plate (371,1)

Reverse lights

Brake lights/Taillights

9. Install the new bulb in the reverse order

of the removal procedure.

High-mount brake light

Due to the complexity and difficulty of
the procedure, the LED bulbs must be
replaced by an Authorized Mazda Dealer.

NOTE

LED bulb replacement is not possible because
it is built into the unit. Replace the unit.

License plate lights

1. Make sure the ignition is switched off,

and the headlight switch is off.

2. Lift the trunk.

3. Slide the light to the left side of the

vehicle and remove it.

4. Turn the socket and bulb assembly

counterclockwise and remove it.

5. Disconnect the bulb from the socket.

6. Install the new bulb in the reverse order

of the removal procedure.

Maintenance and Care

Owner Maintenance

8-45

MX-5_8EN7-EA-14E_Edition1 Page371
Friday, March 28 2014 3:41 PM

Black plate (372,1)

qReplacing Interior Light Bulbs

Overhead light

1. Wrap a flathead screwdriver with a soft

cloth to prevent damage to the trim and
gently insert it in the overhead light as
shown in the figure, and then remove
the cover.

2. Disconnect the bulb by pulling it out.

3. Install the new bulb in the reverse order

of the removal procedure.

Trunk light

1. Wrap a flathead screwdriver with a soft

cloth to prevent damage to the trim and
gently insert it in the luggage
compartment light as shown in the
figure, and then remove the luggage
compartment light unit.

2. Disconnect the bulb by pulling it out.

3. Install the new bulb in the reverse order

of the removal procedure.

8-46

Maintenance and Care

Owner Maintenance

MX-5_8EN7-EA-14E_Edition1 Page372
Friday, March 28 2014 3:41 PM

Black plate (373,1)

Fuses

Your vehicle's electrical system is
protected by fuses.

If any lights, accessories, or controls don't
work, inspect the appropriate circuit
protector. If a fuse has blown, the inside
element will be melted.

If the same fuse blows again, avoid using
that system and consult an Authorized
Mazda Dealer as soon as possible.

qFuse Replacement

Replacing the fuses on the vehicle's left
side

If the electrical system does not work,
first inspect the fuses on the vehicle's left
side.

1. Make sure the ignition is switched off,

and other switches are off.

2. Remove the cover.

3. Pull the fuse straight out with the fuse

puller provided on the inside of the
engine compartment fuse block cover.

Fuse puller

Fuse block cover

4. Inspect the fuse and replace it if it's

blown.

Normal

Blown

5. Insert a new fuse of the same amperage

rating, and make sure it fits tightly. If it
does not fit tightly, have an expert
install it. We recommend an
Authorized Mazda Dealer.
If you have no spare fuses, borrow one
of the same rating from a circuit not
essential to vehicle operation, such as
the MIRROR or CIGAR circuit.

CAUTION

Always replace a fuse with one of the
same rating. Otherwise you may
damage the electric system.

Maintenance and Care

Owner Maintenance

8-47

MX-5_8EN7-EA-14E_Edition1 Page373
Friday, March 28 2014 3:41 PM

Black plate (374,1)

6. Reinstall the cover and make sure that

it is securely installed.

Replacing the fuses under the hood

If the headlights or other electrical
components do not work and the fuses in
the cabin are normal, inspect the fuse
block under the hood. If a fuse is blown, it
must be replaced. Follow these steps:

1. Make sure the ignition is switched off,

and other switches are off.

2. Remove the fuse block cover.

3. If any fuse but the MAIN fuse is

blown, replace it with a new one of the
same amperage rating.

Normal

Blown

WARNING

Do not replace the main fuse by
yourself. Have an Authorized Mazda
Dealer perform the replacement:

Replacing the fuse by yourself is
dangerous because the MAIN fuse is
a high current fuse. Incorrect
replacement could cause an electrical
shock or a short circuit resulting in a
fire.

4. Reinstall the cover and make sure that

it is securely installed.

8-48

Maintenance and Care

Owner Maintenance

MX-5_8EN7-EA-14E_Edition1 Page374
Friday, March 28 2014 3:42 PM

Black plate (375,1)

qFuse Panel Description

Fuse block (Engine compartment)

DESCRIPTION

FUSE

RATING

PROTECTED COMPONENT

1

FAN

30 A

Cooling fan

2

FAN

7.5 A

Cooling fan

3

DEFOG

20 A

Rear window defogger

4

H/CLEAN

5

ROOM

15 A

Overhead lights, Luggage compartment light, For protection of
various circuits, Trunk opener

6

IG KEY2

15 A

For protection of various circuits

7

HEATER

40 A

Air conditioner

í

8

ABS

30 A

ABS

9

FOG

15 A

Front fog lights

í

10

R.FOG

11

RHT L

30 A

Power retractable hardtop (LH)

í

12

RHT R

30 A

Power retractable hardtop (RH)

í

13

MAG

7.5 A

Air conditioner

í

14

ST

20 A

Starter

15

TAIL

15 A

Taillights, Parking lights, License plate lights, Illumination

16

ABS

40 A

ABS

Maintenance and Care

Owner Maintenance

8-49

í

Some models.

MX-5_8EN7-EA-14E_Edition1 Page375
Friday, March 28 2014 3:42 PM


Content   ..  21  22  23  24   ..