Mazda B2300 (2003 year). Instruction - part 4


  Index      Mazda     Mazda B2300 - instruction 2003 year in english


Search            


Content   ..  2  3  4  5   ..


Mazda B2300 (2003 year). Instruction - part 4


Setting speed control

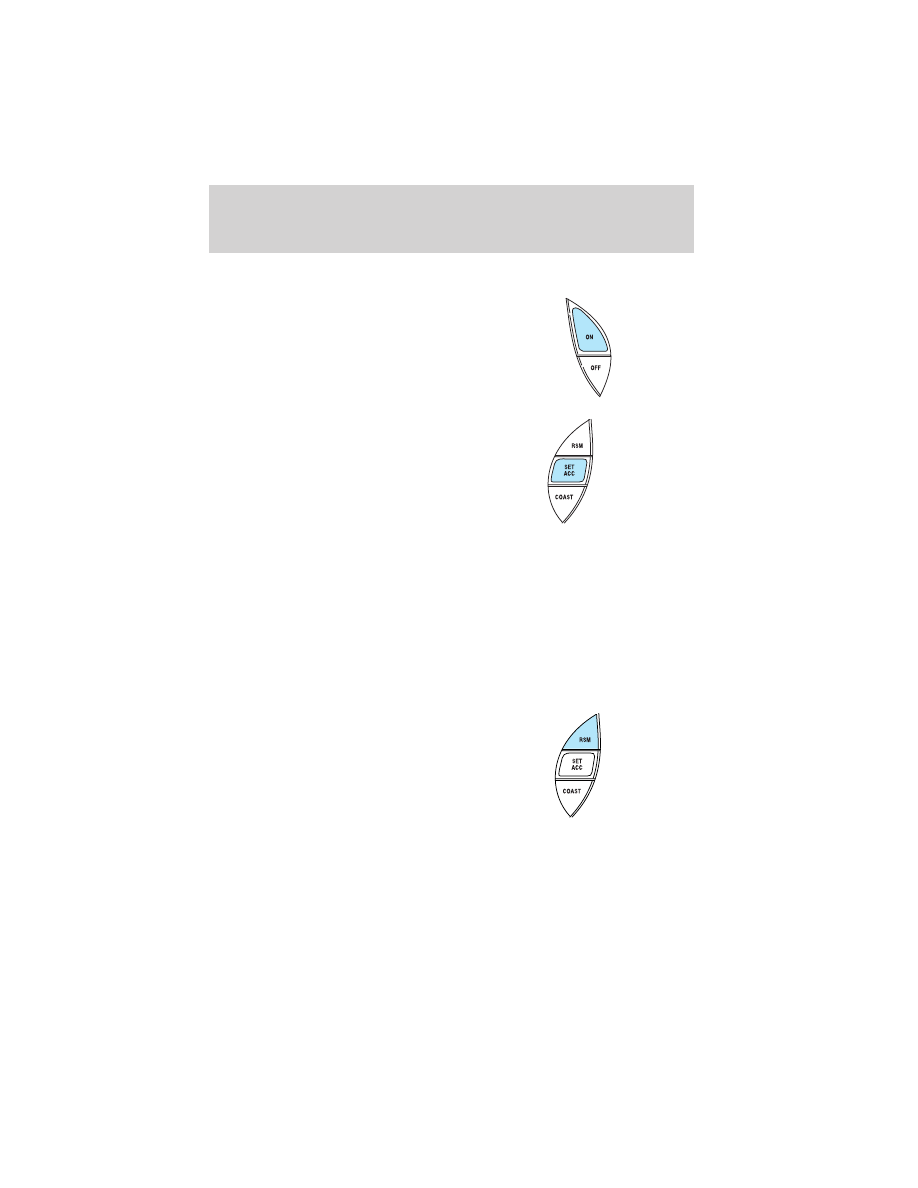
The controls for using your speed
control are located on the steering
wheel for your convenience.

1. Press the ON control and

release it.

2. Accelerate to the desired speed.

3. Press the SET ACC control and

release it.

4. Take your foot off the

accelerator pedal.

5. The indicator light

SPEED

CONT

on the

instrument cluster will turn on.

Note:
• Vehicle speed may vary momentarily when driving up and down a

steep hill.

• If the vehicle speed increases above the set speed on a downhill, you

may want to apply the brakes to reduce the speed.

• If the vehicle speed decreases more than 16 km/h (10 mph) below

your set speed on an uphill, your speed control will disengage.

Resuming a set speed

Press the RSM (resume) control and
release it. This will automatically
return the vehicle to the previously
set speed. The RSM control will not
work if the vehicle speed is not
faster than 48 km/h (30 mph).

Driver Controls

54

Increasing speed while using speed control

There are two ways to set a higher
speed:
• Press and hold the SET ACC

control until you get to the
desired speed, then release the
control. You can also use the SET
ACC control to operate the
Tap-Up function. Press and
release this control to increase the vehicle set speed in small amounts
by 1.6 km/h (1 mph).

• Use the accelerator pedal to get to the desired speed. When the

vehicle reaches that speed, press and release the SET ACC control.

Reducing speed while using speed control

There are two ways to reduce a set
speed:
• Press and hold the COAST

control until you get to the
desired speed, then release the
control. You can also use the
COAST control to operate the
Tap-Down function. Press and
release this control to decrease the vehicle set speed in small amounts
by 1.6 km/h (1 mph).

• Depress the brake pedal until the

desired vehicle speed is reached,
press the SET ACC control.

Turning off speed control

There are two ways to turn off the speed control:
• Depress the brake pedal or the clutch pedal (if equipped). This will

not erase your vehicles previously set speed.

Driver Controls

55

• Press the speed control OFF

control.

Note: When you turn off the speed
control or the ignition, your speed
control set speed memory is erased.

OVERDRIVE CONTROL (IF EQUIPPED)

Activating overdrive

(Overdrive) is the normal drive position for the best fuel economy.

The overdrive function allows automatic upshifts and downshifts through
all available gears.

Deactivating overdrive

Press the Transmission Control
Switch (TCS) located on the end of
the gearshift lever. The O/D Off
indicator light will illuminate on the
instrument cluster. The transmission
will operate in all gears except overdrive.

To return to normal overdrive mode,
press the Transmission Control
Switch again. The O/D Off indicator
light will no longer be illuminated.

When you shut off and re-start your
vehicle, the transmission will automatically return to normal
(Overdrive) mode.

For additional information about the gearshift lever and the transmission
control switch operation refer to the Automatic Transmission
Operation 
section of the Driving chapter.

O/D

ON/OFF

O/D

ON/OFF

Driver Controls

56

CENTER CONSOLE (IF EQUIPPED)

Your vehicle may be equipped with a
variety of console features. These
include:
• Utility compartment with

cassette/compact disc storage

• Cupholders
• Coin holder slots
• Flip up armrest

WARNING: Use only soft cups in the cupholder. Hard objects
can injure you in a collision.

BED EXTENDER (IF EQUIPPED)

Your vehicle may be equipped with a bed extender designed to extend
the pickup box for longer loads.

To extend the bed extender:

1. Lower tailgate.

2. Pull the round knobs on each

side of the extender to release
it from the pickup box.

3. Pivot extender on to the

tailgate.

4. Evenly push down on the

extender and push the round
knobs in on each side locking it
in place.

Green markings on the shaft
indicate the locked position. The
locking clip screws below the middle
bar can be tightened
counterclockwise for extra security.

Driver Controls

57

Note: If the red marking on the shaft is visible, the bed extender
is not locked or properly secured.

To stow the bed extender, follow steps one through four in reverse order.

The bed extender may be used to secure a load of up to 46 kg (100 lbs.)
on the tailgate.

The bed extender should always be kept in the stowed position
with the tailgate closed when not in use.

To remove the bed extender:

1. Extend the bed extender.

2. Pull the round knobs on each

side of the extender to unlock
it.

Make sure the locking clip screws
are loose before removing the
extender.

1. Press the locking clips below

the middle bar on each side and
lift the extender out of the bed.

To install the bed extender, follow the removal procedure in reverse
order.

Driver Controls

58

KEYS

The key operates all locks on your vehicle. In case of loss, replacement
keys are available from your dealer.

You should always carry a second key with you in a safe place in case
you require it in an emergency.

Refer to SecuriLock

Passive Anti-Theft System for more information.

POWER DOOR LOCKS (IF EQUIPPED)

Press the top of the control to
unlock all doors and the bottom to
lock all doors.

REMOTE ENTRY SYSTEM (IF EQUIPPED)

The remote entry system allows you to lock or unlock all vehicle doors
without a key.

The remote entry features only operate with the ignition in the LOCK
position.

If there is any potential remote keyless entry problem with your vehicle,
ensure ALL remote entry transmitters are brought to the dealership,
to aid in troubleshooting.

GENERAL INFORMATION: This device complies with part 15 of the FCC
rules and with RS-210 of Industry Canada. Operation is subject to the
following two conditions: (1) This device may not cause harmful
interference, and (2) This device must accept any interference received,
including interference that may cause undesired operation. Changes or
modifications not expressly approved by the party responsible for
compliance could void the user’s authority to operate the equipment.

This device complies with part 15 of the FCC rules and with RS-210 of
Industry Canada. Operation is subject to the following two conditions:
(1) This device may not cause harmful interference, and (2) This device
must accept any interference received, including interference that may
cause undesired operation.

UNLOCK

LOCK

Locks and Security

59

Changes or modifications not expressly approved by the party
responsible for compliance could void the user’s authority to
operate the equipment.

Your vehicle is equipped with a remote entry system which allows you to:
• unlock the vehicle doors without

a key.

• lock all the vehicle doors without

a key.

• activate the personal alarm.

If there is any potential remote keyless entry problem with your vehicle,
ensure ALL remote entry transmitters are taken to the dealership, to
aid in troubleshooting.

Unlocking the doors

1. Press

and release to unlock the driver’s door. Note: The interior

lamps will illuminate.

2. Press

and release again within three seconds to unlock all the

doors.

Locking the doors

1. Press

and release to lock all the doors.

2. Press

and release again within three seconds to confirm that all

the doors are closed and locked. Note: the doors will lock again, the
horn will chirp once, and the lamps will flash.

If any of the doors are not properly closed the horn will make two quick
chirps and the lamps will not flash.

Locks and Security

60

Power door unlock disabled

The UNLOCK feature on your power
door locks will not work from inside
the vehicle when:

• the ignition has been turned to the OFF position, and
• 20 seconds elapse after all vehicle doors are closed and locked using

the remote entry transmitter, or the power door unlock control (while
the accompanying door is open).

The UNLOCK feature will work again after:
• a door has become ajar,
• the ignition is turned to the ON position, or
• using the UNLOCK

control on your remote entry transmitter, or

• using the keyless entry keypad to unlock the vehicle.

Sounding a personal alarm

Press

to activate the alarm. The horn will sound for a maximum of

30 seconds and the parklamps will flash for a maximum of 3 minutes.
Press again or turn the ignition to ON to deactivate, or wait for the alarm
to timeout in 3 minutes.

Note: The personal alarm will only operate when the ignition is in the
OFF or ACC position.

Replacing the battery

The remote entry transmitter uses one coin type three-volt lithium
battery CR2032 or equivalent. The typical operating range for your
remote entry transmitter is approximately 10 meters (33 feet). A
decrease in the operating range could be caused by:
• weather conditions,
• nearby radio towers,
• structures around the vehicle and
• other vehicles parked next to the vehicle.

UNLOCK

LOCK

Locks and Security

61

To replace the battery:

1. Twist a thin coin between the

two halves of the remote entry
transmitter near the key ring.
DO NOT TAKE THE FRONT
PART OF THE REMOTE
ENTRY TRANSMITTER
APART. Damage to the
transmitter may result in
operation failure.

2. Remove the old battery.

3. Insert the new battery. Refer to the diagram inside the remote entry

transmitter for the correct orientation of the battery.

4. Snap the two halves back together.

Note: Replacement of the battery will not cause the remote transmitter
to become deprogrammed from your vehicle. The remote transmitter
should operate normally after battery replacement.

Replacing lost remote entry transmitters

If you would like to have your remote entry transmitter reprogrammed
because you lost one, or would like to buy additional remote entry
transmitters, you can either reprogram them yourself, or take all
remote entry transmitters 
to your authorized dealer for
reprogramming.

How to reprogram your remote entry transmitters

You must have all remote entry transmitters (maximum of four)
available before beginning this procedure.

To reprogram the remote entry transmitters:

1. Ensure the vehicle is electronically unlocked.

2. Put the key in the ignition.

Locks and Security

62

3. Turn the key from the 2

(LOCK) position to 3 (OFF).

4. Cycle, eight times, rapidly (within 10 seconds) between the 3 (OFF)

position and 4 (ON). Note: The eighth turn must end in the 4 (ON)
position. The instrument lights in the cluster will come on for a bulb
check in the 4 (ON) position.

5. The doors will lock, then unlock, to confirm that the programming

mode has been activated.

6. Within 20 seconds press any button on the remote entry transmitter.

Note: If more than 20 seconds have passed you will need to start
the procedure over again.

7. The doors will lock, then unlock, to confirm that this remote entry

transmitter has been programmed.

8. Repeat Step 6 to program each additional remote entry transmitter.

9. Turn the ignition to the 3 (OFF) position after you have finished

programming all of the remote entry transmitters.

10. The doors will lock, then unlock, to confirm that the programming

mode has been exited.

Illuminated entry

The interior lamps illuminate when the remote entry system is used to
unlock the door(s) or sound the personal alarm.

The illuminated entry system will turn off the interior lights if:
• the ignition switch is turned to the ON position, or
• the remote transmitter lock control is pressed, or
• after 25 seconds of illumination.
The dome lamp control (if equipped) must not be set to the OFF
position for the illuminated entry system to operate.

The inside lights will not turn off if:

3

2

1

5

4

Locks and Security

63

• they have been turned on with the dimmer control, or
• any door is open.
The battery saver will shut off the interior lamps 45 minutes after the
last door is closed, even if the dimmer control is on.

SECURILOCK

Y

PASSIVE ANTI-THEFT SYSTEM

SecuriLock

y passive anti-theft system is an engine immobilization

system. This system is designed to prevent the engine from being started
unless a coded key programmed to your vehicle is used.

The SecuriLock

y passive anti-theft system is not compatible with

non-Mazda aftermarket remote start systems. Use of these systems may
result in vehicle starting problems and a loss of security protection.

Your vehicle comes with two coded keys; additional coded keys may be
purchased from your dealer. The dealer can program your spare keys to
your vehicle or you can program the keys yourself. Refer to
Programming spare keys for instructions on how to program the coded
key.

Note: A maximum of eight keys can be coded to your vehicle.

Note: Large metallic objects, electronic devices that are used to
purchase gasoline or similar items, or a second coded key on the same
key chain may cause vehicle starting issues. You need to prevent these
objects from touching the coded key while starting the engine. These
objects will not cause damage to the coded key, but may cause a
momentary issue if they are too close to the key when starting the
engine. If a problem occurs, turn the ignition off, remove all objects on
the key chain away from the coded key and restart the engine.

Theft indicator

The theft indicator is located in the instrument cluster.
• When the ignition is in the OFF position, the indicator will flash once

every 2 seconds to indicate the SecuriLock

y system is functioning as

a theft deterrent.

• When the ignition is in the ON position, the indicator will glow for 3

seconds, then turn off, to indicate normal system functionality.

If a problem occurs with the SecuriLock

y system, the indicator will flash

rapidly or glow steadily when the ignition is in the ON position. If this
occurs, the vehicle should be taken to an authorized dealer for service.

Locks and Security

64

Automatic arming

The vehicle is armed immediately
after switching the ignition to the 3
(OFF) position.

The

THEFT

indicator will flash

every two seconds when the vehicle
is armed.

Automatic disarming

Switching the ignition to the 4 (ON) position with a coded key disarms
the vehicle.
• The

THEFT

indicator will illuminate for three seconds and then go

out.

• If the

THEFT

indicator stays on for an extended period of time or

flashes rapidly, have the system serviced by your dealer.

Replacement keys

If your keys are lost or stolen and you don’t have an extra coded key,
you will need to have your vehicle towed to a dealership. The key codes
need to be erased from your vehicle and new coded keys will need to be
programmed.

Replacing coded keys can be very costly. Store an extra programmed key
away from the vehicle in a safe place to help prevent any
inconveniences. Please visit an authorized dealer to purchase additional
spare or replacement keys.

Programming spare keys

You can program your own coded keys to your vehicle. Please read and
understand the entire procedure before you begin.

Tips:
• A maximum of eight keys can be coded to your vehicle.
• Only use Securilocky keys.
• You must have two previously programmed coded keys (keys that

already operate your vehicle’s engine) and the new unprogrammed
key(s) readily accessible.

3

2

1

5

4

Locks and Security

65

• If you do not have at least 2 previously programmed keys, you must

take your vehicle to your dealer to have the spare key(s)
programmed.

1. Insert a previously programmed

coded key into the ignition.

2. Turn the ignition from the 3

(OFF) position to the 4 (ON)
position. Keep the ignition in
the 4 (ON) position for at least
one second, but no more than
10 seconds.

3. Turn the ignition to the 3 (OFF)

position, and remove the coded
key from the ignition.

4. Within ten seconds of removing the previously programmed coded

key, insert the other previously programmed coded key into the
ignition.

5. Turn the ignition from the 3 (OFF) position to the 4 (ON) position.

Keep the ignition in the 4 (ON) position for at least one second but
not more than 10 seconds.

6. Turn the ignition to the 3 (OFF) position, and remove the second

key from the ignition.

7. Within twenty seconds of removing the previously programmed

coded key, insert the unprogrammed key (new/valet key) into the
ignition.

8. Turn the ignition from the 3 (OFF) position to the 4 (ON) position.

Keep the ignition in the 4 (ON) position for at least one second.

9. Your new unprogrammed key is now programmed.

If the key has been successfully programmed it will start the vehicle’s
engine and the theft indicator light will illuminate for three seconds and
then go out. If the key was not successfully programmed, it will not start
your vehicle’s engine and the theft indicator light will flash on and off. If
failure repeats, bring your vehicle to your dealer to have the new key(s)
programmed.

To program additional new unprogrammed key(s), repeat this procedure
from step 1 for each additional key.

3

2

1

5

4

Locks and Security

66

SEATING

Adjusting the front manual seat

WARNING: Never adjust the driver’s seat or seatback when the
vehicle is moving. Sudden braking or a collision could cause
serious injury. Adjust the seat only when the vehicle is stopped.

WARNING: Do not pile cargo higher than the seatbacks to
reduce the risk of injuring people in a collision or sudden stop.

WARNING: Always drive and ride with your seatback upright
and the lap belt snug and low across the hips.

WARNING: Sitting in a reclined position while the vehicle is
moving is dangerous because you don’t get the full protection
from seat belts. During sudden braking or a collision, you can
slide under the lap belt and suffer serious internal injury, or in
a rear end collision you could fly up and out of the vehicle. For
maximum protection, sit well back and upright.

Lift handle to move seat forward or
backward.

Seating and Safety Restraints

67

Pull lever up to adjust seatback.

Using the manual lumbar support (if equipped)

Turn the lumbar support control
clockwise to increase firmness.

Turn the lumbar support control
counterclockwise to increase
softness.

Passenger side rear access

Pull up on the recliner handle. The
seat will lean forward and unlock
the track. Slide the seat forward to
access the rear area of the cab.

To return seat to original position, slide the seat bottom back, then push
the seatback up to lock it in place. If the seatback is pushed first, the
seat will lock, and you will have to use the seat adjust handle to move
the seat back to the original position.

Seating and Safety Restraints

68

REAR SEATS

Center facing jump seat (2–door Cab Plus) (if equipped)

To open, pull inboard and down on the seat handle.
To stow the seat, pull seat bottom back to the fully upright position.

WARNING: Do not install a child seat in a center facing jump
seat.

Center facing jump seat (4 door CabPlus 4) (if equipped)

To open, pull seat assembly down,
then raise seatback.

To stow the seat, fold seat back
down and raise seat assembly to the
fully upright position.

WARNING: Do not install a
child seat in a center facing
jump seat.

SAFETY RESTRAINTS

Safety restraints precautions

WARNING: Always drive and ride with your seatback upright
and the lap belt snug and low across the hips.

WARNING: To reduce the risk of injury, make sure children sit
where they can be properly restrained.

WARNING: Never let a passenger hold a child on his or her lap
while the vehicle is moving. The passenger cannot protect the
child from injury in a collision.

WARNING: All occupants of the vehicle, including the driver,
should always properly wear their safety belts, even when an
air bag (SRS) is provided.

Seating and Safety Restraints

69


Content   ..  2  3  4  5   ..