Mazda CX-9 Grand Touring. Manual - part 604
 

  Index      Mazda     Mazda CX-9 Grand Touring - service repair manual 2008 year


Search            


Content   ..  602  603  604  605   ..


Mazda CX-9 Grand Touring. Manual - part 604


13. Connect the filament connector.  

14. Install the high-mount brake light. (See HIGH-MOUNT BRAKE LIGHT 

REMOVAL/INSTALLATION .)  

15. Install the rear spoiler. (See REAR SPOILER REMOVAL/INSTALLATION .)  

16. Install the rear wiper motor. (See REAR WIPER MOTOR REMOVAL/INSTALLATION .)  

17. Install the liftgate lower trim. (See LIFTGATE LOWER TRIM REMOVAL/INSTALLATION .)  

18. Install the liftgate side trim. (See LIFTGATE SIDE TRIM REMOVAL/INSTALLATION )  

19. Install the liftgate upper trim. (See LIFTGATE UPPER TRIM REMOVAL/INSTALLATION .)  

20. Install the rear wiper arm and blade. (See REAR WIPER ARM AND BLADE 

REMOVAL/INSTALLATION .)  

21. Connect the negative battery cable.  

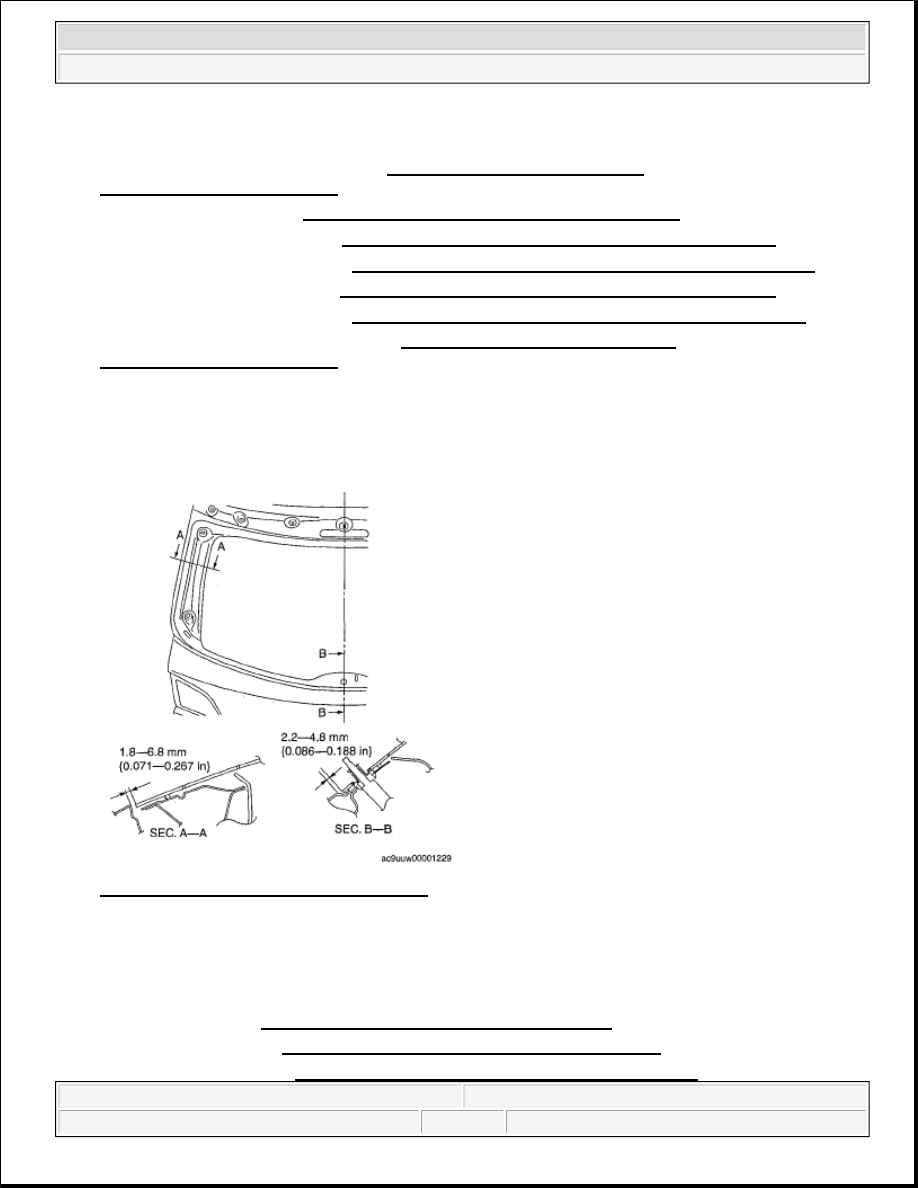
22. Allow the sealant to harden completely. 

Sealant hardening time: 48 h  

Fig. 47: Identifying Sealant Applying Area 
Courtesy of MAZDA MOTORS CORP. 

QUARTER WINDOW GLASS REMOVAL 

1. Remove the following parts: 

1. Trunk box (See TRUNK BOX REMOVAL/INSTALLATION .)  

2. Seat side box (See SEAT SIDE BOX REMOVAL/INSTALLATION .)  

3. Trunk end trim (See TRUNK END TRIM REMOVAL/INSTALLATION .)  


2008 Mazda CX-9 Grand Touring 

2008 BODY & ACCESSORIES Glass/Windows/Mirrors - Mazda CX-9


Microsoft 


Sunday, November 15, 2009 10:36:16 AM

Page 34 

© 2005 Mitchell Repair Information Company, LLC. 

4. Third-row seat (See THIRD-ROW SEAT REMOVAL/INSTALLATION .)  

5. Third-row seat belt lower anchor installation bolt (See REAR SCUFF PLATE 

REMOVAL/INSTALLATION .)  

6. Rear scuff plate inner (See REAR SCUFF PLATE REMOVAL/INSTALLATION .)  

7. Trunk side trim (See TRUNK SIDE TRIM REMOVAL/INSTALLATION .)  

8. Second-row seat belt upper anchor installation bolt (See SECOND-ROW SEAT BELT 

REMOVAL/INSTALLATION .)  

9. Roof side trim (See ROOF SIDE TRIM REMOVAL/INSTALLATION .)  

10. C-pillar trim (See D-PILLAR TRIM REMOVAL/INSTALLATION .)  

11. Third-row seat belt upper anchor installation bolt (See REAR SCUFF PLATE 

REMOVAL/INSTALLATION .)  

12. D-pillar trim (See D-PILLAR TRIM REMOVAL/INSTALLATION .)  

2. Set the headliner out of the way.  

3. Apply protective tape along the edge of the body and the quarter window glass. 

Fig. 48: Applying Protective Tape Of Body 
Courtesy of MAZDA MOTORS CORP. 

NOT REUSING WINDSHIELD 

1. Cut out the sealant all around the glass from inside the vehicle using a sealant remover. 

2. Remove the quarter window glass. 

NOTE:

For the areas of the sealant that are difficult to cut, use the piano wire and 
follow the procedure under "Reusing Windshield".  

WARNING:

Using a razor with bare hands can cause injury. Always wear 
gloves when using a razor.  


2008 Mazda CX-9 Grand Touring 

2008 BODY & ACCESSORIES Glass/Windows/Mirrors - Mazda CX-9


Microsoft 


Sunday, November 15, 2009 10:36:16 AM

Page 35 

© 2005 Mitchell Repair Information Company, LLC. 

Fig. 49: Cutting Sealant Around Glass 
Courtesy of MAZDA MOTORS CORP. 

REUSING WINDSHIELD 

1. Avoiding the pin on the inside of the vehicle, insert the piano wire which has been cut to sufficient length. 

Fig. 50: Identifying Pin And Fastener 
Courtesy of MAZDA MOTORS CORP. 

2. Wind each end of the piano wire around a bar. 

WARNING:

Using the piano wire with bare hands can cause injury. Always wear 
gloves when using the piano wire.  

NOTE:

Use a long sawing action to spread the work over the whole length of 
the piano wire to prevent it from breaking due to localized heating. 


2008 Mazda CX-9 Grand Touring 

2008 BODY & ACCESSORIES Glass/Windows/Mirrors - Mazda CX-9


Microsoft 


Sunday, November 15, 2009 10:36:16 AM

Page 36 

© 2005 Mitchell Repair Information Company, LLC. 

3. Secure one end of the piano wire, and while pulling the other end, cut the sealant around the quarter 

window glass. 

Fig. 52: Pulling Piano Wire 
Courtesy of MAZDA MOTORS CORP. 

4. Pull the quarter window glass outward and detach the pins from the body.  

5. If a pin or spacer is damaged, remove it. 

Fig. 51: Identifying Quarter Glass, Piano Wire, Sealant And Protective 
Tape 
Courtesy of MAZDA MOTORS CORP. 

NOTE:

Before removing the pins or spacers from the quarter window glass, 
place alignment marks on the quarter window glass. 


2008 Mazda CX-9 Grand Touring 

2008 BODY & ACCESSORIES Glass/Windows/Mirrors - Mazda CX-9


Microsoft 


Sunday, November 15, 2009 10:36:16 AM

Page 37 

© 2005 Mitchell Repair Information Company, LLC. 


Content   ..  602  603  604  605   ..