Mazda CX-9 Grand Touring. Manual - part 506


  Index      Mazda     Mazda CX-9 Grand Touring - service repair manual 2008 year


Search            


Content   ..  504  505  506  507   ..


Mazda CX-9 Grand Touring. Manual - part 506


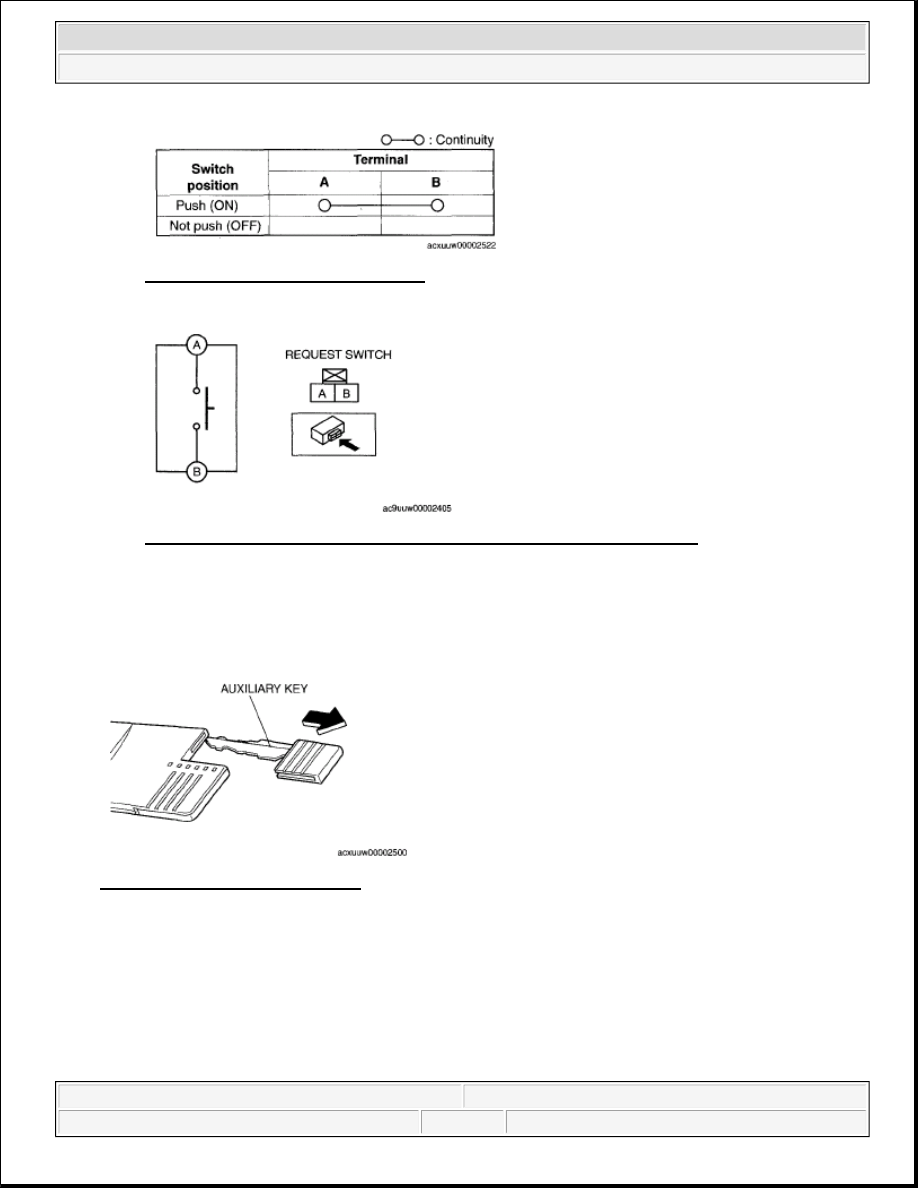
Fig. 76: Terminals Continuity Chart 
Courtesy of MAZDA MOTORS CORP. 

Fig. 77: Checking Continuity Between Request Switch Terminals A & B 
Courtesy of MAZDA MOTORS CORP. 

CARD KEY BATTERY REPLACEMENT [ADVANCED KEYLESS SYSTEM] 

1. Pull out the auxiliary key. 

Fig. 78: Identifying Auxiliary Key 
Courtesy of MAZDA MOTORS CORP. 

2. Replace the cap using a flathead screwdriver, then rotate and remove the cap. 

CAUTION:

Do not turn the cap excessively. The cap may be damaged.


2008 Mazda CX-9 Grand Touring 

2008 BODY & ACCESSORIES Security and Locks - Mazda CX-9


Microsoft 


Sunday, November 15, 2009 10:47:58 AM

Page 51 

© 2005 Mitchell Repair Information Company, LLC. 

3. Insert a flathead screwdriver into the crack and press the battery out. 

Fig. 80: Removing Battery 
Courtesy of MAZDA MOTORS CORP. 

4. Insert the new battery (CR2025) with the positive pole (+) facing the (+) mark on the cap. 

Battery specification  

Lithium CR2025 x 1  

Fig. 79: Removing Cap 
Courtesy of MAZDA MOTORS CORP. 

NOTE:

The batteries will last about 1 years when used 10 times a day.


2008 Mazda CX-9 Grand Touring 

2008 BODY & ACCESSORIES Security and Locks - Mazda CX-9


Microsoft 


Sunday, November 15, 2009 10:47:58 AM

Page 52 

© 2005 Mitchell Repair Information Company, LLC. 

5. Rotate and close the cap.  

6. Reinsert the auxiliary key. 

Fig. 82: Installing Auxiliary Key 
Courtesy of MAZDA MOTORS CORP. 

COIL ANTENNA REMOVAL/INSTALLATION [ADVANCED KEYLESS 
SYSTEM] 

1. Disconnect the negative battery cable.  

2. Remove the lower column cover. (See COLUMN COVER REMOVAL/INSTALLATION .)  

3. Disconnect the coil antenna connector.  

4. Detach the steering lock tabs from the holes on the coil antenna.  

5. Install in the reverse order of removal. 

Fig. 81: Inserting Battery 
Courtesy of MAZDA MOTORS CORP. 

NOTE:

Do not remove the coil antenna unless you are replacing it. 


2008 Mazda CX-9 Grand Touring 

2008 BODY & ACCESSORIES Security and Locks - Mazda CX-9


Microsoft 


Sunday, November 15, 2009 10:47:58 AM

Page 53 

© 2005 Mitchell Repair Information Company, LLC. 

Fig. 83: Identifying Coil Antenna & Connector 
Courtesy of MAZDA MOTORS CORP. 

SECURITY ACCESS PROCEDURE 

1. Connect the M-MDS to the DLC-2.  

2. After the vehicle is identified, select the following items from the initialization screen of the M-MDS. 

When using the IDS (laptop PC) 

1. Select "Body"  

2. Select "Security"  

When using the PDS (Pocket PC) 

1. Select "Programming". 

Fig. 84: Identifying DLC-2 Location 
Courtesy of MAZDA MOTORS CORP.


2008 Mazda CX-9 Grand Touring 

2008 BODY & ACCESSORIES Security and Locks - Mazda CX-9


Microsoft 


Sunday, November 15, 2009 10:47:58 AM

Page 54 

© 2005 Mitchell Repair Information Company, LLC. 


Content   ..  504  505  506  507   ..