Mazda CX-9 Grand Touring. Manual - part 486


  Index      Mazda     Mazda CX-9 Grand Touring - service repair manual 2008 year


Search            


Content   ..  484  485  486  487   ..


Mazda CX-9 Grand Touring. Manual - part 486


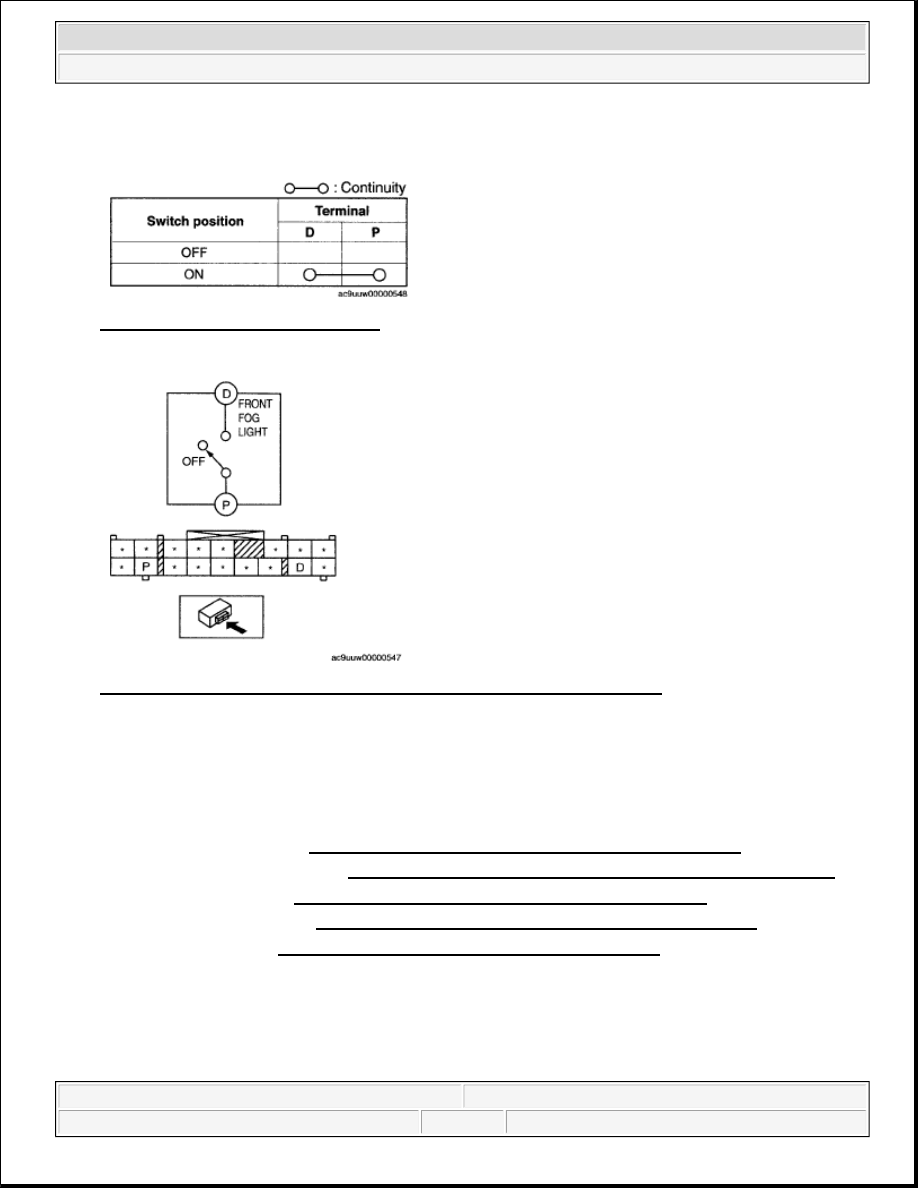
1. Verify that continuity between the front fog light switch terminals is as indicated in the table. 

Fig. 41: Terminals Continuity Chart 
Courtesy of MAZDA MOTORS CORP. 

Fig. 42: Checking Continuity Between Front Fog Light Switch Terminals 
Courtesy of MAZDA MOTORS CORP. 

HAZARD WARNING SWITCH REMOVAL/INSTALLATION 

1. Disconnect the negative battery cable.  

2. Remove the following parts: 

1. Decoration panel (See DECORATION PANEL REMOVAL/INSTALLATION .)  

2. Front console box mat (See FRONT CONSOLE BOX MAT REMOVAL/INSTALLATION .)  

3. Indicator panel (See INDICATOR PANEL REMOVAL/INSTALLATION .)  

4. Front console box (See FRONT CONSOLE BOX REMOVAL/INSTALLATION .)  

5. Center panel (See CENTER PANEL REMOVAL/INSTALLATION .)  

3. Remove in hazard warning switch.  

4. Install in the reverse order of removal. 


2008 Mazda CX-9 Grand Touring 

2008 BODY & ACCESSORIES Lighting Systems - Mazda CX-9


Microsoft 


Sunday, November 15, 2009 10:39:06 AM

Page 25 

© 2005 Mitchell Repair Information Company, LLC. 

Fig. 43: Identifying Hazard Warning Switch 
Courtesy of MAZDA MOTORS CORP. 

HAZARD WARNING SWITCH INSPECTION 

1. Verify that the continuity between the hazard switch terminals is as indicated in the table. 

If not as indicated in the table, replace the hazard warning switch. 

Fig. 44: Terminals Continuity Chart 
Courtesy of MAZDA MOTORS CORP. 

Fig. 45: Checking Continuity Between Hazard Switch Terminals 
Courtesy of MAZDA MOTORS CORP. 

HEADLIGHT LEVELING SWITCH REMOVAL/INSTALLATION 

1. Disconnect the negative battery cable.  

2. Remove the dashboard under cover. (Driver side) (See DASHBOARD UNDER COVER 


2008 Mazda CX-9 Grand Touring 

2008 BODY & ACCESSORIES Lighting Systems - Mazda CX-9


Microsoft 


Sunday, November 15, 2009 10:39:06 AM

Page 26 

© 2005 Mitchell Repair Information Company, LLC. 

REMOVAL/INSTALLATION .)  

3. Remove the hood release lever. (See HOOD LATCH AND RELEASE LEVER 

REMOVAL/INSTALLATION .)  

4. Remove in the order indicated in the table. 

Fig. 46: Identifying Headlight Leveling Switch & Connector 
Courtesy of MAZDA MOTORS CORP. 

5. Install in the reverse order of removal.  

HEADLIGHT LEVELING SWITCH INSPECTION 

1. Verify that continuity between the headlight leveling switch terminals is as indicated in the table. 

If not as indicated in the table, replace the headlight leveling switch. 

Fig. 47: Terminals Continuity Chart 
Courtesy of MAZDA MOTORS CORP.


2008 Mazda CX-9 Grand Touring 

2008 BODY & ACCESSORIES Lighting Systems - Mazda CX-9


Microsoft 


Sunday, November 15, 2009 10:39:06 AM

Page 27 

© 2005 Mitchell Repair Information Company, LLC. 

Fig. 48: Checking Continuity Between Headlight Leveling Switch Terminals 
Courtesy of MAZDA MOTORS CORP. 

DRL & AUTO LIGHT-OFF SYSTEM WIRING DIAGRAM 

AUTO LIGHT/WIPER CONTROL MODULE VEHICLES WITH DRL 

Fig. 49: DRL & Auto Light-Off System (Vehicles With DRL) - Wiring Diagram 
Courtesy of MAZDA MOTORS CORP. 

Vehicles without DRL  


2008 Mazda CX-9 Grand Touring 

2008 BODY & ACCESSORIES Lighting Systems - Mazda CX-9


Microsoft 


Sunday, November 15, 2009 10:39:06 AM

Page 28 

© 2005 Mitchell Repair Information Company, LLC. 


Content   ..  484  485  486  487   ..