Mazda CX-9 Grand Touring. Manual - part 469


  Index      Mazda     Mazda CX-9 Grand Touring - service repair manual 2008 year


Search            


Content   ..  467  468  469  470   ..


Mazda CX-9 Grand Touring. Manual - part 469


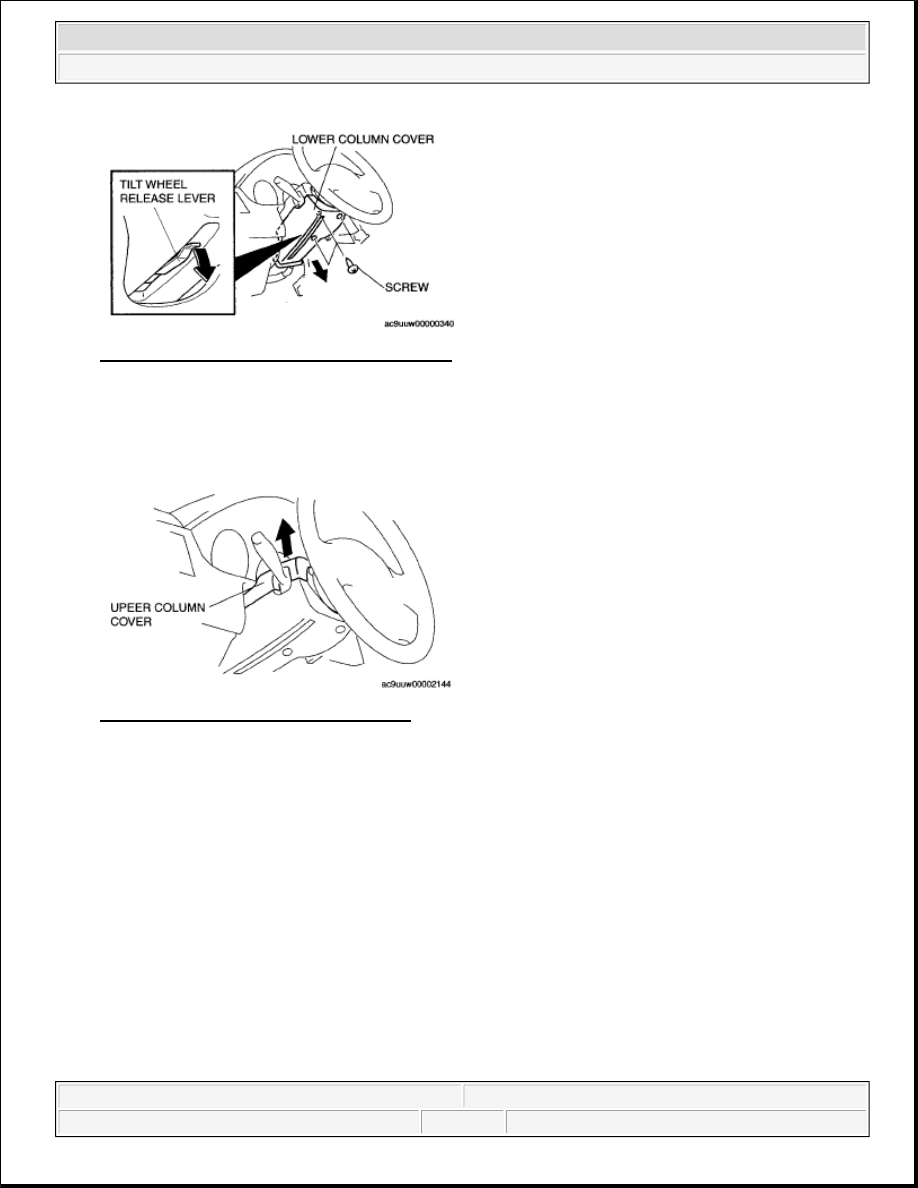
Fig. 7: Identifying Column Cover With Screw 
Courtesy of MAZDA MOTORS CORP. 

UPPER COLUMN COVER REMOVAL 

1. Pull the upper column cover upward and detach the upper column cover from the lower column cover. 

Fig. 8: Identifying Upper Column Cover 
Courtesy of MAZDA MOTORS CORP. 

2. Push the rubber in the direction of the arrow while pinching part A of the rubber. 

CAUTION:

Remove the rubber by pressing it from the backside of the 
upper column cover. The rubber may deform if it is pulled 
forcibly or pried with a flathead screwdriver. 


2008 Mazda CX-9 Grand Touring 

2008 BODY & ACCESSORIES Interior Trim - Mazda CX-9


Microsoft 


Sunday, November 15, 2009 10:43:26 AM

Page 9 

© 2005 Mitchell Repair Information Company, LLC. 

3. Push the rubber in the direction of the arrow while partially peeling part B of the rubber. 

Fig. 10: Identifying Rubber Pushing Direction 
Courtesy of MAZDA MOTORS CORP. 

4. Push part C of the rubber in the direction of the arrow and remove the upper column cover.  

5. Install in the reverse order of removal. 

Fig. 11: Identifying Rubber Pushing Direction 
Courtesy of MAZDA MOTORS CORP. 

UPPER COLUMN COVER INSTALLATION 

Fig. 9: Identifying Rubber Pushing Direction 
Courtesy of MAZDA MOTORS CORP. 


2008 Mazda CX-9 Grand Touring 

2008 BODY & ACCESSORIES Interior Trim - Mazda CX-9


Microsoft 


Sunday, November 15, 2009 10:43:26 AM

Page 10 

© 2005 Mitchell Repair Information Company, LLC. 

1. Push the rubber in the direction of the arrow in the order of A, B, and C part to install the upper column 

cover to the rubber.  

2. Install the upper column cover to the lower column cover. 

Fig. 12: Identifying Upper Column Cover 
Courtesy of MAZDA MOTORS CORP. 

CENTER PANEL REMOVAL/INSTALLATION 

1. Disconnect the negative battery cable.  

2. Remove the following parts: 

1. Decoration panel (See DECORATION PANEL REMOVAL/INSTALLATION.)  

2. Front console box mat (See FRONT CONSOLE BOX MAT REMOVAL/INSTALLATION.)  

3. Indicator panel (See INDICATOR PANEL REMOVAL/INSTALLATION.)  

4. Front console box (See FRONT CONSOLE BOX REMOVAL/INSTALLATION.)  

3. Remove the screws.  

4. Detach clips A by pulling them in the direction of the arrow. 

5. Disconnect the climate control unit connectors and hazard warning switch connector.  

6. Remove the center panel. 

CAUTION:

When removing center panel clips A, perform the work carefully 
so that the panel corners or the clips do not interfere with the 
center speaker and scratch or damage it.  


2008 Mazda CX-9 Grand Touring 

2008 BODY & ACCESSORIES Interior Trim - Mazda CX-9


Microsoft 


Sunday, November 15, 2009 10:43:26 AM

Page 11 

© 2005 Mitchell Repair Information Company, LLC. 

Fig. 13: Identifying Center Panel, Speaker & Connector 
Courtesy of MAZDA MOTORS CORP. 

7. Install in the reverse order of removal. 

LOWER PANEL REMOVAL/INSTALLATION 

1. Disconnect the negative battery cable.  

2. Remove the following parts: 

1. Dashboard under cover (Driver side) (See DASHBOARD UNDER COVER 

CAUTION:

The ventilator grilles will be installed to the shaded areas shown 
in the figure. Therefore, if a wiring harness is in the areas, it 
could get caught and damaged. When installing the center 
panel, completely press in the wiring harnesses of the hazard 
warning switch connector in the direction of the arrow so that 
the wiring harnesses will not be caught. 

Fig. 14: Identifying Air Flow 
Courtesy of MAZDA MOTORS CORP. 


2008 Mazda CX-9 Grand Touring 

2008 BODY & ACCESSORIES Interior Trim - Mazda CX-9


Microsoft 


Sunday, November 15, 2009 10:43:26 AM

Page 12 

© 2005 Mitchell Repair Information Company, LLC. 


Content   ..  467  468  469  470   ..