Mazda CX-9 Grand Touring. Manual - part 28


  Index      Mazda     Mazda CX-9 Grand Touring - service repair manual 2008 year


Search            


Content   ..  26  27  28  29   ..


Mazda CX-9 Grand Touring. Manual - part 28


1. Dashboard under cover (Passenger side) (See DASHBOARD UNDER COVER 

REMOVAL/INSTALLATION .)  

2. Side wall (See SIDE WALL REMOVAL/INSTALLATION .)  

3. Console panel (Passenger side) (See CONSOLE PANEL REMOVAL/INSTALLATION .)  

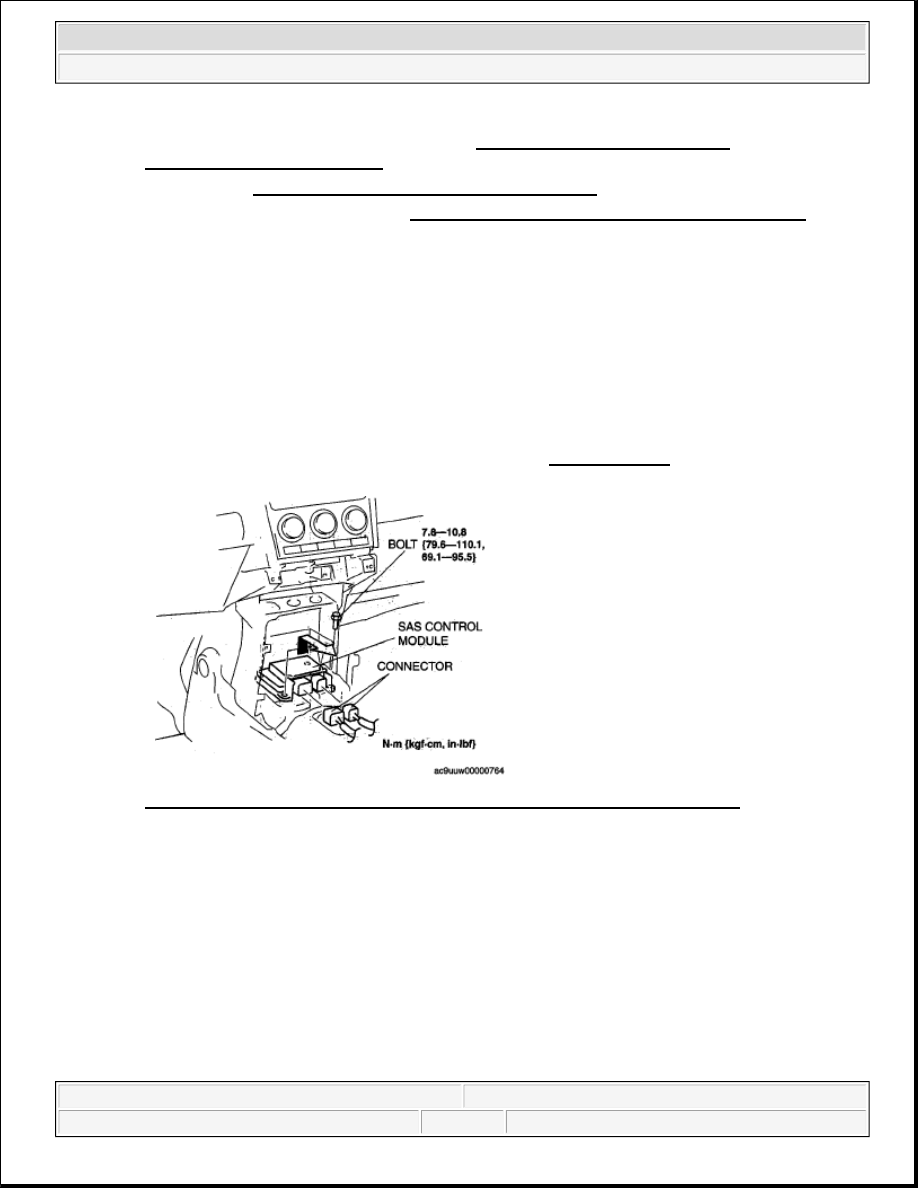
5. Remove the connector.  

6. Remove the nuts.  

7. Remove the SAS control module in the direction of the arrow  

8. Install in the reverse order of removal.  

9. Turn the ignition switch to the ON position. 

If the SAS control module is replaced, turn the ignition switch to the ON position for 20 s or more 
after completing the configuration.  

10. Verify that the air bag system warning light illuminates for approx. 6 s and goes out. 

If the air bag system warning light does not operate, refer to the on-board diagnostic system (air 
bag system) and perform inspection of the system. (See FLOWCHART .) 

Fig. 19: Identifying SAS Control Module, Connector & Torque Specifications 
Courtesy of MAZDA MOTORS CORP. 

SAS CONTROL MODULE CONFIGURATION. 

1. Connect the M-MDS to the DLC-2.  

2. After the vehicle is identified, select the following items from the initialization screen of the M-MDS. 

When using the IDS (laptop PC) 

1. Select "Module Programming". 

NOTE:

Use the IDS (laptop PC) because the PDS (Pocket PC) does not support 
the SAS CONTROL MODULE CONFIGURATION.  


2008 Mazda CX-9 Grand Touring 

2008 RESTRAINTS Air Bag System - Mazda CX-9


Microsoft 


Sunday, November 15, 2009 10:16:38 AM

Page 17 

© 2005 Mitchell Repair Information Company, LLC. 

3. Then, select items from the screen menu in the following order. 

1. Select "Programmable Module Installation".  

2. Select "RCM".  

4. Perform the configuration according to the directions on the screen.  

5. Retrieve DTCs by the M-MDS, then verify that there is no DTC present. 

If a DTC (s) is detected, perform the applicable DTC inspection. (See DTC TABLE .) 

Fig. 20: Identifying DLC-2 Location 
Courtesy of MAZDA MOTORS CORP. 

SEAT WEIGHT SENSOR CONTROL MODULE REMOVAL/INSTALLATION 

1. Turn the ignition switch to the LOCK position.  

2. Disconnect the negative battery cable and wait for 1 min or more .  

3. Remove the front passenger seat. (See FRONT SEAT REMOVAL/INSTALLATION .)  

4. Remove in the order indicated in the table. 

Fig. 21: Identifying Seat Weight Sensor Control Module, Connector And Fastener 
Courtesy of MAZDA MOTORS CORP.

CAUTION:

When the seat weight sensor control module is replaced with a new 
one, perform the seat weight sensor calibration using the M-MDS. 
(See SEAT WEIGHT SENSOR CALIBRATION.)  


2008 Mazda CX-9 Grand Touring 

2008 RESTRAINTS Air Bag System - Mazda CX-9


Microsoft 


Sunday, November 15, 2009 10:16:38 AM

Page 18 

© 2005 Mitchell Repair Information Company, LLC. 

5. Install in the reverse order of removal.  

SEAT WEIGHT SENSOR CALIBRATION 

1. Have two 20 kg {44 lb} weights ready to use.  

2. Connect the M-MDS to the DLC-2.  

3. After the vehicle is identified, select the following items from the initialization screen of the M-MDS. 

When using the IDS (laptop PC) 

1. Select "Body".  

2. Select "Restraints".  

When using the PDS (Pocket PC) 

1. Select "All Tests and Calibrations".  

4. Then, select item from the screen menu in the following order. 

1. Select "Passenger Seat Weight Sensor ReZero".  

5. Perform calibration following the procedures on the M-MDS screen. 

Fig. 22: Identifying DLC-2 Location 
Courtesy of MAZDA MOTORS CORP.

CAUTION:

If any of the following work is performed, perform the seat weight 
sensor calibration using the M-MDS. 

Replacement with a new seat weight sensor  

Replacement with a new seat weight sensor control module  

Replacement with new front passenger-side seat parts  

Disassembly of the front passenger-side seat  

If any of the following work is performed or when the vehicle has 
been involved in a collision, perform the seat weight sensor 
inspection using the M-MDS. (See SEAT WEIGHT SENSOR 
INSPECTION.) 

Removal of the front passenger-side seat  

Loosening and retightening of front passenger-seat fixing bolts 


2008 Mazda CX-9 Grand Touring 

2008 RESTRAINTS Air Bag System - Mazda CX-9


Microsoft 


Sunday, November 15, 2009 10:16:38 AM

Page 19 

© 2005 Mitchell Repair Information Company, LLC. 

SEAT WEIGHT SENSOR INSPECTION

1. Connect the M-MDS to the DLC-2.  

2. After the vehicle is identified, select the following items from the initialization screen of the M-MDS. 

When using the IDS (laptop PC) 

1. Select "Body".  

2. Select "Restraints".  

When using the PDS (Pocket PC) 

1. Select "All Tests and Calibrations".  

3. Then, select item from the screen menu in the following order. 

1. Select "Passenger Seat Weight Sensor ReZero".  

4. Perform inspection following the procedures on the M-MDS screen. 

Fig. 23: Identifying DLC-2 Location 
Courtesy of MAZDA MOTORS CORP. 

SIDE AIR BAG SENSOR NO. 1 REMOVAL/INSTALLATION 

CAUTION:

If any of the following work is performed or when the vehicle has 
been involved in a collision, perform the seat weight sensor 
inspection using the M-MDS. 

Removal of the front passenger-side seat  

Loosening and retightening of front passenger-seat fixing bolts 

If any of the following work is performed, perform the seat weight 
sensor calibration using the M-MDS. (See SEAT WEIGHT SENSOR 
CALIBRATION.) 

Replacement with a new seat weight sensor  

Replacement with a new seat weight sensor control module  

Replacement with new front passenger-side seat parts  

Disassembly of the front passenger-side seat  


2008 Mazda CX-9 Grand Touring 

2008 RESTRAINTS Air Bag System - Mazda CX-9


Microsoft 


Sunday, November 15, 2009 10:16:38 AM

Page 20 

© 2005 Mitchell Repair Information Company, LLC. 


Content   ..  26  27  28  29   ..