Mazda CX-9 Grand Touring. Manual - part 27


  Index      Mazda     Mazda CX-9 Grand Touring - service repair manual 2008 year


Search            


Content   ..  25  26  27  28   ..


Mazda CX-9 Grand Touring. Manual - part 27


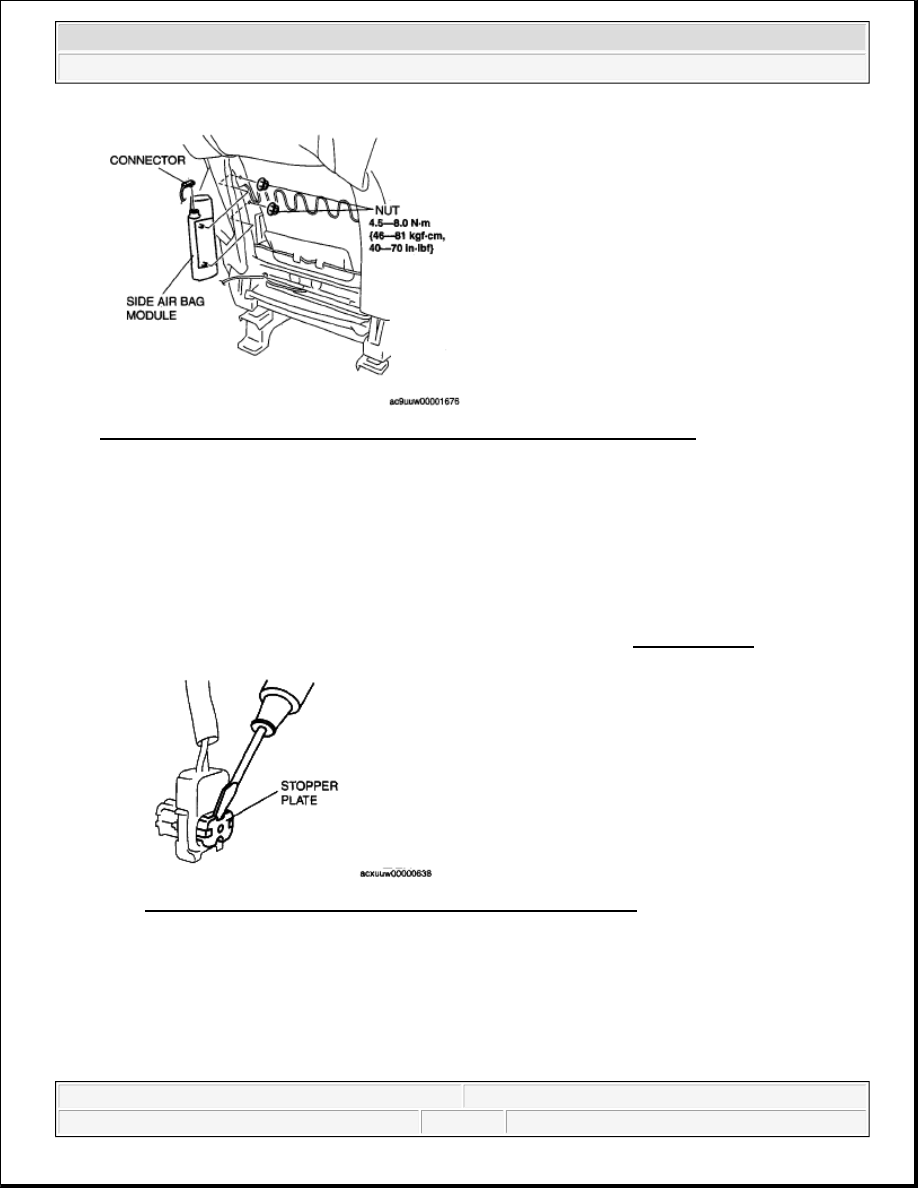
Fig. 15: Identifying Side Air Bag Module, Connector & Torque Specifications 
Courtesy of MAZDA MOTORS CORP. 

15. Using a flathead screwdriver, pry out the connector stopper plate.  

16. Disconnect the connector.  

17. Install in the reverse order of removal.  

18. Turn the ignition switch to the ON position.  

19. Verify that the air bag system warning light illuminates for approx. 6 s and goes out. 

If the air bag system warning light does not operate normally, refer to the on-board diagnostic 
system (air bag system) and perform inspection of the system. (See FLOWCHART .) 

Fig. 16: Prying Out Connector Stopper Plate Using Screwdriver 
Courtesy of MAZDA MOTORS CORP. 

CURTAIN AIR BAG MODULE REMOVAL/INSTALLATION 

WARNING:

Handling the air bag module improperly can accidentally deploy the 
air bag module, which may seriously injure you. Read the air bag 
system service warnings and cautions before handling the air bag 


2008 Mazda CX-9 Grand Touring 

2008 RESTRAINTS Air Bag System - Mazda CX-9


Microsoft 


Sunday, November 15, 2009 10:16:38 AM

Page 13 

© 2005 Mitchell Repair Information Company, LLC. 

1. Turn the ignition switch to the LOCK position.  

2. Disconnect the negative battery cable and wait for 1 min or more .  

3. Remove the following parts: 

1. A-pillar trim (See A-PILLAR TRIM REMOVAL/INSTALLATION .)  

2. Front scuff plate inner (See FRONT SCUFF PLATE REMOVAL/INSTALLATION .)  

3. Rear scuff plate inner (See REAR SCUFF PLATE REMOVAL/INSTALLATION .)  

4. Front seat belt lower anchor installation bolt (Driver side) (See FRONT SEAT BELT 

REMOVAL/INSTALLATION .)  

5. B-pillar lower trim (See B-PILLAR LOWER TRIM REMOVAL/INSTALLATION .)  

6. Front seat belt upper anchor installation bolt (See FRONT SEAT BELT 

REMOVAL/INSTALLATION .)  

7. B-pillar upper trim (See B-PILLAR UPPER TRIM REMOVAL/INSTALLATION .)  

8. Trunk box (See TRUNK BOX REMOVAL/INSTALLATION .)  

9. Seat side box (See SEAT SIDE BOX REMOVAL/INSTALLATION .)  

10. Trunk end trim (See TRUNK END TRIM REMOVAL/INSTALLATION .)  

11. Third-row seat (See THIRD-ROW SEAT REMOVAL/INSTALLATION .)  

12. Third-row seat belt lower anchor installation bolt (See THIRD-ROW SEAT BELT 

REMOVAL/INSTALLATION .)  

13. Trunk side trim (See TRUNK SIDE TRIM REMOVAL/INSTALLATION .)  

14. Roof side trim (See ROOF SIDE TRIM REMOVAL/INSTALLATION .)  

15. Second-row seat belt upper anchor installation bolt (See SECOND-ROW SEAT BELT 

REMOVAL/INSTALLATION .)  

16. C-pillar trim (See C-PILLAR TRIM REMOVAL/INSTALLATION .)  

17. Third-row seat belt upper anchor installation bolt (See THIRD-ROW SEAT BELT 

REMOVAL/INSTALLATION .)  

18. D-pillar trim (See D-PILLAR TRIM REMOVAL/INSTALLATION .)  

19. Front map light (See FRONT MAP LIGHT REMOVAL/INSTALLATION .)  

20. Sunvisor (See SUNVISOR REMOVAL/INSTALLATION .)  

21. Assist handle (See ASSIST HANDLE REMOVAL/INSTALLATION .)  

22. RES unit cover (Vehicles with RES) (See RES UNIT REMOVAL/INSTALLATION .)  

23. Headliner (See HEADLINER REMOVAL/INSTALLATION .)  

24. Rear speaker (See REAR SPEAKER REMOVAL/INSTALLATION .)  

4. Remove in the order indicated in the table. 

module. (See AIR BAG SYSTEM SERVICE WARNINGS.) (See AIR 
BAG SYSTEM SERVICE CAUTIONS.)  


2008 Mazda CX-9 Grand Touring 

2008 RESTRAINTS Air Bag System - Mazda CX-9


Microsoft 


Sunday, November 15, 2009 10:16:38 AM

Page 14 

© 2005 Mitchell Repair Information Company, LLC. 

Fig. 17: Identifying Curtain Air Bag Module & Torque Specifications 
Courtesy of MAZDA MOTORS CORP. 

5. Install in the reverse order of removal. 

6. When the ignition switch is turned to the ON position verify that the air bag system warning light 

illuminates for approx. 6 s and goes out . 

If the air bag system warning light does not operate normally, refer to the on-board diagnostic 
system (air bag system) and perform inspection of the system. (See FLOWCHART .)  

CRASH ZONE SENSOR REMOVAL/INSTALLATION 

1. Turn the ignition switch to the LOCK position.  

2. Disconnect the negative battery cable and wait for 1 min or more .  

3. Remove the front bumper. (See FRONT BUMPER REMOVAL/INSTALLATION .)  

4. Remove in the order indicated in the table. 

CAUTION:

After installing the curtain air bags, verify that the connector 
and wiring harness are not caught.  

WARNING:

Handling the crash zone sensor improperly can accidentally deploy 
the air bags and pre-tensioner seat belts, which may seriously injure 
you. Read the air bag system service warnings and cautions before 
handling the crash zone sensor. (See AIR BAG SYSTEM SERVICE 
WARNINGS.) (See AIR BAG SYSTEM SERVICE CAUTIONS.)  


2008 Mazda CX-9 Grand Touring 

2008 RESTRAINTS Air Bag System - Mazda CX-9


Microsoft 


Sunday, November 15, 2009 10:16:38 AM

Page 15 

© 2005 Mitchell Repair Information Company, LLC. 

Fig. 18: Identifying Bolt, Connector & Torque Specifications 
Courtesy of MAZDA MOTORS CORP. 

5. Install in the reverse order of removal.  

6. Turn the ignition switch to the ON position.  

7. Verify that the air bag system warning light illuminates for approx. 6 s and goes out. 

If the air bag system warning light does not operate normally, refer to the on-board diagnostic 
system (air bag system) and perform inspection of the system. (See FLOWCHART .  

SAS CONTROL MODULE REMOVAL/INSTALLATION 

1. Perform SAS control module configuration when replacing it. (See SAS CONTROL MODULE 

CONFIGURATION.)  

2. Turn the ignition switch to the LOCK position.  

3. Disconnect the negative battery cable and wait for 1 min or more .  

4. Remove the following parts: 

WARNING:

Handling the SAS control module improperly can accidentally 
deploy the air bag modules and pre-tensioner seat belt, which may 
seriously injure you. Read the service warnings and cautions before 
handling the air bag module. (See AIR BAG SYSTEM SERVICE 
WARNINGS.) (See AIR BAG SYSTEM SERVICE CAUTIONS.)  

Connecting the SAS control module with the SAS control module 
not securely fixed to the vehicle is dangerous. When the ignition 
switch is turned to the ON position, the SAS control module could 
tilt causing the SAS control module to detect that the vehicle is in a 
rollover condition, which may accidentally operate (deploy) the 
curtain air bag module and pre-tensioner seat belt. Therefore, before 
turning the ignition switch to the ON position with the connector 
connected, securely fix the SAS control module to the vehicle.  

CAUTION:

Handling the SAS control module improperly can accidentally deploy 
the air bag modules and pre-tensioner seat belt, which may seriously 
injure you. If configuration is not completed before removing the SAS 
control module, DTC B2477 will be displayed.  


2008 Mazda CX-9 Grand Touring 

2008 RESTRAINTS Air Bag System - Mazda CX-9


Microsoft 


Sunday, November 15, 2009 10:16:38 AM

Page 16 

© 2005 Mitchell Repair Information Company, LLC. 


Content   ..  25  26  27  28   ..