Mazda RX7. Manual - part 20


  Index      Mazda     Mazda RX7 - service repair manual 1983 year


Search            


Content   ..  18  19  20  21   ..


Mazda RX7. Manual - part 20


BRAKE SYSTEM

Article Text (p. 6)

1983 Mazda RX7

For www.iluvmyrx7.com    

Copyright © 1998 Mitchell Repair Information Company, LLC

Sunday, August 26, 2001  04:54PM

and dust boot. Place a piece of wood in front of piston.
         2) Apply compressed air to fluid inlet and remove piston.
Tap caliper with plastic hammer, if required. Remove piston seal
without damaging caliper bore.

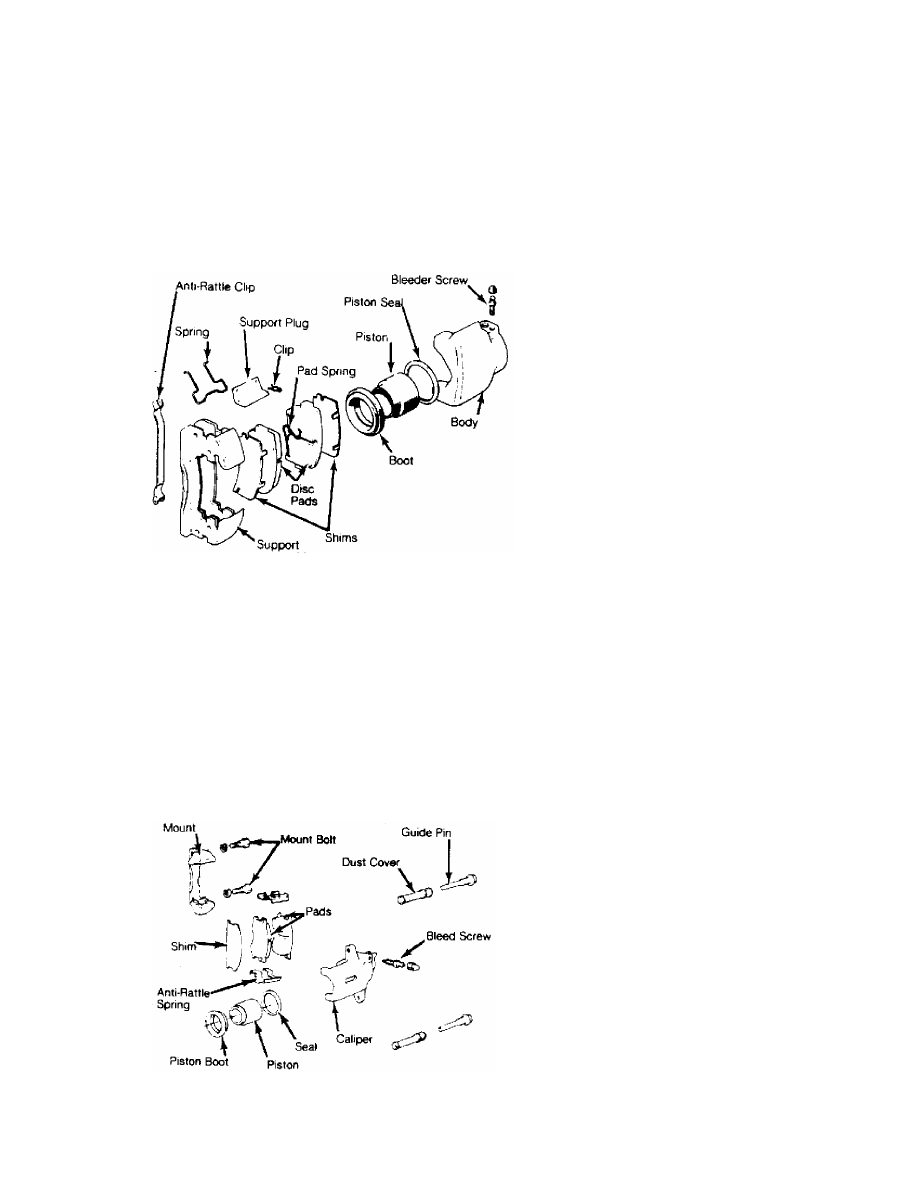
Fig. 3:  Exploded View of Pickup Front Disc Brake Caliper

         Cleaning & Inspection
         1) Wash all parts in alcohol or brake fluid and air dry.
Inspect cylinder bore and piston for scoring, scratches or rust.
Replace defective parts.
         2) Minor damage may be removed with crocus cloth. Always
replace dust boot and piston seal when caliper is disassembled.

         Reassembly
         1) Apply clean brake fluid to cylinder bore, piston and
piston seal. Seat piston seal in caliper bore.
         2) Install piston carefully into cylinder bore and install
dust boot and retainer.

Fig. 4:  Exploded View of RX7 Front Brake Caliper

         REAR DISC BRAKE CALIPER

BRAKE SYSTEM

Article Text (p. 7)

1983 Mazda RX7

For www.iluvmyrx7.com    

Copyright © 1998 Mitchell Repair Information Company, LLC

Sunday, August 26, 2001  04:54PM

         Disassembly (RX7)
         1) Remove dust boot retainer and boot. Turn piston
counterclockwise with disc brake piston wrench (49 FA18 602), and
screw out piston. Remove piston seal.
         2) Remove boot retainer. Slip off boot. Remove snap ring.
Compress conical spring in caliper with spring compressor (49 FA18
601), valve spring lifter arm (49 0636 100A), and removing plate (49
E301 144).
         3) Remove parking brake crank, torsion spring and strut.
Remove adjusting bolt and conical spring assembly. Press out needle
roller bearings.

         Inspection
         1) Clean all parts in brake fluid or alcohol. Air dry parts.
Inspect caliper bore for scratches, scoring or rust. Minor damage can
be removed by polishing with crocus cloth.

CAUTION: Never use gasoline or kerosene when cleaning caliper parts.

         2) Inspect needle roller bearing, strut, adjusting bolt, and
parking brake crank for corrosion, wear or damage. Check torsion
spring and conical spring for corrosion, weakness or damage.
         3) Check piston and sleeve nut for excessive play. It should
be within .012-.020" (.3-.5 mm).

         Reassembly
         1) Assemble the caliper in the reverse order of disassembly.
Use new piston and dust seals. Three kinds of grease contained in
seal kit must be used.
         2) White grease is for caliper slide bolts and mounting
bolts. Orange grease is for bearings, adjusting bolt, strut and
piston boot. Pink grease is for piston seal.
         3) Lubricate the piston and caliper bore with clean brake
fluid. Press in needle roller bearing so that arrow on bearing faces
outward.
         4) Assemble conical spring and adjusting bolt. See Fig. 5.
Install adjusting bolt assembly, strut and torsion spring in the
caliper. Install piston using disc brake wrench, as described under
Disc Brake Pad Installation.

Fig. 5:  Proper Installation of Conical Spring and Adjusting Bolt
Apply orange grease, supplied in seal kit, to adjusting bolt.

BRAKE SYSTEM

Article Text (p. 8)

1983 Mazda RX7

For www.iluvmyrx7.com    

Copyright © 1998 Mitchell Repair Information Company, LLC

Sunday, August 26, 2001  04:54PM

         WHEEL CYLINDERS

         Disassembly
         Remove dust boots. Remove piston assemblies by pressing on
cylinder cup to force out filling blocks and return spring.

         Cleaning & Inspection
         1) Clean all parts in alcohol or brake fluid. Check cylinder
bore and pistons for scores, roughness or wear.
         2) Check clearance between cylinder bore and pistons.
Replace if clearance exceeds .006" (.15 mm). Check cups for
deformation. Replace as necessary.

Fig. 6:  Exploded View of Wheel Cylinder
Flat side of cylinder cups face outward.

         Reassembly
         1) Reverse disassembly procedure. Coat all parts with clean
brake fluid before reassembly.
         2) When installing cylinder cups, make sure flat side of cup
faces outward.

         MASTER CYLINDER

         Disassembly
         1) Thoroughly clean outside of master cylinder, and pour out
any remaining brake fluid. If equipped, remove reservoir and dust
boot. Depress primary piston assembly. See Fig. 7.
         2) From rear of cylinder bore, remove retaining ring ,
washer, primary piston assembly, and return spring. Remove stopper
bolt and secondary piston by blowing compressed air through the
outlet port. See Fig. 8.
         3) Carefully withdraw secondary piston assembly and return
spring. Remove fittings, check valves, and springs.

BRAKE SYSTEM

Article Text (p. 9)

1983 Mazda RX7

For www.iluvmyrx7.com    

Copyright © 1998 Mitchell Repair Information Company, LLC

Sunday, August 26, 2001  04:54PM

Fig. 7:  Exploded View of Typical Master Cylinder
Some models may vary slightly.

         Cleaning & Inspection
         1) Clean all parts in alcohol or brake fluid. Check all
parts for scoring, roughness or wear. Check piston-to-cylinder
clearance.
         2) If clearance exceeds .006" (.15 mm), replace parts as
necessary. Remove all foreign matter from internal passages and
recesses with compressed air.
         3) Check cylinder cups for deformation and replace as
required.

         Reassembly
         1) Reverse disassembly procedure. Coat all parts with clean
brake fluid before reassembly. Use new gaskets at all hydraulic
unions.
         2) When assembled, make sure piston cups do not cover
compensating ports. Make sure valve with hole in center, faces front
side outlet hole.

         POWER BRAKE UNIT

NOTE:    Power brake units vary slightly between model applications.
         The following general overhaul procedures can be used if
         attention is paid to specific order of components.

         Disassembly
         1) Remove master cylinder and check valve from power unit.
Place power unit in a vise with push rod up.
         2) Scribe alignment marks on front and rear shells to assure
reassembly in original position. Remove clevis, lock nut, and dust
boot from rear shell.

CAUTION: Separate front and rear shells carefully. Spring tension may
         cause rear shell to release quickly.


Content   ..  18  19  20  21   ..