Mazda RX7. Manual - part 18


  Index      Mazda     Mazda RX7 - service repair manual 1983 year


Search            


Content   ..  16  17  18  19   ..


Mazda RX7. Manual - part 18


TRANSMISSION SERVICING - A/T

Article Text (p. 2)

1983 Mazda RX7

For www.iluvmyrx7.com    

Copyright © 1998 Mitchell Repair Information Company, LLC

Sunday, August 26, 2001  04:51PM

pan bolts to 36-60 INCH lbs. (4-9 N.m). Add fluid, make sure not to
overfill.
         Transaxle
         1) Drain oil by removing drain plug on bottom of
differential. Remove speedometer driven gear and oil pan. Clean oil
pan. Replace oil pan and speedometer driven gear.
         2) Replace oil through oil filler tube. Place selector lever
in "P", warm engine, and check oil level. Oil level must not be
higher than "F" on gauge.

         ADJUSTMENT

         BRAKE BAND

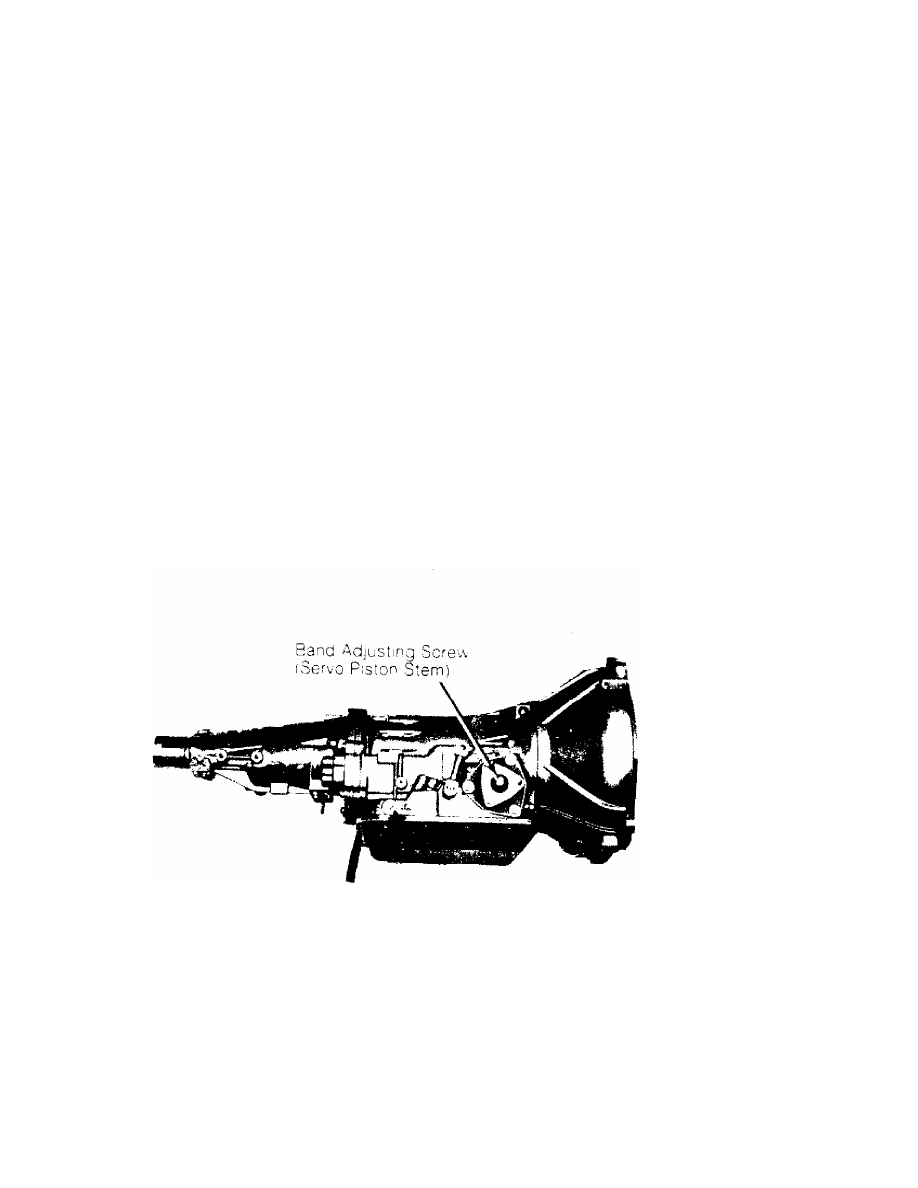
         1) Loosen servo piston stem lock nut and back off a few
turns.
         2) Using a torque wrench, tighten servo piston stem to
108-132 INCH lbs. (12-15 N.m), then back off piston stem 2 turns.
         3) Hold piston stem in this position and tighten lock nut to
132-348 INCH lbs. (15-39 N.m) on RWD models.

Fig. 1:  RX7 Transmission Brake Band Adjustment

         KICKDOWN SWITCH & DOWNSHIFT SOLENOID

         1) Depress accelerator pedal to limit. Near wide open
throttle, click should be heard from solenoid. Switch must operate at
or after 7/8 of pedal travel.
         2) If not, loosen switch retaining nut and adjust switch to
engage when pedal is at 7/8 of its full travel, tighten retaining nut
and check solenoid.

TRANSMISSION SERVICING - A/T

Article Text (p. 3)

1983 Mazda RX7

For www.iluvmyrx7.com    

Copyright © 1998 Mitchell Repair Information Company, LLC

Sunday, August 26, 2001  04:51PM

Fig. 2:  Kickdown Switch and Downshift Solenoid

         SHIFT LINKAGE

NOTE:    Before linkage is adjusted, be sure engine idle is properly
         set.

         RX7
         Remove boot plate. Place selector lever in "P" position.
Loosen selector lever plate bolt. Place transmission in "P" position.
Tighten selector lever plate bolt and replace boot.

         SELECTOR LEVER HANDLE ADJUSTMENT

         Loosen and back off lock nut. Screw handle fully down until
no play exists in the push button. Unscrew handle 1 complete turn at
a time until smooth shifting operation is obtained. Tighten lock nut.

         NEUTRAL SAFETY SWITCH

         1) After checking and adjusting shift linkage, place the
transmission lever in the "N" position.
         2) Loosen safety switch retaining bolts. Remove screw from
alignment pin hole at bottom of switch.
         3) Rotate switch and insert a .078" (2 mm) diameter
alignment pin through the alignment hole and into hole of internal
rotor. Tighten switch retaining bolts and remove alignment pin.
         4) Reinstall alignment pin hole screw. Check operation of
switch. The engine should only start in "N" or "P" position.

Fig. 3:  Adjusting Neutral Safety Switch On RX7 Transmissions

TRANSMISSION SERVICING - A/T

Article Text (p. 4)

1983 Mazda RX7

For www.iluvmyrx7.com    

Copyright © 1998 Mitchell Repair Information Company, LLC

Sunday, August 26, 2001  04:51PM

END OF ARTICLE

BRAKE SYSTEM

Article Text

1983 Mazda RX7

For www.iluvmyrx7.com    

Copyright © 1998 Mitchell Repair Information Company, LLC

Sunday, August 26, 2001  04:54PM

ARTICLE BEGINNING

         1983 Brakes
         MAZDA

         GLC Wagon, Pickups, RX7

         DESCRIPTION

         Brake system is hydraulically-operated, using a tandem
master cylinder and power brake unit. Front brakes are floating
caliper disc. Rear brakes on most models are leading/trailing drums.
         Floating caliper rear disc brakes are available on RX7 as an
option. Proportioning valves are used on most models to prevent
premature lockup of rear wheels.

         ADJUSTMENT

         REAR DRUM BRAKE SHOES

         GLC Wagon, RX7 & Pickups
         1) Raise and support rear of vehicle. Release parking brake.
Remove rear wheel. Through the hole in the brake drum of the GLC
Wagon or on the backing plate of all others, remove the star wheel
plug. Insert a flat-tipped screwdriver, and move the star wheel
forward until the wheel is locked. See Fig. 1.

Fig. 1:  Adjusting Rear Brake Shoe-to-Drum Position

         2) On all backing plates, remove the pawl lever hole plug.
Insert a flat-tipped screwdriver through hole. Push on the pawl lever
self-adjuster, so the star wheel may be moved in the reverse
direction.
         3) Back off the star wheel about 3 or 4 notches, so the


Content   ..  16  17  18  19   ..