Mazda RX7. Manual - part 13


  Index      Mazda     Mazda RX7 - service repair manual 1983 year


Search            


Content   ..  11  12  13  14   ..


Mazda RX7. Manual - part 13


IGNITION SYSTEM

Article Text (p. 5)

1983 Mazda RX7

For www.iluvmyrx7.com    

Copyright © 1998 Mitchell Repair Information Company, LLC

Sunday, August 26, 2001  03:31PM

         2) Quickly operate switch "ON " and "OFF", and make sure
test lamp flashes. If not, replace ignitor.

         OVERHAUL

         DISASSEMBLY

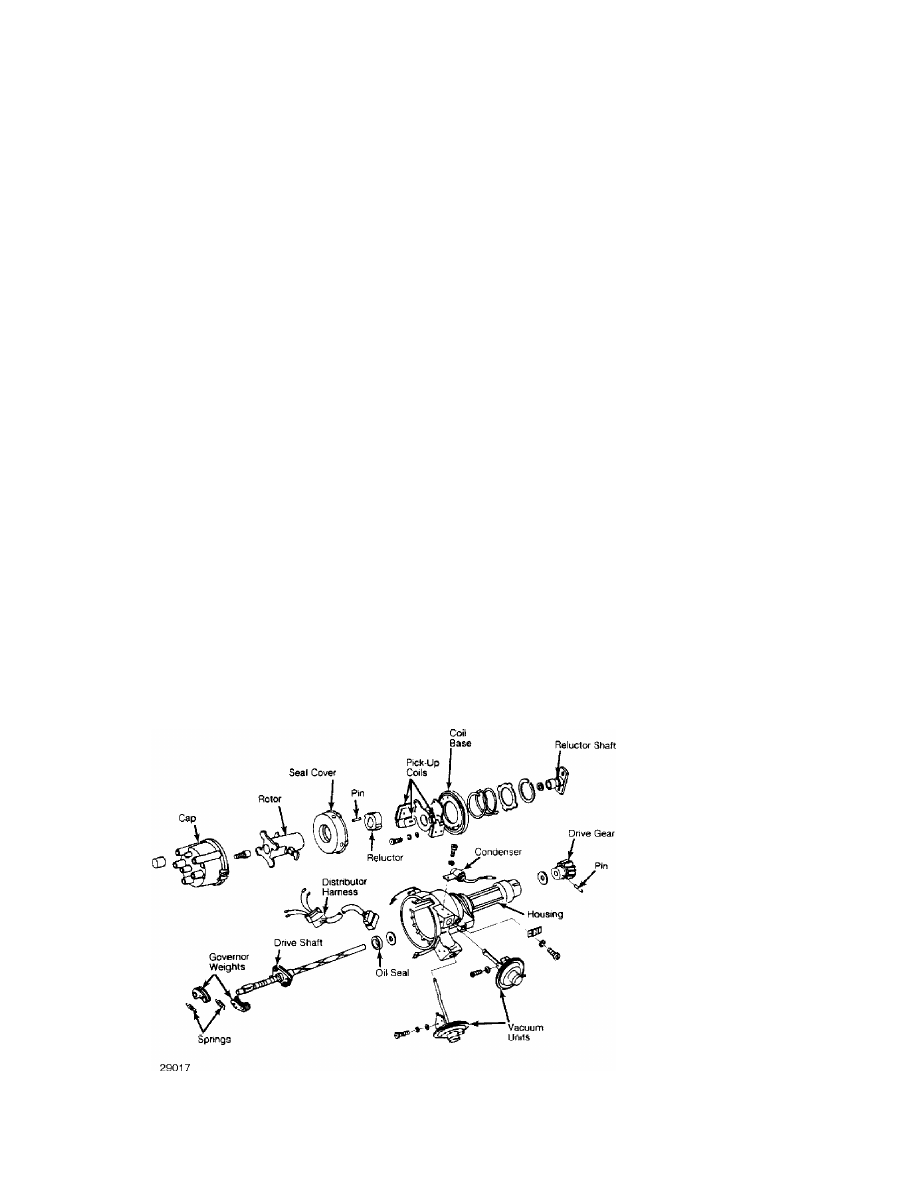
         1) Remove distributor cap, rotor and seal cover. See Fig. 6.
Remove igniters and attaching screws from distributor housing. Remove
clips holding vacuum diaphragm links. Remove attaching screws and
vacuum control units from distributor housing. Remove condenser.
         2) Remove reluctor shaft attaching screw from end of shaft.
Remove pick-up coil base bearing attaching screws. Remove reluctor,
reluctor shaft, pick-up coils and coil base bearing assembly from top
of distributor drive shaft.
         3) Remove reluctor from reluctor shaft, using puller. Remove
spring pin. Remove governors by removing springs. Drive lock pin out
of drive gear, using a small drift. Remove gear and washers. Remove
drive shaft through top of distributor housing.

         REASSEMBLY

         1) Inspect distributor cap and rotor for cracks, carbon
tracks, and burned or corroded terminals.
         2) Assemble distributor in reverse order of disassembly,
noting the following: Install reluctor shaft onto distributor drive
shaft, engaging slots of reluctor shaft and governor pins. Install
pick-up coil and coil base bearing assembly and tighten attaching
screws. Install reluctor on shaft, driving spring pin in with a punch.

Fig. 6:  Disassembled View of RX7 Mitsubishi Distributor

END OF ARTICLE

STARTER - HITACHI/MITSUBISHI

Article Text

1983 Mazda RX7

For www.iluvmyrx7.com    

Copyright © 1998 Mitchell Repair Information Company, LLC

Sunday, August 26, 2001  03:31PM

ARTICLE BEGINNING

         1983 Starters
         HITACHI & MITSUBISHI

         Mazda

         DESCRIPTION

         Starter is a conventional 12-volt, 4-pole brush-type motor,
with either direct or reduction gear drive. The starter-mounted
solenoid shifts overrunning clutch and pinion into flywheel when
starter is energized.

MITSUBISHI STARTER APPLICATION TABLE

ÄÄÄÄÄÄÄÄÄÄÄÄÄÄÄÄÄÄÄÄÄÄÄÄÄÄÄÄÄÄÄÄÄÄÄÄÄÄÄÄÄÄÄÄÄÄÄÄÄÄÄÄÄÄÄ

Model                                  Type or Part No.

Mazda
  B2000 Pickup Gasoline
   Man. Trans.  ....................  (1)  HE19-18-400A
   Auto. Trans.  ....................  (1)  HE20-18-400
  B2200 Pickup Diesel  ..............  (1)  S211-18-400
  GLC
   FWD Sedan  .......................  (1)  E301-18-400
   RWD Wagon
     Man. Trans.  ...................  (1)  D501-18-400
     Auto. Trans.  ..................  (1)  D502-18-400
  RX7
   Man. Trans.  .....................  (1)  N221-18-400
   Auto. Trans.  ...................  (1)  N202-18-400A
  626  ..............................  (1)  FE05-18-400

(1) - Vehicle manufacturer's part number.

ÄÄÄÄÄÄÄÄÄÄÄÄÄÄÄÄÄÄÄÄÄÄÄÄÄÄÄÄÄÄÄÄÄÄÄÄÄÄÄÄÄÄÄÄÄÄÄÄÄÄÄÄÄÄÄ

         TESTING

         STARTER PERFORMANCE TESTS

         No Load Tests
         Connect starter in series with a 12-volt battery, a
voltmeter and a 1000 amp ammeter. Compare readings with Starter No
Load Specifications.

MITSUBISHI STARTER NO LOAD SPECIFICATIONS TABLE (1)

ÄÄÄÄÄÄÄÄÄÄÄÄÄÄÄÄÄÄÄÄÄÄÄÄÄÄÄÄÄÄÄÄÄÄÄÄÄÄÄÄÄÄÄÄÄÄÄÄÄÄÄÄÄÄÄÄÄÄÄÄÄÄÄÄÄÄÄÄÄÄ

Application                    Max. Amps                      Min. RPM

Mazda
  B2000 Pickup  ................  53  ..........................  6800

STARTER - HITACHI/MITSUBISHI

Article Text (p. 2)

1983 Mazda RX7

For www.iluvmyrx7.com    

Copyright © 1998 Mitchell Repair Information Company, LLC

Sunday, August 26, 2001  03:31PM

  B2200 Pickup  ...............  180  ..........................  3800
  GLC
   FWD Sedan  ..................  53  ..........................  6800
   RWD Wagon  ..................  53  ..........................  6800
  RX7
   Man. Trans.  ................  60  ..........................  6500
   Auto. Trans.  ..............  100  ..........................  3500
  626
   Man. Trans.  ................  60  ..........................  6500
   Auto. Trans.  ...............  60  ..........................  6600

(1) - Applied voltage of 11.5-12 volts.

ÄÄÄÄÄÄÄÄÄÄÄÄÄÄÄÄÄÄÄÄÄÄÄÄÄÄÄÄÄÄÄÄÄÄÄÄÄÄÄÄÄÄÄÄÄÄÄÄÄÄÄÄÄÄÄÄÄÄÄÄÄÄÄÄÄÄÄÄÄÄ

         Load (Lock Torque) Test
         Mount starter in a test stand to perform torque measurement
test. Follow manufacturer's instructions for test stand operation.
With voltage adjusted, ammeter reading and torque should be within
specifications.

MITSUBISHI STARTER LOAD TEST SPECIFICATIONS TABLE (1)

ÄÄÄÄÄÄÄÄÄÄÄÄÄÄÄÄÄÄÄÄÄÄÄÄÄÄÄÄÄÄÄÄÄÄÄÄÄÄÄÄÄÄÄÄÄÄÄÄÄÄÄÄÄÄÄÄÄÄÄÄÄÄÄÄÄÄÄÄÄÄ

                          Max.                                  Torque
Application               Amps            Volts         Ft. Lbs. (N.m)

Mazda
  B2000 Pickup  ........  310  ............  5  ...........  5.4 (7.5)
  B2200 Pickup  .......  1050  ............  2  ...........  21.7 (30)
  GLC
   FWD  ................  310  ............  5  ...........  5.4 (7.5)
   Wagon  ..............  310  ............  5  ...........  5.4 (7.5)
  RX7
   Man. Trans.  ........  600  ............  5  ...........  6.9 (9.6)
   Auto. Trans.  ......  1100  ............  4  ...........  22.4 (31)
  626  .................  310  ............  5  ...........  5.4 (7.5)

(1) - Turning speed not specified by manufacturer.

ÄÄÄÄÄÄÄÄÄÄÄÄÄÄÄÄÄÄÄÄÄÄÄÄÄÄÄÄÄÄÄÄÄÄÄÄÄÄÄÄÄÄÄÄÄÄÄÄÄÄÄÄÄÄÄÄÄÄÄÄÄÄÄÄÄÄÄÄÄÄ

         SOLENOID TESTS

NOTE:    Make tests with solenoid removed from starter or remove
         solenoid lead to starter before testing. Ensure solenoid
         plunger and sleeve are clean and dry before performing
         tests. Make tests in less than 10 seconds to prevent coil
         damage.

         Pull-In Coil Test
         1) Connect jumper between positive post of 12-volt battery
and "S" terminal. Connect a second jumper to negative battery
terminal and touch "M" (MT) terminal (and between terminal "S" and
switch body). See Fig. 1.

STARTER - HITACHI/MITSUBISHI

Article Text (p. 3)

1983 Mazda RX7

For www.iluvmyrx7.com    

Copyright © 1998 Mitchell Repair Information Company, LLC

Sunday, August 26, 2001  03:31PM

Fig. 1:  Connections for Conducting Solenoid Pull-In Test
Remove solenoid-to-starter lead before testing.

         2) If pinion moves outward (or plunger is pulled-in),
pull-in coil is good. If not, replace magnetic switch.

         Hold-In Coil Test
         1) Connect a jumper wire between the "M" (MT) terminal and
solenoid case. Apply 8 volts to "S" terminal to pull in the plunger.
See Fig. 2. Disconnect lead to "M" (MT) terminal.

Fig. 2:  Connections for Conducting Solenoid Hold-In Test
Make tests in less than 10 seconds to avoid solenoid damage.

         2) If pinion remains out (plunger is pulled-in), hold-in
coil is good. If not, replace magnetic switch.

         Return Test


Content   ..  11  12  13  14   ..