Mazda Protege 5. Manual - part 347


  Index      Mazda     Mazda Protege 5 - service repair manual 2002 year


Search            


Content   ..  345  346  347  348   ..


Mazda Protege 5. Manual - part 347


WIPER/WASHER SYSTEM 

09–19–14

REAR WASHER MOTOR REMOVAL/INSTALLATION

A3U091976672W01

1. Disconnect the negative battery cable.
2. Partially peel off the right side mud guard.
3. Remove the washer tank. (See 09–19–7 WASHER TANK REMOVAL/INSTALLATION.)
4. Remove in the order indicated in the table.

5. Install in the reverse order of removal.

End Of Sie

REAR WASHER MOTOR INSPECTION

A3U091976672W02

1. Remove the washer tank. (See 09–19–7 WASHER TANK REMOVAL/INSTALLATION.)
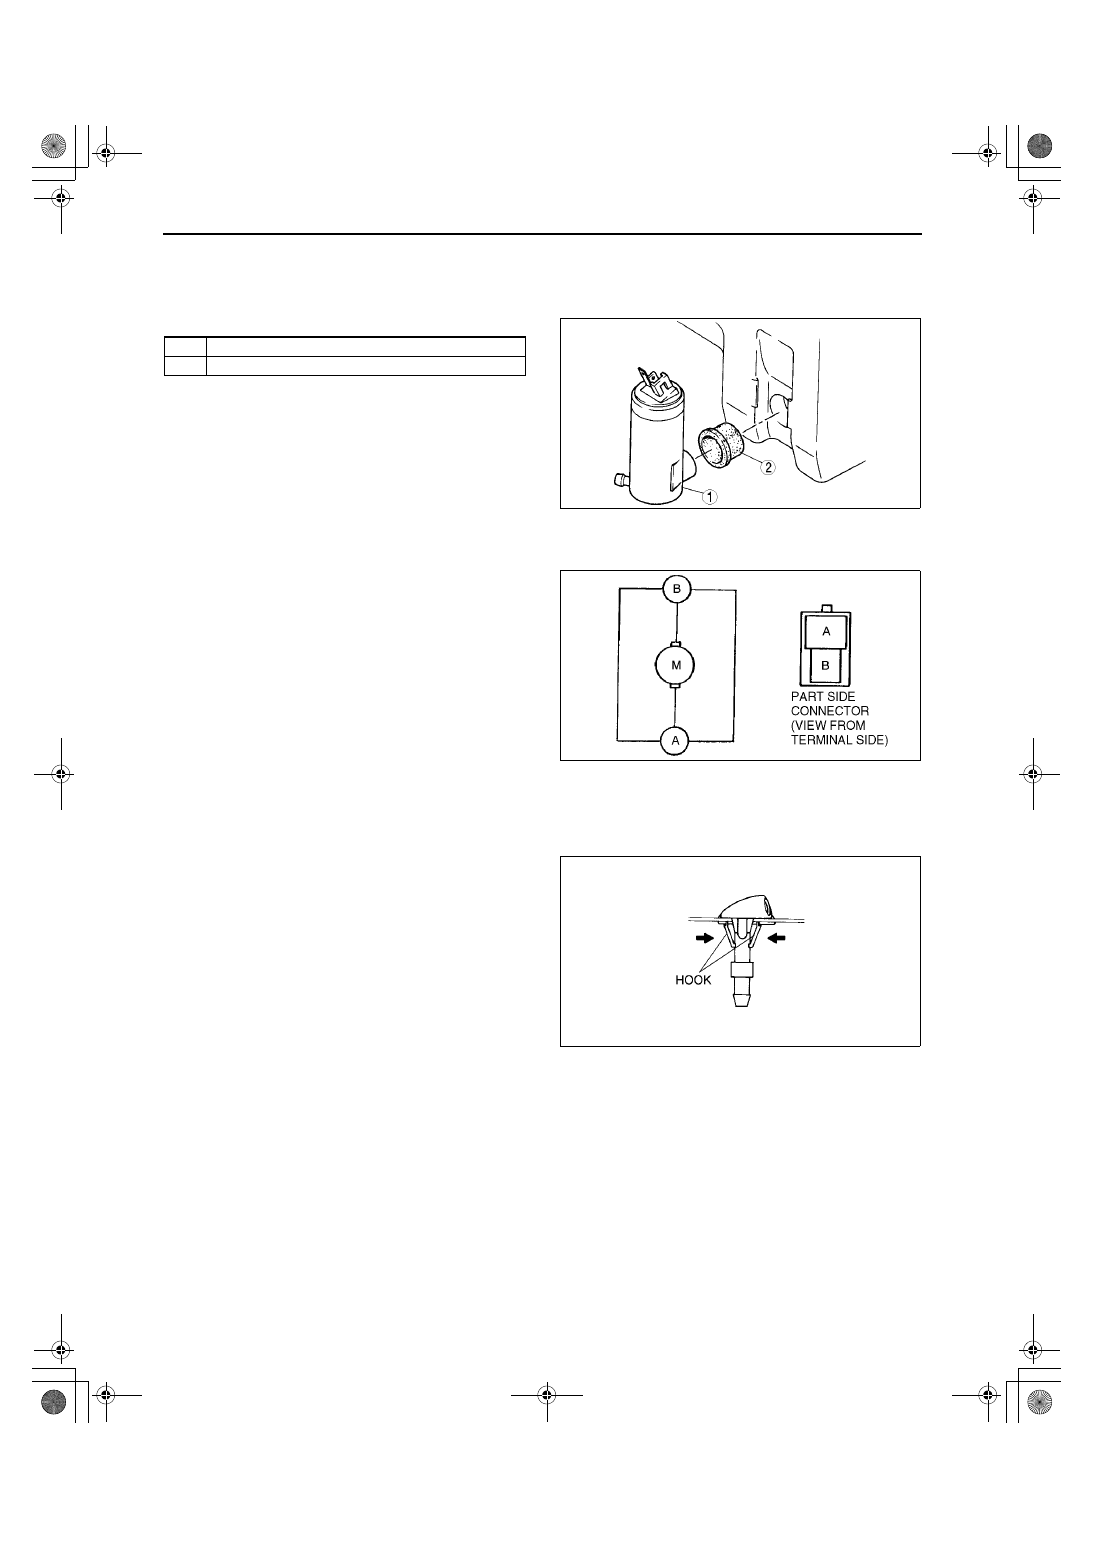
2. Connect battery positive voltage to the terminal B 

and ground to the terminal A of the motor.

3. Verify that the rear washer motor operates.

If the motor does not operate, replace the rear 
washer motor.

End Of Sie

REAR WASHER NOZZLE REMOVAL/INSTALLATION

A3U091967511W01

1. Disconnect the negative battery cable.
2. Remove the rear spoiler. (See 09–16–8 REAR SPOILER REMOVAL/INSTALLATION.)
3. Remove the rear washer hose from the rear washer nozzle.
4. Compress the hooks of the rear washer nozzle.
5. Pull the rear washer nozzle out to remove it.
6. Install in the reverse order of removal.
7. Adjust the rear washer nozzle. (See 09–19–15 

REAR WASHER NOZZLE ADJUSTMENT.)

End Of Sie

1

Rear washer motor

2

Grommet

YMU919WAT

A3U0919W103

A3U0919W011

1712-1U-01G(09-19).fm  14 ページ  2001年6月29日 金曜日 午前10時37分

WIPER/WASHER SYSTEM 

09–19–15

09–19

REAR WASHER NOZZLE ADJUSTMENT

A3U091967511W02

1. Insert a needle or equivalent tool into the spray 

hole of the rear washer nozzle and adjust the 
nozzle direction as shown.

End Of Sie

REAR WASHER NOZZLE CLEANING

A3U091967511W03

1. Clean the rear washer nozzle. (See 09–19–11 WINDSHIELD WASHER NOZZLE CLEANING.)

End Of Sie

REAR WASHER HOSE REMOVAL/INSTALLATION

A3U091967470W01

1. Disconnect the negative battery cable.
2. Remove the headliner. (See 09–17–16 HEADLINER REMOVAL/INSTALLATION.)
3. Remove the rear washer hose from the clips.
4. Partially peel off the right side mud guard and 

remove the rear washer hose from the clip.

5. Remove the rear washer hose from the washer 

tank.

6. Install in the reverse order of removal.

End Of Sie

A3U0919W110

A3U0919W104

A3U0919W105

1712-1U-01G(09-19).fm  15 ページ  2001年6月29日 金曜日 午前10時37分

WIPER/WASHER SYSTEM 

09–19–16

INTERMITTENT REAR WIPER RELAY REMOVAL/INSTALLATION

A3U091966810W01

1. Disconnect the negative battery cable.
2. Remove the left side trunk side trim. (See 09–17–15 TRUNK SIDE TRIM REMOVAL/INSTALLATION.)
3. Remove in the order indicated in the table.

4. Install in the reverse order of removal.

End Of Sie

INTERMITTENT REAR WIPER RELAY INSPECTION

A3U091966810W02

1. Measure the voltage at the intermittent rear wiper relay terminals as indicated below.
2. Disconnect the intermittent rear wiper relay connector before inspecting for continuity at the terminal H.

If not as specified, inspect the parts listed under “Action”.

If the parts and wiring harnesses are okay but the system still does not work properly, replace the 
intermittent rear wiper relay.

Terminal Voltage Table (Reference)

End Of Sie

1

Nut

2

Connector

3

Intermittent rear wiper relay

A3U0919W111

Terminal

Signal

Connected to

Test condition

Voltage (V)/

Continuity

Action

A

B

IG2

R. WIP 10 A fuse

Ignition switch at ON position

B+

Inspect  R. WIP 10 A fuse

Inspect related harness

Other

Below 1.0

C

D

F

Rear wiper 
switch INT

Rear wiper switch

Ignition switch at 
ON position

Rear wiper 
switch at INT 
position

Below 1.0

Inspect  R. WIP 10 A fuse 

Inspect wiper and washer 
switch
(See 09–19–9 WIPER 
AND WASHER SWITCH 
INSPECTION)

Inspect related harness

Rear wiper 
switch at OFF 
position

B+

H

GND

GND

Under any condition: inspect for 
continuity to ground

Yes

Inspect GND

I

J

Autostop

Rear wiper motor

Ignition switch at 
ON position

Rear wiper is 
operating (INT 
position)

Alternates 

below 1.0 

and B+

Inspect  R. WIP 10 A fuse

Inspect wiper and washer 
switch
(See 09–19–9 WIPER 
AND WASHER SWITCH 
INSPECTION)

Inspect rear wiper motor
(See 09–19–13 REAR 
WIPER MOTOR 
INSPECTION)

Inspect related harness

Other

B+

A3U0919W106

1712-1U-01G(09-19).fm  16 ページ  2001年6月29日 金曜日 午前10時37分

ENTERTAINMENT 

09–20–1

09–20

09–20

ENTERTAINMENT

LOCATION INDEX  . . . . . . . . . . . . . . . . .  09–20–1
PILLAR ANTENNA REMOVAL. . . . . . . .  09–20–2
PILLAR ANTENNA INSTALLATION  . . .  09–20–2
PILLAR ANTENNA INSPECTION. . . . . .  09–20–2
REAR CENTER ROOF ANTENNA 

REMOVAL/INSTALLATION . . . . . . . . .  09–20–3

REAR CENTER ROOF ANTENNA 

INSPECTION . . . . . . . . . . . . . . . . . . . . .  09–20–3

FRONT DOOR SPEAKER 

REMOVAL/INSTALLATION . . . . . . . . .  09–20–3

REAR DOOR SPEAKER 

REMOVAL/INSTALLATION . . . . . . . . .  09–20–3

DOOR SPEAKER INSPECTION . . . . . . .  09–20–4
REAR PACKAGE SPEAKER 

REMOVAL/INSTALLATION . . . . . . . . .  09–20–4

REAR PACKAGE SPEAKER 

INSPECTION . . . . . . . . . . . . . . . . . . . . .  09–20–4

FRONT ANTENNA FEEDER 

REMOVAL/INSTALLATION . . . . . . . . .  09–20–5

FRONT ANTENNA FEEDER 

INSPECTION . . . . . . . . . . . . . . . . . . . . .  09–20–5

REAR ANTENNA FEEDER 

REMOVAL/INSTALLATION . . . . . . . . . . 09–20–5

REAR ANTENNA FEEDER 

INSPECTION  . . . . . . . . . . . . . . . . . . . . . 09–20–6

AUDIO UNIT REMOVAL  . . . . . . . . . . . . . 09–20–6
AUDIO UNIT INSTALLATION  . . . . . . . . . 09–20–6
UPPER MODULE 

REMOVAL/INSTALLATION . . . . . . . . . . 09–20–7

Upper Module Removal Note  . . . . . . . . 09–20–7
Cover Removal Note . . . . . . . . . . . . . . . 09–20–7
Screw Installation Note . . . . . . . . . . . . . 09–20–7

LOWER MODULE 

REMOVAL/INSTALLATION . . . . . . . . . . 09–20–8

Cover Removal Note . . . . . . . . . . . . . . . 09–20–8
Screw Installation Note . . . . . . . . . . . . . 09–20–8

CIGARETTE LIGHTER 

REMOVAL/INSTALLATION . . . . . . . . . . 09–20–8

Socket Removal Note . . . . . . . . . . . . . . 09–20–9
Ring Removal Note . . . . . . . . . . . . . . . . 09–20–9

CIGARETTE LIGHTER INSPECTION . . . 09–20–9

End of Toc

LOCATION INDEX

.

A3U0920W102

1

Pillar antenna
(See 09–20–2 PILLAR ANTENNA REMOVAL)
(See 09–20–2 PILLAR ANTENNA INSTALLATION)
(See 09–20–2 PILLAR ANTENNA INSPECTION)

2

Rear center roof antenna
(See 09–20–3 REAR CENTER ROOF ANTENNA 
REMOVAL/INSTALLATION)
(See 09–20–3 REAR CENTER ROOF ANTENNA 
INSPECTION)

3

Front door speaker
(See 09–20–3 FRONT DOOR SPEAKER 
REMOVAL/INSTALLATION)
(See 09–20–4 DOOR SPEAKER INSPECTION)

4

Rear package speaker
(See 09–20–4 REAR PACKAGE SPEAKER 
REMOVAL/INSTALLATION)
(See 09–20–4 REAR PACKAGE SPEAKER 
INSPECTION)

5

Rear door speaker
(See 09–20–3 REAR DOOR SPEAKER REMOVAL/
INSTALLATION)
(See 09–20–4 DOOR SPEAKER INSPECTION)

6

Front antenna feeder
(See 09–20–5 FRONT ANTENNA FEEDER 
REMOVAL/INSTALLATION)
(See 09–20–5 FRONT ANTENNA FEEDER 
INSPECTION)

7

Rear antenna feeder
(See 09–20–5 REAR ANTENNA FEEDER 
REMOVAL/INSTALLATION)
(See 09–20–6 REAR ANTENNA FEEDER 
INSPECTION)

8

Audio unit
(See 09–20–6 AUDIO UNIT REMOVAL)
(See 09–20–6 AUDIO UNIT INSTALLATION)

1712-1U-01G(09-20).fm  1 ページ  2001年6月29日 金曜日 午前10時37分


Content   ..  345  346  347  348   ..