Mazda Protege 5. Manual - part 330


  Index      Mazda     Mazda Protege 5 - service repair manual 2002 year


Search            


Content   ..  328  329  330  331   ..


Mazda Protege 5. Manual - part 330


SUNROOF 

09–15–17

09–15

5HB

1. Remove the headliner. (See 09–17–16 HEADLINER REMOVAL/INSTALLATION.)
2. Connect the sunroof switch connector.
3. Connect the negative battery cable.
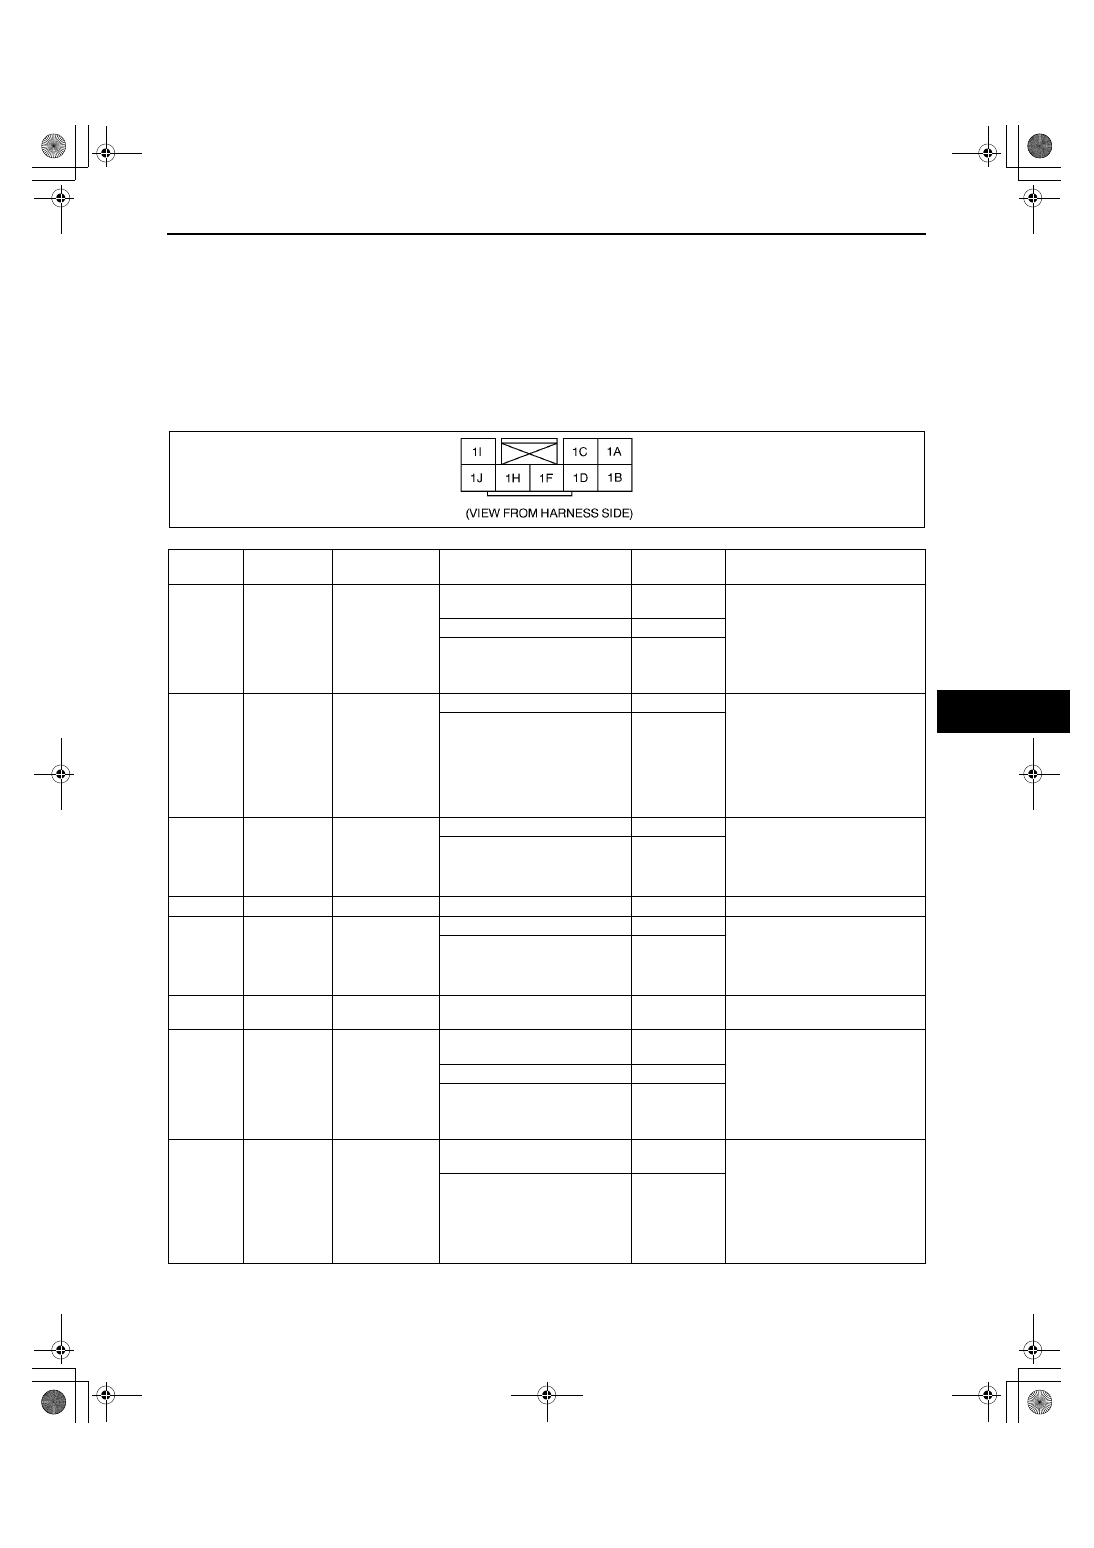
4. Measure the voltage at the sunroof relay terminals as indicated below.
5. Disconnect the sunroof relay connector before inspecting for continuity at terminal H.

If not as specified, inspect the parts listed under “Action” and the related wiring harnesses.

If the parts and wiring harnesses are okay but the system still does not work properly, replace the sunroof 
relay.

Terminal voltage list (Reference)

End Of Sie

Terminal

Signal

Connected to

Test condition

Voltage (V)/

Continuity

Action

1A

Slide close/
tilt up

Sunroof motor

Sunroof is opening/tilting 
down.

0

Inspect sunroof switch
(See 09–15–18 SUNROOF 
SWITCH INSPECTION)

Inspect sunroof motor
(See 09–15–12 SUNROOF 
MOTOR INSPECTION)

Inspect related harness

Sunroof is closing/tilting up.

B+

Other

0

1B

Slide close/
tilt up

Sunroof motor 
(Limit switch)

Sunroof is closing/tilting up.

0

Inspect sunroof switch
(See 09–15–18 SUNROOF 
SWITCH INSPECTION)

Inspect sunroof motor (Limit 
switch)
(See 09–15–12 SUNROOF 
MOTOR INSPECTION)

Inspect related harness

Other

B+

1C

IG2

Sunroof switch

IG SW is at ON position.

B+

Inspect A/C 15 A fuse

Inspect sunroof switch
(See 09–15–18 SUNROOF 
SWITCH INSPECTION)

Inspect related harness

Other

0

1D

-

Not used

-

-

-

1F

IG2

Sunroof switch

IG SW is at ON position.

B+

Inspect A/C 15 A fuse

Inspect sunroof switch
(See 09–15–18 SUNROOF 
SWITCH INSPECTION)

Inspect related harness

Other

0

1H

Sunroof relay 
ground

GND

Under any condition: inspect 
for continuity to ground.

Yes

Inspect related harness

1I

Slide open/
tilt down

Sunroof motor

Sunroof is opening/tilting 
down.

B+

Inspect sunroof switch
(See 09–15–18 SUNROOF 
SWITCH INSPECTION)

Inspect sunroof motor
(See 09–15–12 SUNROOF 
MOTOR INSPECTION)

Inspect related harness

Sunroof is closing/tilting up.

0

Other

0

1J

Slide open/
tilt down

Sunroof motor 
(Limit switch)

Sunroof is opening/tilting 
down.

0

Inspect sunroof switch
(See 09–15–18 SUNROOF 
SWITCH INSPECTION)

Inspect sunroof motor (Limit 
switch)
(See 09–15–12 SUNROOF 
MOTOR INSPECTION)

Inspect related harness

Other

B+

A3U0915W021

1712-1U-01G(09-15).fm  17 ページ  2001年6月29日 金曜日 午前10時33分

SUNROOF 

09–15–18

SUNROOF SWITCH REMOVAL/INSTALLATION

A3U091566560W01

Note

The sunroof switch is together with the spot light.

1. Disconnect the negative battery cable.
2. Remove the spot light from the headliner. (See 09–18–21 MAP LIGHT REMOVAL/INSTALLATION.)
3. Install in the reverse order of removal.

End Of Sie

SUNROOF SWITCH INSPECTION

A3U091566560W02

1. Remove the sunroof switch. (See 09–18–21 MAP LIGHT REMOVAL/INSTALLATION.)
2. Inspect for continuity between the sunroof switch 

terminals using an ohmmeter.

If not as specified, replace the sunroof switch.

End Of Sie

Z3U0915W001

X3U915WAU

1712-1U-01G(09-15).fm  18 ページ  2001年6月29日 金曜日 午前10時33分

EXTERIOR TRIM 

09–16–1

09–16

09–16

EXTERIOR TRIM

COWL GRILLE 

REMOVAL/INSTALLATION . . . . . . . . .  09–16–1

EXTRACTOR CHAMBER 

REMOVAL/INSTALLATION . . . . . . . . .  09–16–1

4SD  . . . . . . . . . . . . . . . . . . . . . . . . . . .  09–16–1
5HB  . . . . . . . . . . . . . . . . . . . . . . . . . . .  09–16–2

FRONT FLAP 

REMOVAL/INSTALLATION . . . . . . . . .  09–16–2

REAR FLAP 

REMOVAL/INSTALLATION . . . . . . . . .  09–16–2

RADIATOR 

GRILLE REMOVAL/INSTALLATION . .  09–16–2

REAR FINISHER 

REMOVAL/INSTALLATION . . . . . . . . .  09–16–3

LIFTGATE GARNISH 

REMOVAL/INSTALLATION . . . . . . . . .  09–16–3

SIDE PROTECTOR REMOVAL  . . . . . . .  09–16–3
SIDE PROTECTOR INSTALLATION . . .  09–16–4
SIDE STEP MOLDING 

REMOVAL/INSTALLATION . . . . . . . . .  09–16–4

ROOF RACK 

REMOVAL/INSTALLATION . . . . . . . . .  09–16–4

ROOF RACK 

DISASSEMBLY/ASSEMBLY . . . . . . . . . 09–16–5

ROOF CARRIER 

REMOVAL/INSTALLATION . . . . . . . . . . 09–16–5

Front . . . . . . . . . . . . . . . . . . . . . . . . . . . 09–16–5
Rear  . . . . . . . . . . . . . . . . . . . . . . . . . . . 09–16–6

FRONT BELTLINE MOLDING 

REMOVAL/INSTALLATION . . . . . . . . . . 09–16–7

REAR BELTLINE MOLDING 

REMOVAL/INSTALLATION . . . . . . . . . . 09–16–7

REAR WINDOW GLASS 

MOLDING REMOVAL  . . . . . . . . . . . . . . 09–16–7

EAR WINDOW GLASS 

MOLDING INSTALLATION  . . . . . . . . . . 09–16–7

WINDSHIELD MOLDING REMOVAL. . . . 09–16–8
WINDSHIELD MOLDING 

INSTALLATION  . . . . . . . . . . . . . . . . . . . 09–16–8

ROOF MOLDING 

REMOVAL/INSTALLATION . . . . . . . . . . 09–16–8

REAR SPOILER 

REMOVAL/INSTALLATION . . . . . . . . . . 09–16–8

4SD . . . . . . . . . . . . . . . . . . . . . . . . . . . . 09–16–8
5HB . . . . . . . . . . . . . . . . . . . . . . . . . . . . 09–16–9

End of Toc

COWL GRILLE REMOVAL/INSTALLATION

A3U091650790W01

1. Remove the windshield wiper arm and blade. (See 09–19–5 WINDSHIELD WIPER ARM AND BLADE 

REMOVAL/INSTALLATION.)

2. Remove the weatherstrip.
3. Disengage the clips of the cowl grille using a 

fastener remover, then remove the cowl grille.

4. Install in the reverse order of removal.

End Of Sie

EXTRACTOR CHAMBER REMOVAL/INSTALLATION

A3U091651920W01

4SD

1. Remove the rear bumper.
2. Remove the passenger-side trunk side trim.
3. Remove the screw.
4. Squeeze the clips with your fingers and remove 

the extractor chamber from the vehicle side.

5. Install in the reverse order of removal.

X3U916WA0

X3U916WA1

1712-1U-01G(09-16).fm  1 ページ  2001年6月29日 金曜日 午前10時34分

EXTERIOR TRIM 

09–16–2

5HB

1. Remove the rear bumper.
2. Squeeze the clips with your fingers and remove 

the extractor chamber from the vehicle side.

3. Install in the reverse order of removal.

End Of Sie

FRONT FLAP REMOVAL/INSTALLATION

A3U091651840W01

1. Remove the bolts and fasteners.
2. Remove the front flap.
3. Install in the reverse order of removal.

End Of Sie

REAR FLAP REMOVAL/INSTALLATION

A3U091651940W01

1. Remove the bolts.
2. Remove the rear flap.
3. Install in the reverse order of removal.

End Of Sie

RADIATOR GRILLE REMOVAL/INSTALLATION

A3U091650710W01

1. Remove the front bumper. (See 09–10–5 FRONT BUMPER REMOVAL/INSTALLATION.)
2. Pull the radiator grille forward to disengage clips 

A and tabs B from the front bumper.

3. Install in the reverse order of removal.

End Of Sie

A3U0916W001

X3U916WA2

X3U916WA3

Y3E7728W001

1712-1U-01G(09-16).fm  2 ページ  2001年6月29日 金曜日 午前10時34分


Content   ..  328  329  330  331   ..