Mazda Protege 5. Manual - part 327


  Index      Mazda     Mazda Protege 5 - service repair manual 2002 year


Search            


Content   ..  325  326  327  328   ..


Mazda Protege 5. Manual - part 327


SUNROOF 

09–15–5

09–15

REAR DRAIN HOSE INSTALLATION

A3U091569922W02

Caution

••••

If the rear drain hose is pinched or bent anywhere, the water in the hose may not discharge and 
enter the inside of the vehicle. During and after installation of the trims and the headliner, always 
make sure there is no interference with the rear drain hose. Fix any problem if found.

1. Apply soapy water to the rear drain hose inserting area.
2. Insert one end of the rear drain hose into the sunroof frame.
3. Install the rear drain hose to the clips parallel to the pillar and free of slack.
4. Insert the rear drain hose joint into the rear pillar inner hole.
5. Install the trunk side trim. (See 09–17–15 TRUNK SIDE TRIM REMOVAL/INSTALLATION.)
6. Install the headliner. (See 09–17–16 HEADLINER REMOVAL/INSTALLATION.)

End Of Sie

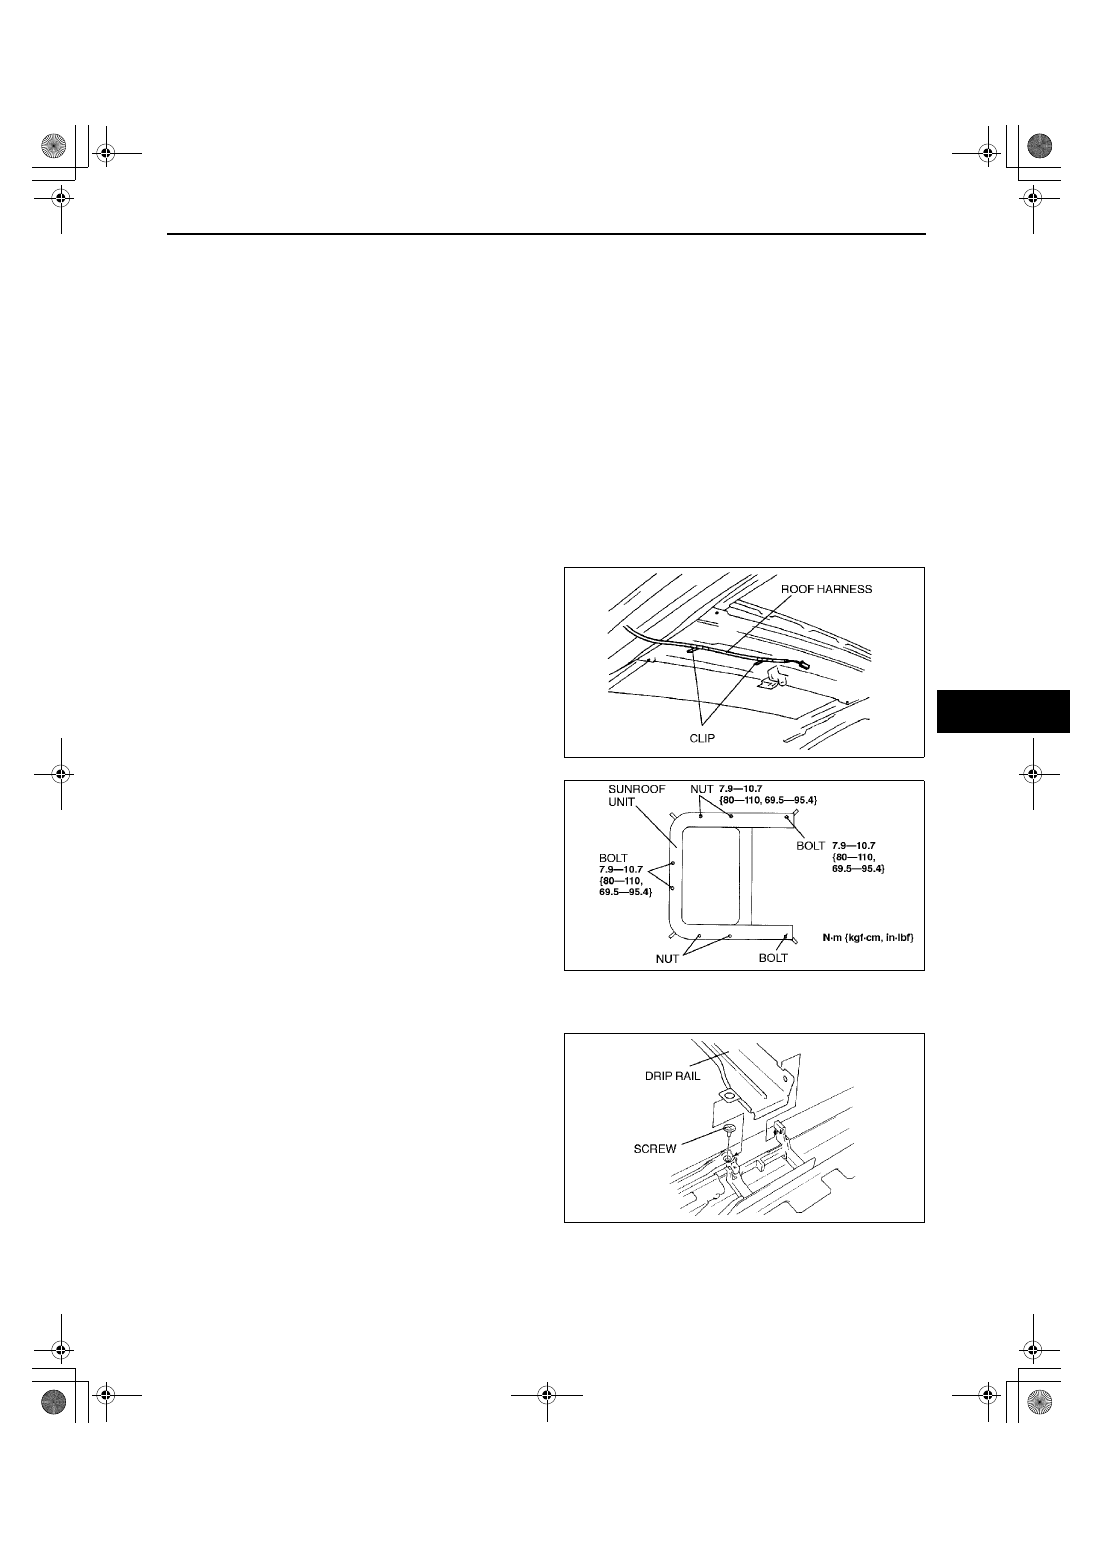
SUNROOF UNIT REMOVAL/INSTALLATION

A3U091569850W01

1. Disconnect the negative battery cable.
2. Remove the headliner. (See 09–17–16 HEADLINER REMOVAL/INSTALLATION.)
3. Remove the glass panel.
4. Disconnect the front and rear drain hoses from the sunroof frame.
5. Remove the roof harness from the sunroof frame.

6. Remove the bolts and nuts, and then remove the 

sunroof unit.

7. Install in the reverse order of removal.
8. Adjust the glass panel. (See 09–15–3 GLASS 

PANEL ADJUSTMENT.)

End Of Sie

SUNROOF UNIT DISASSEMBLY

A3U091569850W02

4SD

1. Remove the screws, and then remove the drip 

rail.

X3U915WAA

X3U915WAB

X3U915WAC

1712-1U-01G(09-15).fm  5 ページ  2001年6月29日 金曜日 午前10時33分

SUNROOF 

09–15–6

2. Remove the sunshade stopper.
3. Slide the sunshade backward, and remove it from 

the sunroof frame.

4. Remove the screws, and then remove the rear 

drip.

5. Slide the drip shoe backward, and remove it from 

the sunroof frame.

6. Remove the sunroof motor.

7. Remove the stopper screw.
8. Slide the guide backward, and remove it from the 

sunroof frame.

9. Remove the deflector.

X3U915WAD

X3U915WAE

X3U915WAF

X3U915WAG

1712-1U-01G(09-15).fm  6 ページ  2001年6月29日 金曜日 午前10時33分

SUNROOF 

09–15–7

09–15

5HB

1. Bend the hook of the decoration link backward to 

remove the drip rail.

2. Remove the sunshade stopper.
3. Slide the sunshade backward, and remove it from 

the sunroof frame.

4. Remove the screw, and then remove the guide 

stopper.

5. Remove the lock washer using a tape-wrapped 

screwdriver.

6. Slide the decoration link backward, and remove it 

from the sunroof frame.

7. Remove the sunroof motor.

A3U0915W003

A3U0915W004

A3U0915W005

A3U0915W006

1712-1U-01G(09-15).fm  7 ページ  2001年6月29日 金曜日 午前10時33分

SUNROOF 

09–15–8

8. Slide the guide backward, and remove it from the 

sunroof frame.

9. Remove the screws.

10. Slide the drive unit forward, and remove it from 

the sunroof frame.

11. Remove the deflector.
12. Remove the sunroof relay.

End Of Sie

SUNROOF UNIT ASSEMBLY

A3U091569850W03

4SD

1. Install the deflector.
2. Slide the guide forward, and install it to the sunroof frame.
3. Install the stopper screw.
4. Move the guide by hand until it is tilted up 

position.

5. Move the link built into the guide by hand until it is 

aligned with mark A and mark B.

6. Install the sunroof motor.

A3U0915W007

A3U0915W008

X3U915WAH

X3U915WAJ

1712-1U-01G(09-15).fm  8 ページ  2001年6月29日 金曜日 午前10時33分


Content   ..  325  326  327  328   ..