Mazda Protege 5. Manual - part 109
SYMPTOM TROUBLESHOOTING [ENGINE CONTROL SYSTEM (FS)]
01–03B–29
01–03B
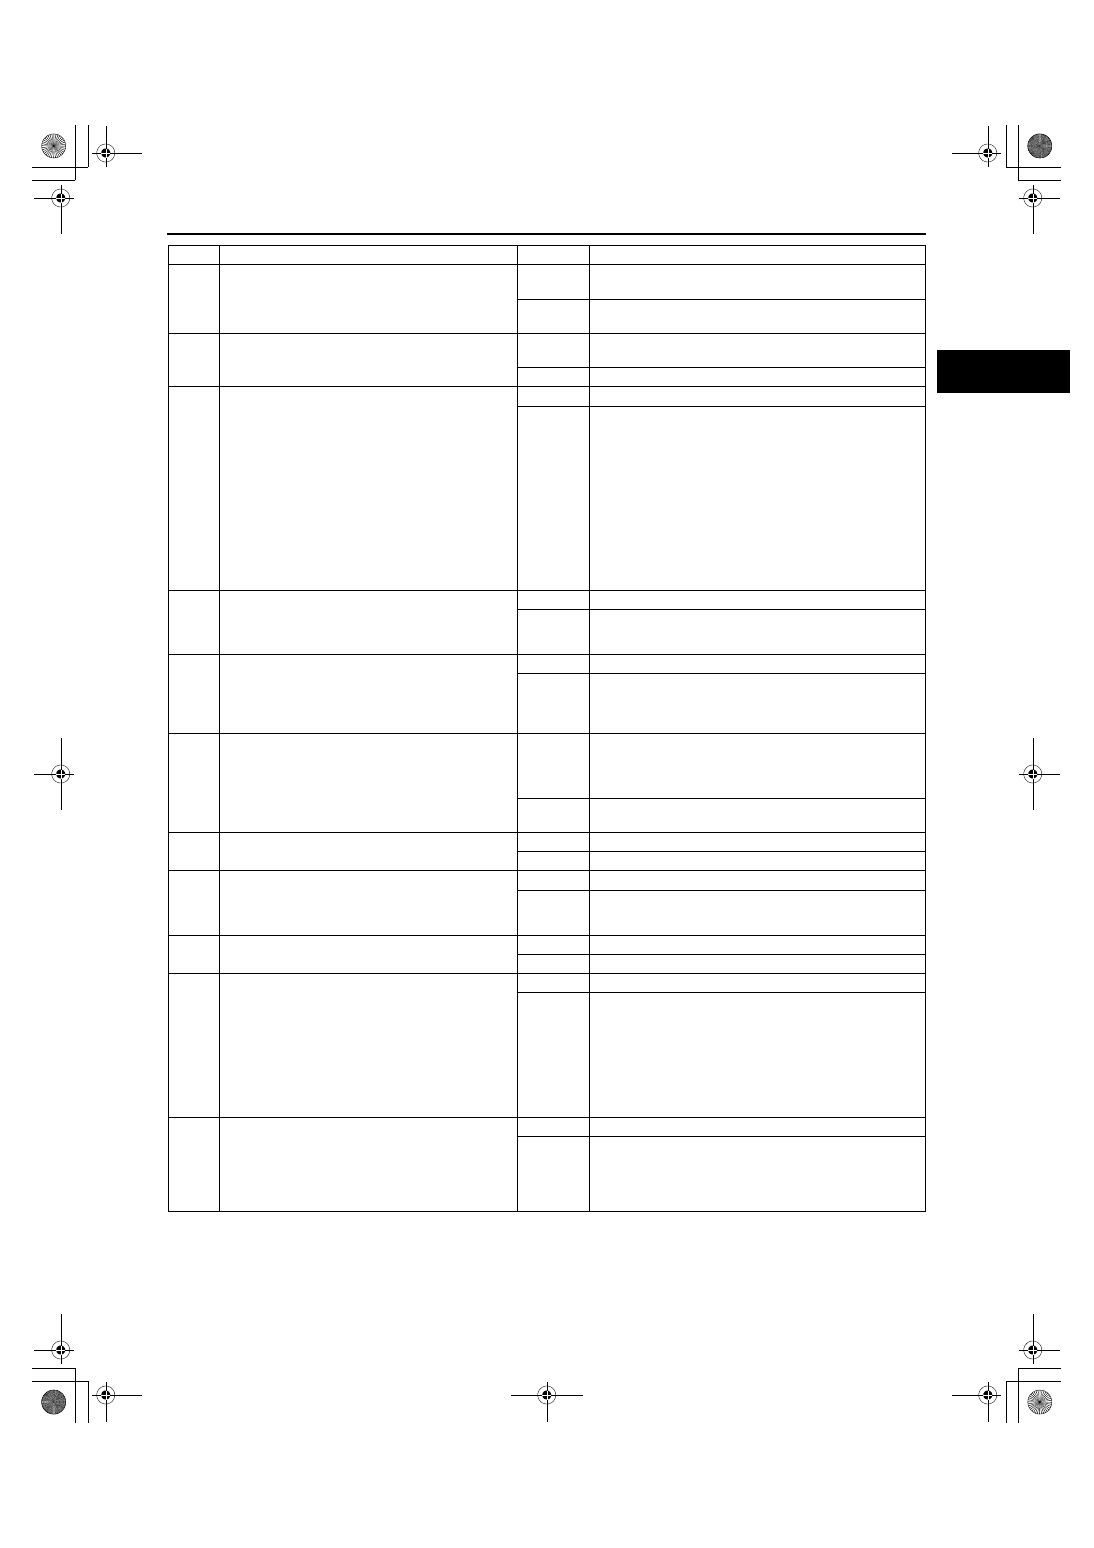
2
•
Connect WDS or equivalent to DLC-2.
•
Turn ignition key to ON.
•
Retrieve any DTC.
•
Is “DTC” displayed?
Yes
No DTC displayed:
•
Go to next step.
No
DTC displayed:
•
Go to appropriate DTC test.
3
•
Is engine overheating?
Yes
Go to symptom troubleshooting “NO.17 COOLING
SYSTEM CONCERNS - OVERHEATING [FS].”
No
Go to next step.
4
•
Connect WDS or equivalent to DLC-2.
•
Access RPM PID, MAF PID, TP PID, and
VSS PID.
•
Drive vehicle with monitoring PIDs.
•
Are PIDs within specification?
Yes
Go to next step.
No
RPM PID:
•
Inspect CKP sensor and related wiring harness:
vibration, intermittent open/short circuit.
MAF PID:
•
Inspect for open circuit of MAF sensor and related
wiring harness intermittently.
TP PID:
•
Inspect if output signal from TP sensor changes
smoothly.
VSS PID:
•
Inspect for open circuit of VSS and related wiring
harness intermittently.
5
•
Visually inspect CKP sensor and teeth of
crankshaft pulley.
•
Are CKP sensor and teeth of crankshaft
pulley okay?
Yes
Go to next step.
No
Replace malfunctioning parts.
6
•
Measure gap between CKP sensor and teeth
of crankshaft pulley.
Gap
0.5—1.5 mm {0.020—0.059 in}
•
Is gap within specification?
Yes
Go to next step.
No
Adjust CKP sensor.
7
•
Inspect condition of spark plugs.
•
Is spark plug wet, covered with carbon or
grayish white?
Yes
Spark plug is wet or covered with carbon:
•
Inspect for fuel leakage from fuel injector.
Spark plug is grayish white:
•
Inspect for clogged fuel injector.
No
Install spark plugs on original cylinders.
Go to next step.
8
•
Remove and shake PCV valve.
•
Does PCV valve rattle?
Yes
Go to next step.
No
Replace PCV valve.
9
•
Verify that throttle lever is resting on throttle
valve stop screw and/or throttle valve orifice
plug.
•
Is lever in correct position?
Yes
Go to next step.
No
Adjust as necessary.
10
•
Are there any restrictions in the exhaust
system?
Yes
Inspect exhaust system.
No
Go to next step.
11
•
Install fuel pressure gauge between fuel filter
and fuel distributor.
•
Connect jumper wire between F/P terminal at
DLC in engine compartment and GND.
•
Turn ignition key to ON.
•
Is fuel line pressure correct with ignition key
at ON?
Fuel line pressure
270—310 kPa {2.7—3.2 kgf/cm
2
, 39—45 psi}
Yes
Go to next step.
No
Zero or low:
•
Inspect fuel pump circuit.
•
Inspect for open fuel pump relief valve.
•
Inspect for fuel leakage inside pressure regulator.
•
Inspect for clogged main fuel line.
High:
•
Inspect pressure regulator for high pressure cause.
•
Inspect for clogged fuel return line.
12
•
Visually inspect for fuel leakage at fuel
injector, O-ring, and fuel line.
•
Service as necessary.
•
Does fuel line pressure hold after ignition key
is turned to LOCK?
(See 01–14–28 Operation Inspection.)
Yes
Go to next step.
No
Inspect pressure regulator diaphragm condition.
If condition is okay, inspect fuel injector.
If condition is not okay, replace pressure regulator.
STEP
INSPECTION
RESULTS
ACTION
1712-1U-01G(01-03B).fm 29 ページ 2001年6月29日 金曜日 午前9時33分