Mazda MX-5 Miata (1997+). Manual - part 41


  Index      Mazda     Mazda MX-5 Miata - service repair manual 1997 year


Search            


Content   ..  39  40  41  42   ..


Mazda MX-5 Miata (1997+). Manual - part 41


Installation (B2300, B2500, B3000 & B4000) 

1. Lightly coat input shaft splines, release bearing, and fork contact areas with molybdenum disulfide 

grease. Align clutch cover dowel holes with flywheel dowels. Tighten clutch cover bolts evenly in a 
crisscross pattern to specification. See TORQUE SPECIFICATIONS .  

2. Raise transmission into position. Install and tighten transmission-to-engine block bolts. See TORQUE 

SPECIFICATIONS . Install crossmember.  

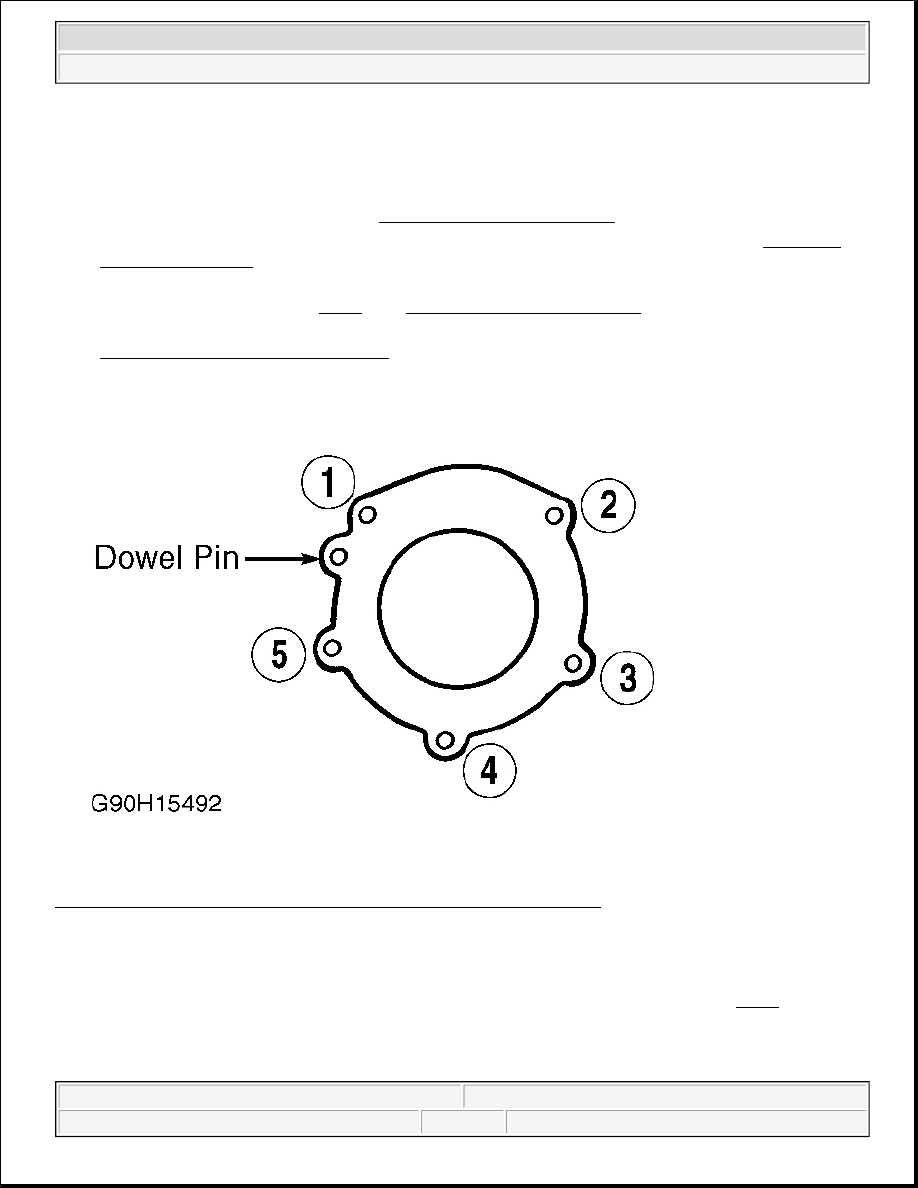
3. On 4WD models, install NEW transfer case gasket. Install transfer case. Tighten transfer case bolts to 

specification is sequence. See Fig. 3 . See TORQUE SPECIFICATIONS .  

4. On all models, to complete installation, reverse removal procedure. Bleed hydraulic clutch system. See 

HYDRAULIC SYSTEM BLEEDING under ADJUSTMENTS.  

Fig. 3: Tightening Transfer Case Bolts (B2300, B2500, B3000 & B4000) 
Courtesy of MAZDA MOTORS CORP. 

Removal (Miata) 

1. Disconnect negative battery cable. Remove gearshift knob, console, and shift lever. See Fig. 4 . Raise and 

support vehicle. Remove engine undercover. Disconnect exhaust pipe from manifold. Mark drive shaft 
flanges for installation reference. Remove drive shaft. 


1997 Mazda MX-5 Miata 

CLUTCH 1997-98 CLUTCHES Mazda - RWD


Fig. 4: Exploded View Of Drive Line (Miata) 
Courtesy of MAZDA MOTORS CORP. 

2. Remove clutch release cylinder. Remove starter. Disconnect speedometer cable from transmission. Note 

locations, and disconnect wiring harness from Power Plant Frame (PPF).  

3. Remove PPF bracket from rear transmission extension housing. Remove PPF-to-differential side bolts. 

Pry out spacer. Remove PPF/differential mounting spacer. See Fig. 5 .  

4. Thread M14 X 1.5 bolt into sleeve. See Fig. 6 . Twist bolt side to side while pulling it downward. Thread 

M6 X 1 bolt into hole in housing block to hold sleeve. Remove long bolt. Remove short bolt. 

5. Remove PPF side bolts. Remove PPF. Remove transmission-to-engine block bolts. Remove transmission. 

Remove clutch cover bolts evenly in crisscross pattern. Remove clutch cover and disc. See Fig. 7 

NOTE:

Do not remove spacers attached to top of Power Plant Frame (PPF). If they 
are removed, replace PPF.


1997 Mazda MX-5 Miata 

CLUTCH 1997-98 CLUTCHES Mazda - RWD


Fig. 5: Installing & Removing Power Plant Frame (Miata) 
Courtesy of MAZDA MOTORS CORP. 


1997 Mazda MX-5 Miata 

CLUTCH 1997-98 CLUTCHES Mazda - RWD


Fig. 6: Removing Reamer Bolt Sleeve (Miata) 
Courtesy of MAZDA MOTORS CORP. 


1997 Mazda MX-5 Miata 

CLUTCH 1997-98 CLUTCHES Mazda - RWD


Content   ..  39  40  41  42   ..