LEXUS LC 500H (2019 year). Instruction - part 6


  Index      Lexus     LEXUS LC 500H - instruction 2019 year in english


Search            


Content   ..  4  5  6  7   ..


LEXUS LC 500H (2019 year). Instruction - part 6


90

2-1. Instrument cluster

roundings are dark, a suggestion mes-
sage will be displayed.

Suggestion to turn off the head-
lights

If the headlights are left on for a certain 
amount of time after the engine switch 
<power switch> has been turned off, a 
suggestion message will be displayed 
asking if you wish to turn the headlights 
off.
When the headlight switch is in the 
“AUTO” position: To turn the headlights 
off, select “Yes”.

If a front door is opened after the engine 
switch <power switch> is turned off, this 
suggestion message will not be displayed.

Suggestion to unlock the power 
windows

If it is attempt to close the passenger’s 
side window using the power window 
switch on the driver’s door, a sugges-
tion message will be displayed.

Customization

The suggestion function can be turned 

on/off. (Customizable features: 

P.391)

*

: If equipped

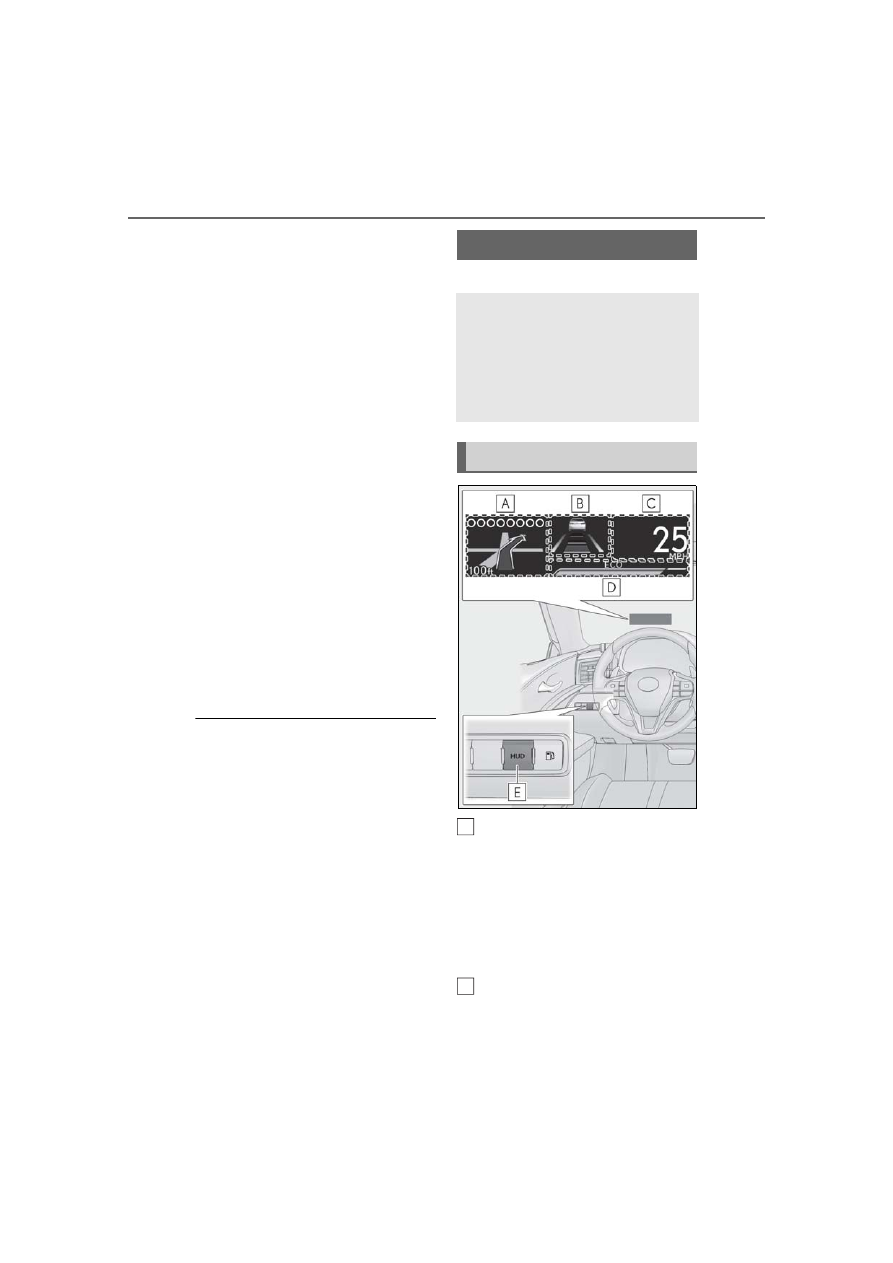
Navigation system-linked display 
area

Displays the following items, which are 
linked to the navigation system:
• Speed  limit
• Street name
• Route guidance to destination
• Compass

Driving assist system status display 
area

Displays the current shift position, and shift 

Head-up display

*

The head-up display is linked to the 
meters and navigation system and 
projects a variety of information in 
front of the driver, such as the cur-
rent vehicle speed and route guid-
ance to a set destination.

System components

A

B

91

2-1. Instrument cluster

2

Vehi

cle

 status 

inform

ati

on a

nd i

ndic
ators

range/gear position, or the operational sta-
tus of the following systems:
• Pre-collision warning (Pre-Collision Sys-

tem) (

P.189)

• Dynamic radar cruise control with full-

speed range (

P.203)

• LKA (Lane-Keeping Assist) (

P.196)

• Intuitive parking assist (

P.214)

Displayed content is the same as that dis-
played on the multi-information display. For 
details, refer to the explanations of each 
system.

Vehicle speed display

Information display area (

P.93)

Displays the following items:
• Warning/message

/


icon  (

P.93)

• Audio system operation status
• Dynamic radar cruise control with full-

speed range status (

P.203)

• Hands-free system status (

P.93)

• Eco Driving Indicator/tachometer 

(

P.94) (LC500)

• Hybrid System Indicator/motor power 

display/tachometer (

P.94) (LC500h)

HUD (Head-up display) switch

Enabling/Disabling the head-up 
display

Pressing the switch turns the head-up 
display on/off.

Changing settings of the head-up 
display

Select 

 on the multi-information dis-

play (

P.84) to change the following 

settings:
 Display brightness/position

Select to adjust the brightness and position 
of the head-up display.

 Eco Driving Indicator/tachometer 

(LC500)

Select to display Eco Driving Indicator, 
tachometer or no content.

 Hybrid System Indicator/motor 

power display/tachometer 
(LC500h)

Select to display Hybrid System Indicator, 
tachometer or no content.
Motor power display can be displayed 
when Hybrid System Indicator is selected 
while the driving mode (

P.213

) is other 

than the Eco drive mode.

 Display content

Select to enable/disable the following 
items:
• Route guidance to destination
• Driving assist system status
• Compass
• Audio system operation status

 Display angle

Using the head-up display

C
D

E

92

2-1. Instrument cluster

Select to adjust the angle of the head-up 
display.

Head-up display

The head-up display may seem dark and 

hard to see when viewed through sun-

glasses, especially polarized sunglasses. 

Adjust the brightness of the head-up dis-

play or remove your sunglasses.

When the head-up display is turned off, it 

will remain off even if the engine switch 

<power switch> is turned to ACCES-

SORY mode or IGNITION ON mode 

<ON mode> after the engine switch 

<power switch> has been turned off.

The startup image will be displayed on 

the head-up display after the engine 

switch <power switch> has been turned to 

IGNITION ON mode <ON mode> while 

the head-up display switch is set to on.

Display brightness

The brightness of the head-up display can 
be adjusted on 

 of the multi-information 

display. Also, it is automatically adjusted 

according to the ambient brightness.

Head-up display automatic position 

adjustment

If the display position is recorded into mem-

ory, the head-up display will be automati-

cally adjusted to the desired position. 

(

P.122)

When the 12-volt battery is discon-

nected

The customize settings of the head-up dis-

play will be reset.

Customization

Settings (e.g. display) can be changed. 

(Customizable features: 

P.391)

WARNING

Before using the head-up display

Check that the position and brightness 

of the head-up display image does not 

interfere with safe driving. Incorrect 

adjustment of the image’s position or 

brightness may obstruct the driver’s 

view and lead to an accident, resulting 

in death or serious injury.

Do not continuously look at the head-

up display while driving as you may fail 

to see pedestrians, objects on the 

road, etc. ahead of the vehicle.

Caution for changing settings of the 

head-up display

As the engine needs to be running 

<hybrid system needs to be operating> 

while changing the settings of the head-

up display, ensure that the vehicle is 

parked in a place with adequate ventila-

tion. In a closed area such as a garage, 

exhaust gases including harmful carbon 

monoxide (CO) may collect and enter 

the vehicle. This may lead to death or a 

serious health hazard.

NOTICE

To prevent damage to components

Do not place any drinks near the head-

up display projector. If the projector 

gets wet, electrical malfunctions may 

result.

Do not place anything on or put stick-

ers onto the head-up display projector. 

Doing so could interrupt head-up dis-

play indications.

93

2-1. Instrument cluster

2

Vehi

cle

 status 

inform

ati

on a

nd i

ndic
ators

Displays the following items in the 
appropriate situation:

Warning/message

Displays the following warning/mes-
sages:
• Master warning message
• Notification message (Dynamic 

radar cruise control with full-speed 
range)

• Other messages

/


icons

Displays the following multi-informa-
tion display linked icons:

: Master warning icon

Displayed when a warning message is dis-
played on the multi-information display. 
(

P.344)

: Information icon

Displayed when a suggestion/advice pop-
up display is displayed on the multi-infor-
mation display. (

P.89)

Hands-free system status

Displayed when the hands-free system 
is operated.

Audio system operation status

Displayed when the audio system is 
operated.

Eco Driving Indicator/tachometer 
(LC500)

Displays either of Eco Driving Indica-
tor or the tachometer.

Hybrid System Indicator/motor 
power display/tachometer 
(LC500h)

Displays either of Hybrid System Indi-
cator or the tachometer.
Motor power display can be displayed 
when Hybrid System Indicator is 
selected while the driving mode 
(

P.213) is other than the Eco drive 

mode.

Displays the following items which are 
linked to the navigation system:

Speed limit

Displays the speed limit on the current 
road.

Street name

When the navigation system is per-
forming route guidance, the name of 
the next street will be displayed on the 
top of the display area.

Route guidance to destination

Displayed when the navigation system 
is performing route guidance. When 
approaching an intersection, an arrow 
will be displayed to indicate the sug-

NOTICE

Do not touch the inside of the head-up 

display projector or thrust sharp edges 

or the like into the projector. 

Doing so could cause mechanical mal-

functions.

When changing the settings of the 

head-up display

To prevent battery discharge, ensure that 

the engine is running while changing the 

settings of the head-up display.

Information display area

Navigation system-linked dis-
play area

94

2-1. Instrument cluster

gested direction of travel.

Compass

Displays the direction of travel.

Street name display

Only street names which are included in the 

map data will be displayed.

Eco Driving Indicator

Eco Driving Indicator Zone Display

Eco driving ratio based on acceler-
ation

Zone of Eco driving

Displayed content is the same as that dis-
played on the multi-information display 
(Eco Driving Indicator). For details, refer to 
P.78.

Tachometer

Displays the engine speed in revolu-
tions per minute.

Hybrid System Indicator

Charge area

Hybrid Eco area

Eco area

Power area

Displayed content is the same as that dis-
played on the meter (Hybrid System Indi-
cator). For details, refer to P.78.

Motor power display

Charge area

Power area

Displayed content is the same as that dis-
played on the meter (Motor power dis-
play). For details, refer to P.79.
Motor power display can be displayed 
when Hybrid System Indicator is selected 

Eco Driving Indicator/tachome-
ter (LC500)

A
B

C

Hybrid System Indicator/motor 
power display/tachometer 
(LC500h)

A
B
C
D

A
B

95

2-1. Instrument cluster

2

Vehi

cle

 status 

inform

ati

on a

nd i

ndic
ators

while the driving mode (

P.213) is other 

than the Eco drive mode.

Tachometer

Displays the engine speed in revolu-
tions per minute.

*

: If equipped

Multi-information display

Center Display

Meter control switches

“MENU” button

Touchpad

Energy monitor

*

/consump-

tion screen

You can view the status of your 
hybrid system (LC500h) and fuel 
consumption information on the 
multi-information display and Cen-
ter Display.
The energy monitor or consump-
tion screen can be displayed on the 
side display.

System components

A
B
C
D

E

96

2-1. Instrument cluster

Center Display

Press the “MENU” button on the Remote Touch, and then select 

 on the menu 

screen.

If the “Trip Information” or “History” screen is displayed, select “Energy”.

Multi-information display

Press 

 or 

 of the meter control switches and select 

, and then press 

 or 

 to select the energy monitor display.

Energy monitor (LC500h)

When the vehicle is powered by the electric motor (traction motor)

Center Display

Multi-information display

When the vehicle is powered by both the gasoline engine and the electric motor (traction 
motor)

Center Display

Multi-information display

97

2-1. Instrument cluster

2

Vehi

cle

 status 

inform

ati

on a

nd i

ndic
ators

These images are examples only, and may vary slightly from actual conditions.

When the vehicle is powered by the gasoline engine

Center Display

Multi-information display

When the vehicle is charging the hybrid battery (traction battery)

Center Display

Multi-information display

When there is no energy flow

Center Display

Multi-information display

98

2-1. Instrument cluster

Hybrid battery (traction battery) 
status

Center Display

Low

High

Multi-information display

Low

High

These images are examples only, and may 
vary slightly from actual conditions.

Press the “MENU” button on the 
Remote Touch, then select 

 on the 

screen, and then select “Trip Informa-
tion” or “History”.

Trip information

If a screen other than “Trip Information” 
is displayed, select “Trip Information”.

Resetting the consumption data

Fuel consumption in the past 15 
minutes

Current fuel consumption

Regenerated energy in the past 15 
minutes (LC500h)

One symbol indicates 50 Wh. Up to 5 
symbols are shown.

Average vehicle speed since the 
engine <hybrid system> was started.

Elapsed time since the engine 
<hybrid system> was started.

Cruising range

Average fuel consumption for the past 15 
minutes is divided by color into past aver-
ages and averages attained since the 
engine switch <power switch> was last 
turned to IGNITION ON mode <ON 
mode>. Use the displayed average fuel 
consumption as a reference.
The image is an example only, and may 
vary slightly from actual conditions.

History

If a screen other than “History” is dis-
played, select “History”.

Consumption

A
B

A
B

A
B

C
D

E

F

G

99

2-1. Instrument cluster

2

Vehi

cle

 status 

inform

ati

on a

nd i

ndic
ators

Best recorded fuel consumption

Latest fuel consumption

Previous fuel consumption record

Resetting the history data

Updating the latest fuel consump-
tion data

The average fuel consumption history is 
divided by color into past averages and the 
average fuel consumption since the last 
updated. Use the displayed average fuel 
consumption as a reference.
The image is an example only, and may 
vary slightly from actual conditions.

Updating the history data

Update the latest fuel consumption by 

selecting “Clip” to measure the current fuel 

consumption again.

Resetting the data

The fuel consumption data can be deleted 

by selecting “Clear”.

Cruising range

Displays the estimated maximum distance 

that can be driven with the quantity of fuel 

remaining.
This distance is computed based on your 

average fuel consumption. 

As a result, the actual distance that can be 

driven may differ from that displayed.

Display the vehicle information on the 
side display (

P.244), and then select 

 or 

 to display the desired 

screen.

Trip information (type A)

Displays the average fuel consumption 
and regenerated energy for the past 10 
minutes in 1 minute intervals 
(LC500h), as well as the cruising 
range.

The image is an example only, and may 
vary slightly from actual conditions.
Use the displayed average fuel consump-
tion as a reference.

Trip information (type B)

Displays the cruising range, latest fuel 
consumption and the amount of time 
elapsed since the engine <hybrid sys-
tem> was started.

A
B
C
D

E

Using the side display

100

2-1. Instrument cluster

The image is an example only, and may 
vary slightly from actual conditions.
Use the displayed average fuel consump-
tion as a reference.

History

Displays the average fuel consumption, 
last average fuel consumption and 
highest fuel consumption.

The image is an example only, and may 
vary slightly from actual conditions.
Use the displayed average fuel consump-
tion as a reference.

Energy monitor (LC500h)

Displays the hybrid system operation 
and energy recovery states.

Displayed content is the same as that dis-
played on the multi-information display. 
(

P.96)

The image is an example only, and may 
vary slightly from actual conditions.

101

3

3

Be

fore
 dri
ving

Before driving

3-1. Key information

Keys .................................................

102

3-2. Opening, closing and locking the 

doors and trunk

Doors...............................................

106

Trunk.................................................

110

Smart access system with push-

button start..................................

113

3-3. Adjusting the seats

Front seats.....................................

120

Driving position memory ........

122

Head restraints............................

125

3-4. Adjusting the steering wheel and 

mirrors

Steering wheel.............................

127

Inside rear view mirror.............

128

Outside rear view mirrors......

129

3-5. Opening and closing the win-

dows

Power windows...........................

132

102

3-1. Key information

3-1.Key information

The following keys are provided with 
the vehicle.

Electronic keys

• Operating the smart access system with 

push-button start (

P.113)

• Operating the wireless remote control 

function

Mechanical keys

Key number plate

Card key (electronic key) (if 
equipped)

Operating the smart entry & start system 
(

P.113)

Card key (if equipped)

The card key is not waterproof.

The mechanical key that is stored inside 

the card key should be used only if a 

problem arises, such as when the card 

key does not operate properly.

If it is difficult to take out the mechanical 

key, push down the release button using a 

pen tip etc. If it is still difficult to pull it out, 

use a coin etc. (

P.104)

To store the mechanical key in the card 

key, insert it while pressing the release 

button.

If the battery cover is not installed and the 

battery falls out or if the battery was 

removed because the key got wet, rein-

stall the battery with the positive terminal 

facing the Lexus emblem.

When riding in an aircraft

When bringing an electronic key onto an 

aircraft, make sure you do not press any 

buttons on the electronic key while inside 

the aircraft cabin. If you are carrying an 

electronic key in your bag etc., ensure that 

the buttons are not likely to be pressed acci-

dentally. Pressing a button may cause the 

electronic key to emit radio waves that 

could interfere with the operation of the air-

craft.

Electronic key battery depletion

The standard battery life is 1 to 2 years. 

(The card key battery life is about a year 

and a half.)

If the battery becomes low, an alarm will 

sound in the cabin when the engine 

<hybrid system> is stopped.

As the electronic key always receives 

Keys

Key types

A

B
C
D

103

3-1. Key information

3

Be

fore
 dri
ving

radio waves, the battery will become 

depleted even if the electronic key is not 

used. The following symptoms indicate 

that the electronic key battery may be 

depleted. Replace the battery when nec-

essary. (

P.318)

• The smart access system with push-but-

ton start or the wireless remote control 

does not operate.

• The detection area becomes smaller.

• The  LED  indicator  on the key surface 

does not turn on.

To avoid serious deterioration, do not 

leave the electronic key within 3 ft. (1 m) 

of the following electrical appliances that 

produce a magnetic field:

• TVs

• Personal computers

• Cellular phones, cordless phones and 

battery chargers

• Recharging cellular phones or cordless 

phones

• Table lamps

• Induction cookers

Replacing the battery

P.318

Confirmation of the registered key 

number

The number of keys already registered to 

the vehicle can be confirmed. Ask your 

Lexus dealer for details.

If “A New Key has been Registered 

Contact Your Dealer for Details” is 

shown on the multi-information display

This message will be displayed each time 

the driver’s door is opened when the doors 

are unlocked from the outside for approxi-

mately 10 days after a new electronic key 

has been registered.

If this message is displayed but you have not 

had a new electronic key registered, ask 

your Lexus dealer to check if an unknown 

electronic key (other than those in your 

possession) has been registered.

NOTICE

To prevent key damage

Do not drop the keys, subject them to 

strong shocks or bend them.

Do not expose the keys to high tem-

peratures for long periods of time.

Do not get the keys wet or wash them 

in an ultrasonic washer etc.

Do not attach metallic or magnetic 

materials to the keys or place the keys 

close to such materials.

Do not disassemble the keys.

Do not attach a sticker or anything else 

to the surface of the electronic key.

Do not place the keys near objects that 

produce magnetic fields, such as TVs, 

audio systems and induction cookers.

Do not place the keys near medical 

electrical equipment such as low-fre-

quency therapy equipment or micro-

wave therapy equipment, and do not 

receive medical attention with the keys 

on your person.

Carrying the electronic key on your 

person

Carry the electronic key 3.9 in. (10 cm) 

or more away from electric appliances 

that are turned on. Radio waves emitted 

from electric appliances within 3.9 in. (10 

cm) of the electronic key may interfere 

with the key, causing the key to not func-

tion properly.

In case of a smart access system with 

push-button start malfunction or 

other key-related problems

P.355

When an electronic key is lost

P.354

Handling the card key (if equipped)

Do not apply excess force when insert-

ing the mechanical key into the card 

key. Doing so may damage the card 

key.

104

3-1. Key information

The electronic keys are equipped with 
the following wireless remote control:

Locks the doors (

P.106)

Unlocks the doors (

P.106)

Opens the windows

*

 (

P.106)

Opens the trunk (

P.111)

Sounds the alarm (

P.104)

*

: This setting must be customized at your 

Lexus dealer.

Theft deterrent panic mode

When 

 is pressed for longer than 

about one second, an alarm will sound 

intermittently and the vehicle lights will flash 

to deter any person from trying to break 

into or damage your vehicle.
To stop the alarm, press any button on the 

electronic key.

To take out the mechanical key, push 
the release button and take the key out.

The mechanical key can only be inserted in 
one direction, as the key only has grooves 
on one side. If the key cannot be inserted in 

NOTICE

If the battery or card key terminals get 

wet, the battery may corrode and the 

card key may stop working.

If the key is dropped into water, or if 

drinking water, etc. is spilled on the key, 

immediately remove the battery cover 

and wipe the battery and terminals. (To 

remove the battery cover, lightly grasp 

and pull it.) If the battery is corroded, 

have your Lexus dealer replace the 

battery.

Do not crush the battery cover or use 

a screwdriver to remove the battery 

cover.

Forcibly removing the battery cover 

may bend or damage the key.

If the battery cover is frequently 

removed, the battery cover may 

become loose.

When installing the battery, make sure 

to check the direction of the battery.

Installing the battery in the wrong 

direction may cause the battery to 

deplete rapidly.

The surface of the card key may be 

damaged, or its coating may peel off in 

the following situations:

• The card key is carried together with 

hard objects, such as coins and keys.

• The card key is scraped with a sharp 

object, such as the tip of a mechanical 

pencil.

• The surface of the card key is wiped 

with thinner or benzene.

Wireless remote control

Using the mechanical key

A
B
C
D

E

105

3-1. Key information

3

Be

fore
 dri
ving

a lock cylinder, turn it over and re-attempt 
to insert it.
After using the mechanical key, store it in 
the electronic key. Carry the mechanical 
key together with the electronic key. If the 
electronic key battery is depleted or the 
entry function does not operate properly, 
you will need the mechanical key. 
(

P.355)

When required to leave the vehicle’s 

key with a parking attendant

Turn the trunk opener main switch off and 

lock the glove box (

P.260) as circum-

stances demand. 

Remove the mechanical key for your own 

use and provide the attendant with the elec-

tronic key only.

If you lose your mechanical keys

P.354

If a wrong key is used

The key cylinder rotates freely, isolated 

from the internal mechanism.


Content   ..  4  5  6  7   ..