Range Rover Body Repair Manual - part 36


  Index      Land Rover     Range Rover - Body Repair Manual 1996 year


Search            


Content   ..  34  35  36  37   ..


Range Rover Body Repair Manual - part 36


CHASSIS AND BODY

69

REPAIR

TAILGATE LATCH

Service repair no - 76.37.17
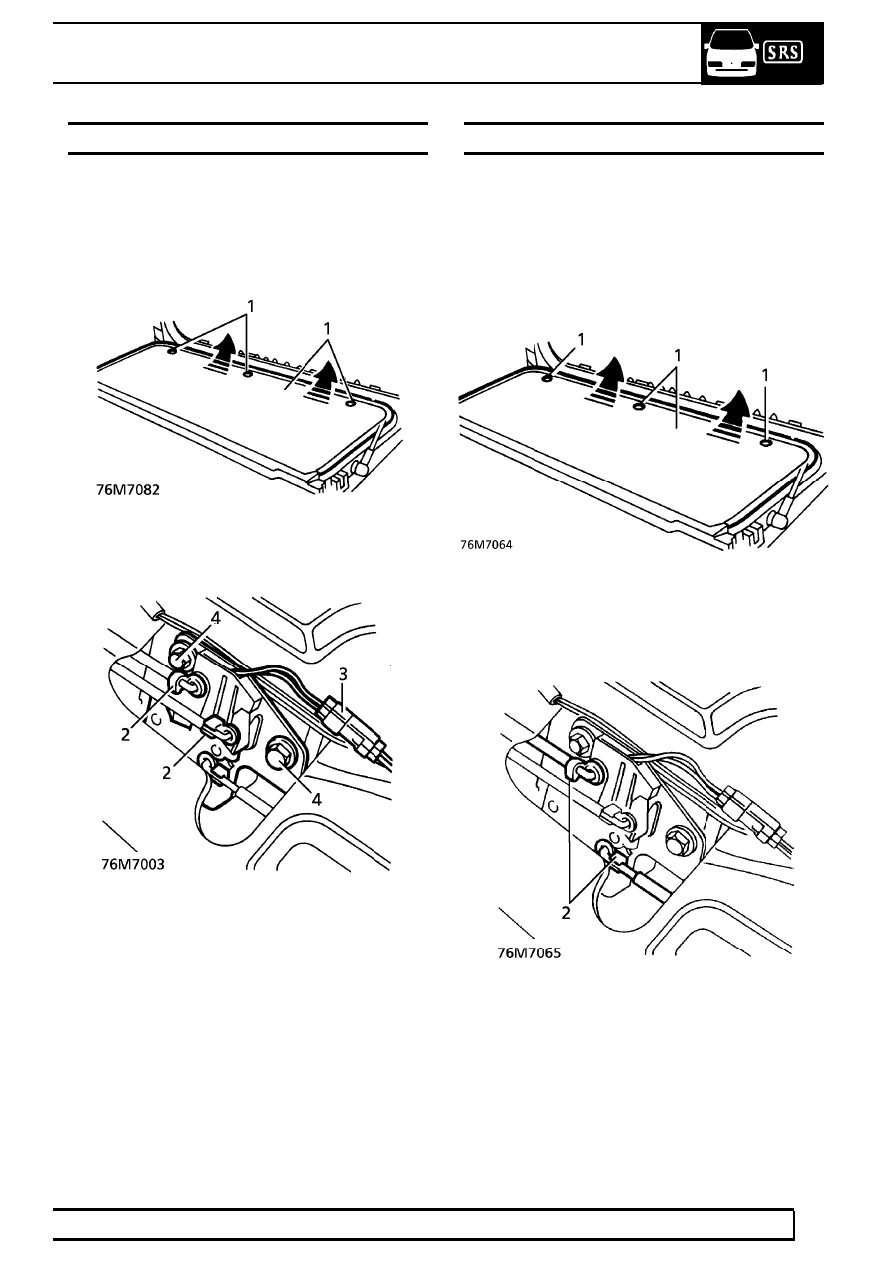
Remove

1. Release studs securing tailgate board. Remove

board.

2. Release clips securing operating rods to tailgate

centre latch. Release rods.

3. Disconnect latch multiplug.
4. Remove 2 bolts securing latch to tailgate.

Remove latch.

Refit

5. Reverse removal procedure.

TAILGATE LATCH - OUTER

Service repair no - 76.37.73

Remove

1. Release studs securing tailgate board. Remove

board.

2. Release clip securing outer latch rod. Disconnect

rod from centre latch.

76

CHASSIS AND BODY

NEW RANGE ROVER

70

REPAIR

3. Remove 2 bolts securing outer latch to tailgate.

Remove latch and rod.

4. Rotate release rod 90˚ to remove from outer

latch.

Refit

5. Reverse removal procedure.

UPPER TAILGATE - INTERIOR TRIM

Service repair no - 76.34.13

Remove

Lower trim assembly

1. Release load space lamp from trim panel,

disconnect 2 Lucar terminals and remove lamp.

2. Remove 6 screws securing trim panel to side

trims and tailgate.

3. Release 4 studs securing trim panel to tailgate.
4. Disconnect high level stop lamp multiplug, if

fitted.

5. Remove lower trim assembly.

Upper trim

6. Remove 6 screws securing trim panel to tailgate.

CHASSIS AND BODY

71

REPAIR

7. Remove trim panel and collect 2 foam pads.

Side trims

8. Release 3 studs securing each side trim.

9. Remove 2 side trims.

Refit

10. Reverse removal procedure.

TAILGATE STRUT

Service repair no - 76.40.33

Remove

1. Secure tailgate in open position using suitable

support.

2. Release clips securing strut to ball joints.

Remove strut.

Refit

3. Reverse removal procedure.

76

CHASSIS AND BODY

NEW RANGE ROVER

72

REPAIR

WHEEL ARCH LINER - FRONT

Service repair no - 76.10.48

Remove

1. Raise the vehicle.

WARNING: Support on safety stands.

2. Remove relevant road wheel.
3. Remove 3 screws securing mud flap. Remove

mud flap.

4. Remove 8 studs securing wheel arch liner.

Refit

5. Position liner and secure with trim studs.
6. Fit mud flap and secure with screws.
7. Refit road wheel. Secure with nuts. Tighten to

108 Nm. (80 lbf.ft)

8. Remove safety stands. Lower vehicle.

WHEEL ARCH LINER - REAR

Service repair no - 76.10.49

Remove

1. Raise the vehicle.

WARNING: Support on safety stands.

2. Remove relevant road wheel.
3. Remove screws from wheel arch liner fixings.

Remove fixings.

4. Remove liner.

Refit

5. Position liner. Fit liner fixings. Secure with

screws.

6. Refit road wheel. Secure with nuts. Tighten to

108 Nm. (80 lbf.ft)

7. Remove safety stands. Lower vehicle.


Content   ..  34  35  36  37   ..