Jeep Compass (2019 year). Instruction - part 24


  Index      Jeep     Jeep Compass - instruction 2019 year in english


Search            


Content   ..  22  23  24  25   ..


Jeep Compass (2019 year). Instruction - part 24


Sealant Bottle Replacement:

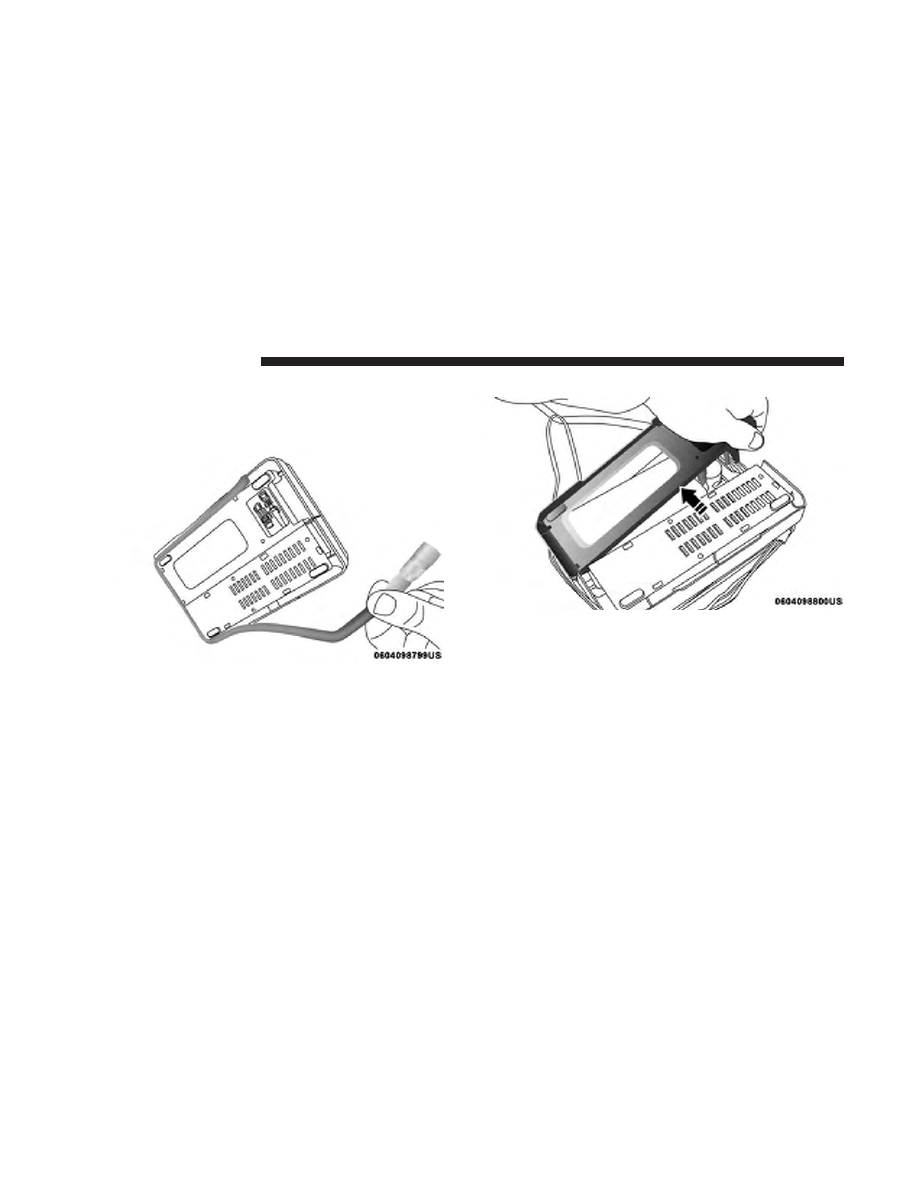
1. Unwrap the power cord.

2. Unwrap the hose.

3. Remove the bottle cover.

Unwrap The Hose

Remove The Bottle Cover

372

IN CASE OF EMERGENCY

4. Rotate the bottle up beyond vertical to release.

5. Pull the bottle away from the Compressor.

NOTE:
• For sealant bottle installation, follow these steps in

reverse order.

• Replacement sealant bottles are available at authorized

service centers.

Rotate The Bottle Up

Remove The Bottle

7

IN CASE OF EMERGENCY

373

JUMP STARTING

If your vehicle has a discharged battery, it can be jump
started using a set of jumper cables and a battery in another
vehicle or by using a portable battery booster pack. Jump
starting can be dangerous if done improperly, so please
follow the procedures in this section carefully.

NOTE:

When using a portable battery booster pack, follow

the manufacturer’s operating instructions and precautions.

WARNING!

Do not attempt jump starting if the battery is frozen. It
could rupture or explode and cause personal injury.

CAUTION!

Do not use a portable battery booster pack or any other
booster source with a system voltage greater than
12 Volts or damage to the battery, starter motor, alter-
nator or electrical system may occur.

Preparations For Jump Start

The battery in your vehicle is located in the front of the
engine compartment, behind the left headlight assembly.

NOTE:

The positive battery post is covered with a protec-

tive cap. Lift up on the cap to gain access to the post.

Positive Battery Post

374

IN CASE OF EMERGENCY

WARNING!

• Take care to avoid the radiator cooling fan whenever

the hood is raised. It can start anytime the ignition
switch is ON. You can be injured by moving fan
blades.

• Remove any metal jewelry such as rings, watch

bands and bracelets that could make an inadvertent
electrical contact. You could be seriously injured.

• Batteries contain sulfuric acid that can burn your

skin or eyes and generate hydrogen gas which is
flammable and explosive. Keep open flames or
sparks away from the battery.

1. Apply the parking brake, shift the automatic transmis-

sion into PARK (manual transmission in NEUTRAL)
and turn the ignition to OFF/LOCK.

2. Turn off the heater, radio, and all unnecessary electrical

accessories.

3. If using another vehicle to jump start the battery, park

the vehicle within the jumper cables reach, set the
parking brake and make sure the ignition is OFF/
LOCK.

WARNING!

Do not allow vehicles to touch each other as this could
establish a ground connection and personal injury
could result.

Jump Starting Procedure

WARNING!

Failure to follow this jump starting procedure could
result in personal injury or property damage due to
battery explosion.

CAUTION!

Failure to follow these procedures could result in
damage to the charging system of the booster vehicle
or the discharged vehicle.

Connecting The Jumper Cables

1. Connect the positive (+) end of the jumper cable to the

positive (+) post of the discharged vehicle.

2. Connect the opposite end of the positive (+) jumper

cable to the positive (+) post of the booster battery.

7

IN CASE OF EMERGENCY

375

3. Connect the negative (-) end of the jumper cable to the

negative (-) post of the booster battery.

4. Connect the opposite end of the negative (-) jumper

cable to a good engine ground (exposed metal part of
the discharged vehicle’s engine) away from the battery
and the fuel injection system.

WARNING!

Do not connect the jumper cable to the negative (-) post
of the discharged battery. The resulting electrical spark
could cause the battery to explode and could result in
personal injury. Only use the specific ground point, do
not use any other exposed metal parts.

5. Start the engine in the vehicle that has the booster

battery, let the engine idle for a few minutes, and then
start the engine in the vehicle with the discharged
battery.

6. Once the engine is started, remove the jumper cables in

the reverse sequence:

Disconnecting The Jumper Cables

1. Disconnect the negative (-) end of the jumper cable from

the engine ground of the vehicle with the discharged
battery.

2. Disconnect the opposite end of the negative (-) jumper

cable from the negative (-) post of the booster battery.

3. Disconnect the positive (+) end of the jumper cable from

the positive (+) post of the booster battery.

Suitable Engine Ground (Example Engine Shown)

376

IN CASE OF EMERGENCY

4. Disconnect the opposite end of the positive (+) jumper

cable from the positive (+) post of the vehicle with the
discharged battery.

If frequent jump starting is required to start your vehicle,
you should have the battery and charging system in-
spected at your authorized dealer.

CAUTION!

Accessories plugged into the vehicle power outlets
draw power from the vehicle’s battery, even when not
in use (i.e., cellular devices, etc.). Eventually, if plugged
in long enough without engine operation, the vehicle’s
battery will discharge sufficiently to degrade battery
life and/or prevent the engine from starting.

REFUELING IN EMERGENCY

The fuel filling procedure in case of emergency is described
in the “Emergency Gas Can Refueling”. Refer to “Refueling
The Vehicle” in “Starting And Operating” for further
information.

IF YOUR ENGINE OVERHEATS

In any of the following situations, you can reduce the
potential for overheating your engine by taking the appro-
priate action.
• On the highways — slow down.
• In city traffic — while stopped, place the transmission in

NEUTRAL, but do not increase engine idle speed.

CAUTION!

Driving with a hot cooling system could damage your
vehicle. If the temperature gauge reads “H,” pull over
and stop the vehicle. Idle the vehicle with the air
conditioner turned off until the pointer drops back
into the normal range. If the pointer remains on the
“H” and you hear continuous chimes, turn the engine
off immediately and call for service.

NOTE:

There are steps that you can take to slow down an

impending overheat condition:
• If your Air Conditioner (A/C) is on, turn it off. The A/C

system adds heat to the engine cooling system and
turning the A/C off can help remove this heat.

7

IN CASE OF EMERGENCY

377

• You can also turn the temperature control to maximum

heat, the mode control to floor and the blower control to
high. This allows the heater core to act as a supplement
to the radiator and aids in removing heat from the
engine cooling system.

WARNING!

You or others can be badly burned by hot engine
coolant (antifreeze) or steam from your radiator. If you
see or hear steam coming from under the hood, do not
open the hood until the radiator has had time to cool.
Never try to open a cooling system pressure cap when
the radiator or coolant bottle is hot.

GEAR SELECTOR OVERRIDE

If a malfunction occurs, and the gear selector cannot be
moved out of the PARK position, you can use the following
procedure to temporarily move the gear selector:

1. Turn the engine OFF.

2. Apply the park brake.

3. Grasp the boot material rearward of the gear selector

and pull up to carefully separate the gear selector bezel
and boot assembly from the center console.

4. Press and maintain firm pressure on the brake pedal.

5. Insert a small screwdriver or similar tool down into the

gear selector override access hole (at the right rear
corner of the gear selector assembly), and push and hold
the override release lever down.

Gear Selector Bezel

378

IN CASE OF EMERGENCY

6. Move the gear selector to the NEUTRAL position.

7. The vehicle may then be started in NEUTRAL.

8. Reinstall the gear selector boot.

FREEING A STUCK VEHICLE

If your vehicle becomes stuck in mud, sand or snow, it can
often be moved using a rocking motion. Turn the steering
wheel right and left to clear the area around the front
wheels. For vehicles with automatic transmission, push
and hold the lock button on the gear selector. Then shift
back and forth between DRIVE and REVERSE (for auto-
matic transmission) or SECOND GEAR and REVERSE (for
manual transmission) while gently pressing the accelerator.

NOTE:

For vehicles with automatic transmission, shifts

between DRIVE and REVERSE can only be achieved at
wheel speeds of 5 mph (8 km/h) or less. Whenever the
transmission remains in NEUTRAL for more than two
seconds, you must press the brake pedal to engage DRIVE
or REVERSE.

Use the least amount of accelerator pedal pressure that will
maintain the rocking motion without spinning the wheels
or racing the engine.

Gear Selector Override Access Hole

7

IN CASE OF EMERGENCY

379

WARNING!

Fast spinning tires can be dangerous. Forces generated
by excessive wheel speeds may cause damage, or even
failure, of the axle and tires. A tire could explode and
injure someone. Do not spin your vehicle’s wheels
faster than 30 mph (48 km/h) or for longer than 30
seconds continuously without stopping when you are
stuck and do not let anyone near a spinning wheel, no
matter what the speed.

NOTE:

Push the “ESC Off” switch (if necessary), to place

the Electronic Stability Control (ESC) system in “Partial
Off” mode, before rocking the vehicle. Refer to “Electronic
Brake Control System” in “Safety” for further information.
Once the vehicle has been freed, push the

⬙ESC Off⬙ switch

again to restore “ESC On” mode.

CAUTION!

• Racing the engine or spinning the wheels may lead

to transmission overheating and failure. Allow the
engine to idle with the transmission in NEUTRAL
for at least one minute after every five rocking-
motion cycles. This will minimize overheating and
reduce the risk of clutch or transmission failure
during prolonged efforts to free a stuck vehicle.

• When “rocking” a stuck vehicle by shifting between

DRIVE/SECOND gear and REVERSE, do not spin
the wheels faster than 15 mph (24 km/h), or drive-
train damage may result.

• Revving the engine or spinning the wheels too fast

may lead to transmission overheating and failure. It
can also damage the tires. Do not spin the wheels
above 30 mph (48 km/h) while in gear (no transmis-
sion shifting occurring).

380

IN CASE OF EMERGENCY

TOWING A DISABLED VEHICLE

This section describes procedures for towing a disabled
vehicle using a commercial towing service.

Towing Condition

Wheels OFF
The Ground

FWD MODELS

4X4 MODELS

Flat Tow

NONE

NOT ALLOWED

NOT ALLOWED

Wheel Lift Or

Dolly Tow

Rear

NOT ALLOWED

NOT ALLOWED

Front

OK

NOT ALLOWED

Flatbed

ALL

BEST METHOD

ONLY METHOD

Proper towing or lifting equipment is required to prevent
damage to your vehicle. Use only tow bars and other
equipment designed for this purpose, following equipment
manufacturer’s instructions. Use of safety chains is man-
datory. Attach a tow bar or other towing devices to main
structural members of the vehicle, not to bumpers or
associated brackets. State and local laws regarding vehicles
under tow must be observed.

NOTE:
• You must ensure that the Auto Park Brake feature is

disabled before towing this vehicle to avoid inadvertent
Electric Park Brake engagement. The Auto Park Brake
feature is enabled or disabled via the customer program-
mable features in the Uconnect Settings.

• Vehicles with a discharged battery, or total electrical

failure when the Electric Park Brake (EPB) is engaged,
will need a wheel dolly or jack to raise the rear wheels
off the ground when moving the vehicle onto a flatbed.

7

IN CASE OF EMERGENCY

381

If you must use the accessories (wipers, defrosters, etc.)
while being towed, the ignition must be in the ON/RUN
mode.

Note that the Safehold feature will engage the Electric Park
Brake whenever the driver’s door is opened (if the battery
is connected, ignition is ON, transmission is not in PARK,
and brake pedal is released). If you are towing this vehicle
with the ignition in the ON/RUN mode, you must manu-
ally disable the Electric Park Brake each time the driver’s
door is opened by pressing the brake pedal and then
releasing the EPB.

If the vehicle’s battery is discharged, refer to “Gear Selector
Override” in this section for instructions on shifting the
automatic transmission out of PARK so that the vehicle can
be moved.

CAUTION!

• Do not use sling-type equipment when towing. Ve-

hicle damage may occur.

• When securing the vehicle to a flatbed truck, do not

attach to front or rear suspension components. Dam-
age to your vehicle may result from improper towing.

• Ensure that the Electric Park Brake is released, and

remains released, while being towed.

• Do not use a bumper mounted clamp-on tow bar on

your vehicle. The bumper face bar will be damaged.

Without The Key Fob

Special care must be taken when the vehicle is towed with
the ignition in the LOCK/OFF mode. The only approved
method of towing without the key fob is with a flatbed
truck. Proper towing equipment is necessary to prevent
damage to the vehicle.

382

IN CASE OF EMERGENCY

Front-Wheel Drive (FWD) Models — With Key Fob

The manufacturer recommends towing your vehicle with
all four wheels OFF the ground using a flatbed.

If flatbed equipment is not available, this vehicle must be
towed with the front wheels OFF the ground (using a
towing dolly, or wheel lift equipment with the front wheels
raised).

Ensure that the Electric Park Brake is released, and remains
released, while being towed. The Electric Park Brake does
not need to be released if all four wheels are off the ground.

CAUTION!

Towing this vehicle in violation of the above require-
ments can cause severe engine and/or transmission
damage. Damage from improper towing is not covered
under the New Vehicle Limited Warranty.

4x4 Models

The manufacturer requires towing with all four wheels
OFF

the ground.

Acceptable methods are to tow the vehicle on a flatbed, or
with one end of the vehicle raised and the opposite end on
a towing dolly.

CAUTION!

• Front or rear wheel lifts must not be used (if the

remaining wheels are on the ground). Internal dam-
age to the transmission or transfer case will occur if
a front or rear wheel lift is used when towing.

• Towing this vehicle in violation of the above require-

ments can cause severe transmission and/or transfer
case damage. Damage from improper towing is not
covered under the New Vehicle Limited Warranty.

• Proper towing or lifting equipment is required to

prevent damage to your vehicle. Use only tow bars
and other equipment designed for this purpose,
following equipment manufacturer’s instructions.

• Use of safety chains in mandatory. Attach a tow bar

or other towing devices to main structural members
of the vehicle, not to bumpers or associated brackets.

7

IN CASE OF EMERGENCY

383

Emergency Tow Hooks — If Equipped

If your vehicle is equipped with tow hooks, there will be
one in the rear and two mounted on the front of the vehicle.
The rear hook will be located on the driver’s side of the
vehicle.

NOTE:

For off-road recovery, it is recommended to use

both of the front tow hooks to minimize the risk of damage
to the vehicle.

Place the ignition in the ON/RUN position, and subse-
quently in OFF/LOCK, without opening the door. During
towing, remember that not having the aid of the power
brakes and the electromechanical power steering will re-
quire greater force when applying the brakes and steering
of the vehicle.

Front Tow Hooks Location

Rear Tow Hook Location

384

IN CASE OF EMERGENCY

WARNING!

• Do not use a chain for freeing a stuck vehicle. Chains

may break, causing serious injury or death.

• Stand clear of vehicles when pulling with tow hooks.

Tow straps may become disengaged, causing serious
injury.

CAUTION!

Tow hooks are for emergency use only, to rescue a
vehicle stranded off road. Do not use tow hooks for
tow truck hookup or highway towing. You could
damage your vehicle.

ENHANCED ACCIDENT RESPONSE SYSTEM
(EARS)

This vehicle is equipped with an Enhanced Accident
Response System.

Please refer to “Occupant Restraint Systems” in “Safety”
for further information on the Enhanced Accident Re-
sponse System (EARS) function.

EVENT DATA RECORDER (EDR)

This vehicle is equipped with an Event Data Recorder
(EDR). The main purpose of an EDR is to record data that
will assist in understanding how a vehicle’s systems per-
formed under certain crash or near crash-like situations,
such as an air bag deployment or hitting a road obstacle.

Please refer to “Occupant Restraint Systems” in “Safety”
for further information on the Event Data Recorder (EDR).

7

IN CASE OF EMERGENCY

385

SERVICING AND MAINTENANCE

CONTENTS

䡵 SCHEDULED SERVICING . . . . . . . . . . . . . . . . .389

▫ Maintenance Plan. . . . . . . . . . . . . . . . . . . . . . .390

䡵 ENGINE COMPARTMENT . . . . . . . . . . . . . . . . .393

▫ 2.4L Engine . . . . . . . . . . . . . . . . . . . . . . . . . . .393
▫ Checking Oil Level . . . . . . . . . . . . . . . . . . . . .394
▫ Adding Washer Fluid . . . . . . . . . . . . . . . . . . .394
▫ Maintenance-Free Battery . . . . . . . . . . . . . . . . .395

䡵 DEALER SERVICE . . . . . . . . . . . . . . . . . . . . . . .396

▫ Engine Oil . . . . . . . . . . . . . . . . . . . . . . . . . . .396
▫ Engine Oil Filter . . . . . . . . . . . . . . . . . . . . . . .397
▫ Engine Air Cleaner Filter . . . . . . . . . . . . . . . . .398
▫ Air Conditioner Maintenance . . . . . . . . . . . . . .398
▫ Body Lubrication . . . . . . . . . . . . . . . . . . . . . .399
▫ Wiper Blades . . . . . . . . . . . . . . . . . . . . . . . . .400

▫ Exhaust System . . . . . . . . . . . . . . . . . . . . . . . .403
▫ Cooling System . . . . . . . . . . . . . . . . . . . . . . . .405
▫ Brake System . . . . . . . . . . . . . . . . . . . . . . . . .409
▫ Manual Transmission — If Equipped . . . . . . . .410
▫ Automatic Transmission — If Equipped . . . . . . .411

䡵 RAISING THE VEHICLE . . . . . . . . . . . . . . . . . .412
䡵 TIRES . . . . . . . . . . . . . . . . . . . . . . . . . . . . . . . .412

▫ Tire Safety Information . . . . . . . . . . . . . . . . . .412
▫ Tires — General Information . . . . . . . . . . . . . .419
▫ Tire Types . . . . . . . . . . . . . . . . . . . . . . . . . . . .425
▫ Spare Tires — If Equipped . . . . . . . . . . . . . . . .427
▫ Tire Chains (Traction Devices) . . . . . . . . . . . . .429
▫ Tire Rotation Recommendations . . . . . . . . . . . .430

8


Content   ..  22  23  24  25   ..