Jeep XJ. Manual - part 448


  Index      Jeep     Jeep XJ - service repair manual 2001 year


Search            


Content   ..  446  447  448  449   ..


Jeep XJ. Manual - part 448


ASSEMBLY

(1) Lubricate and install new O–rings on brake

piston. Then install brake piston in drum.

(2) Install return springs and retainer on brake

piston.

(3) Compress return springs with shop press and

Compressor Tool 7538. Install piston snap ring and
remove brake assembly from press.

(4) Check brake piston operation with low pres-

sure compressed air (Fig. 285). Apply air pressure
through feed hole in drum. Piston should move
smoothly when applying–releasing air pressure.

(5) Coat thrust washer with petroleum jelly and

install it in drum. Be sure washer notches are
aligned with tabs on spring retainer (Fig. 286).

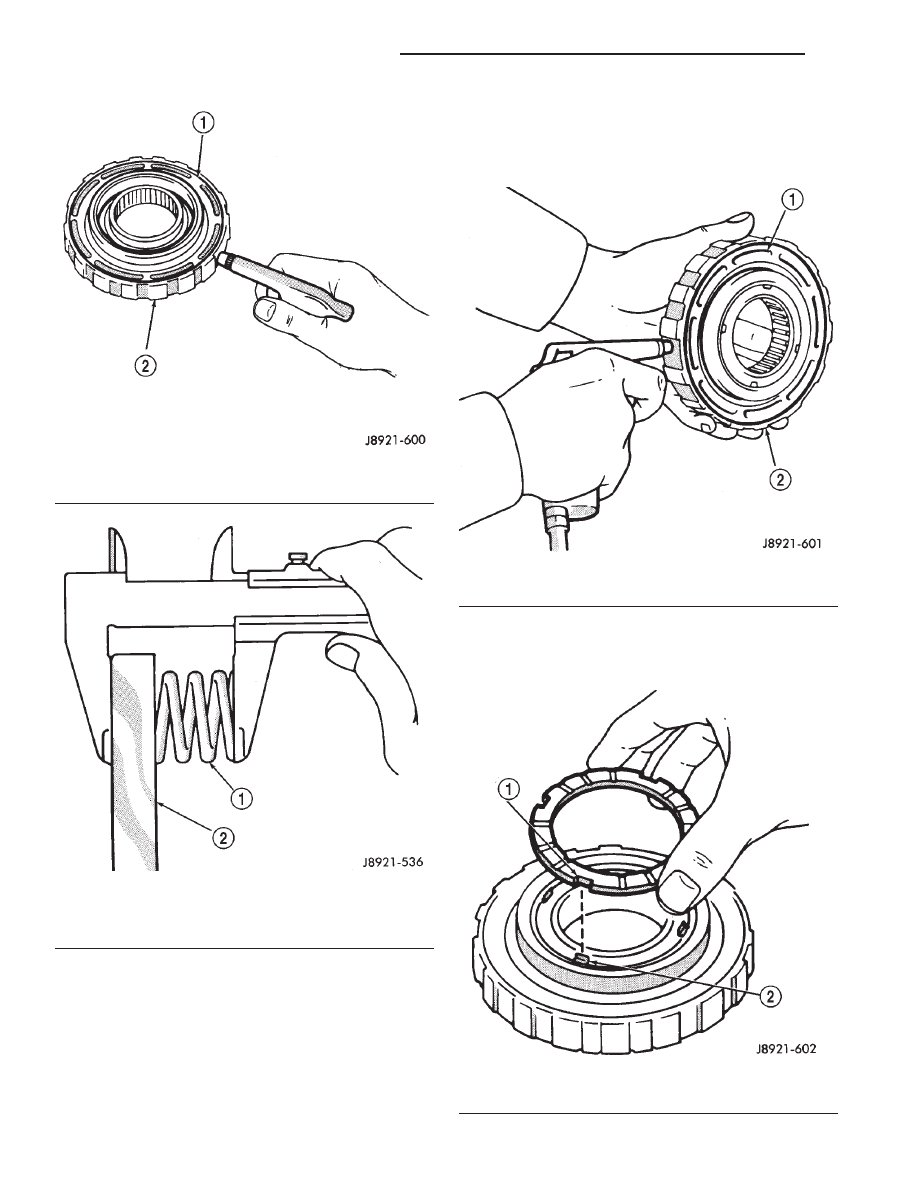
Fig. 283 Removing/Installing Piston And Sleeve

1 – PISTON AND SLEEVE
2 – DRUM

Fig. 284 Measuring Second Brake Piston Return

Springs

1 – PISTON RETURN SPRINGS
2 – SPRING RETAINER

Fig. 285 Checking Second Brake Piston Operation

1 – PISTON
2 – DRUM

Fig. 286 Installing Second Brake Thrust Washer

1 – THRUST WASHER NOTCHES
2 – SPRING RETAINER TABS

21 - 328

AW–4 AUTOMATIC TRANSMISSION

XJ

DISASSEMBLY AND ASSEMBLY (Continued)

PLANETARY/BRAKE PACK/OUTPUT SHAFT

Rear Planetary, Brake Pack, Output Shaft Components

1 – FIRST-REVERSE BRAKE PACK
2 – SNAP RING
3 – NO. 2 ONE-WAY CLUTCH
4 – REAR PLANETARY GEAR
5 – REAR THRUST WASHER
6 – FRONT THRUST WASHER
7 – ONE-WAY CLUTCH INNER RACE

8 – SNAP RING
9 – RING GEAR HUB
10 – REAR PLANETARY RING GEAR
11 – THRUST BEARING
12 – RACES
13 – OUTPUT SHAFT
14 – SEAL RING

XJ

AW–4 AUTOMATIC TRANSMISSION

21 - 329

DISASSEMBLY AND ASSEMBLY (Continued)

DISASSEMBLY

(1) Remove output shaft from gear assembly (Fig.

287).

(2) Remove and discard shaft seal ring (Fig. 288).

(3) Remove brake pack from planetary gear (Fig.

289).

(4) Remove planetary gear from ring gear (Fig.

290).

(5) Check No. 2 one–way clutch (Fig. 291). Hold

planetary gear and turn clutch inner race in both
directions. Race should turn freely counterclockwise,
but lock when turned clockwise. Replace one–way
clutch if necessary.

Fig. 287 Removing/Installing Output Shaft

1 – GEAR ASSEMBLY
2 – OUTPUT SHAFT

Fig. 288 Removing/Installing Shaft Seal Ring

1 – SEAL RING
2 – OUTPUT SHAFT

Fig. 289 Removing/Installing First–Reverse Brake

Pack

1 – FIRST-REVERSE BRAKE PACK
2 – REAR PLANETARY GEAR

Fig. 290 Removing/Installing Rear Planetary

1 – REAR PLANETARY GEAR
2 – RING GEAR

21 - 330

AW–4 AUTOMATIC TRANSMISSION

XJ

DISASSEMBLY AND ASSEMBLY (Continued)

(6) Remove clutch inner race from planetary gear

(Fig. 292).

(7) Remove clutch snap ring and remove No. 2

one–way clutch top end cap from planetary.

(8) Remove No. 2 one–way clutch from planetary

(Fig. 293).

(9) Remove No. 2 one–way clutch bottom end cap

from planetary.

Fig. 291 Checking No. 2 One–Way Clutch Operation

1 – CLUTCH INNER RACE
2 – PLANETARY GEAR

Fig. 292 Removing/Installing Clutch Inner Race

1 – CLUTCH INNER RACE
2 – REAR PLANETARY

Fig. 293 Removing/Installing One–Way Clutch

1 – CLUTCH SNAP RING
2 – NO. 2 ONE-WAY CLUTCH
3 – PLANETARY GEAR

XJ

AW–4 AUTOMATIC TRANSMISSION

21 - 331

DISASSEMBLY AND ASSEMBLY (Continued)


Content   ..  446  447  448  449   ..