Jeep XJ. Manual - part 350


  Index      Jeep     Jeep XJ - service repair manual 2001 year


Search            


Content   ..  348  349  350  351   ..


Jeep XJ. Manual - part 350


Testing in Fuel Ingection System section of this
group for test procedures.

FUEL INJECTOR TEST

The fuel injection nozzels, located in the engine

cylinder head, spray fuel under high pressure into
the individual combustion chambers. Pressurized
fuel, delivered by the fuel injection pump, unseats a
spring-loaded needle valve inside the injector, and
the fuel is atomized as it escapes through the injector
opening into the engine’s combustion chamber. If the
fuel injector does not operate properly, the engine
may misfire, or cause other driveability problems.

A leak in the injection pump–to–injector high–pres-

sure fuel line can cause many of the same symptoms
as a malfunctioning injector. Inspect for a leak in the
high–pressure lines before checking for a malfunc-
tioning fuel injector.

WARNING: THE INJECTION PUMP SUPPLIES HIGH-
–PRESSURE FUEL OF UP TO APPROXIMATELY
45,000 KPA (6526 PSI) TO EACH INDIVIDUAL INJEC-
TOR THROUGH THE HIGH–PRESSURE LINES. FUEL
UNDER THIS AMOUNT OF PRESSURE CAN PENE-
TRATE THE SKIN AND CAUSE PERSONAL INJURY.
WEAR SAFETY GOGGLES AND ADEQUATE PRO-
TECTIVE CLOTHING. AVOID CONTACT WITH FUEL
SPRAY WHEN BLEEDING HIGH–PRESSURE FUEL
LINES.

WARNING: DO NOT BLEED AIR FROM THE FUEL
SYSTEM OF A HOT ENGINE. DO NOT ALLOW FUEL
TO SPRAY ONTO THE EXHAUST MANIFOLD WHEN
BLEEDING AIR FROM THE FUEL SYSTEM.

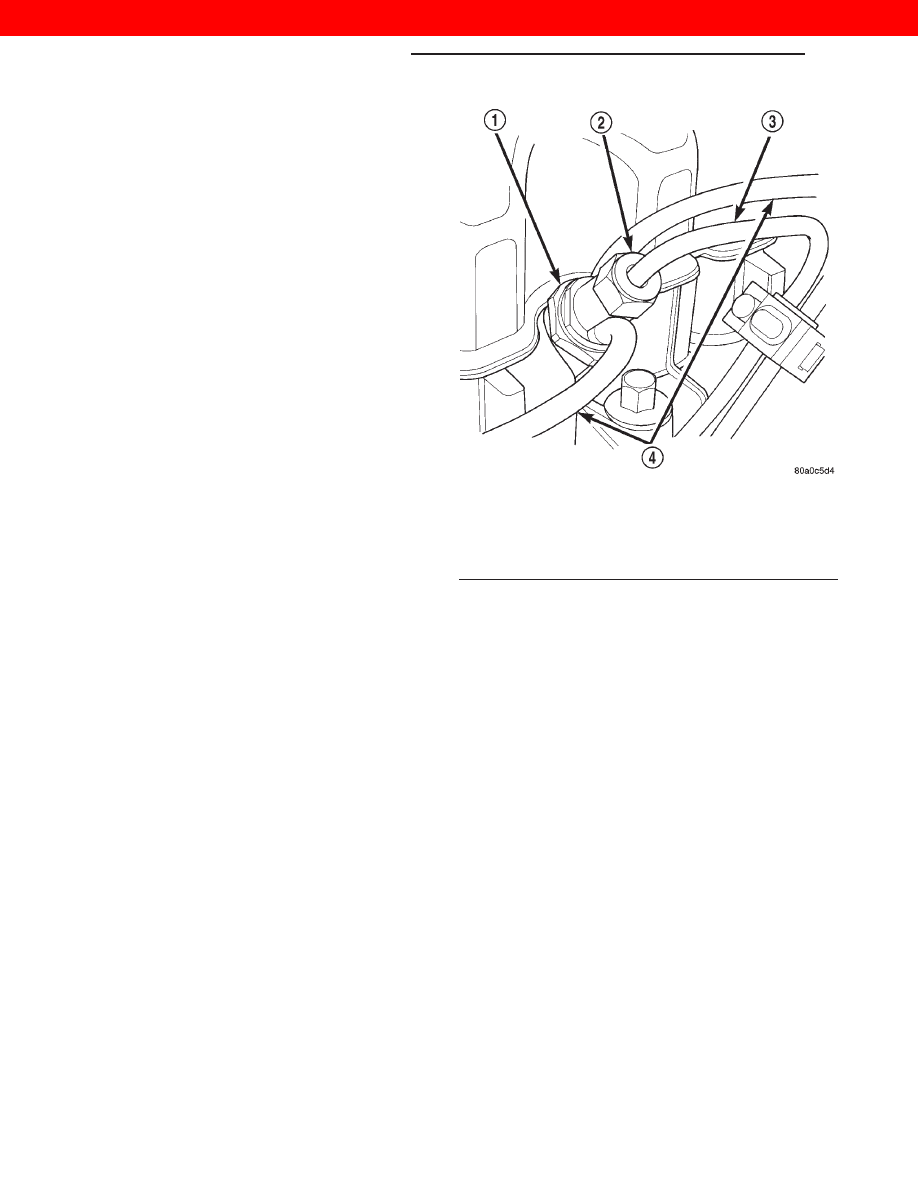
To determine which fuel injector is malfunctioning,

run the engine and loosen the high–pressure fuel line
nut at the injector (Fig. 18). Listen for a change in
engine speed. If engine speed drops, the injector was
operating normally. If engine speed remains the
same, the injector may be malfunctioning. After test-
ing, tighten the line nut to 19 N·m (14 ft. lbs.)
torque. Test all injectors in the same manner one at
a time.

Once an injector has been found to be malfunction-

ing, remove it from the engine and test it. Refer to
the Removal/Installation section of this group for pro-
cedures.

After the injector has been removed, install it to a

bench–mount

injector

tester.

Refer

to

operating

instructions supplied with tester for procedures.

The opening pressure or “pop” pressure should be

15,000–15,800 kPa (2175–2291 psi). If the fuel injec-
tor needle valve is opening (“popping”) to early or to
late, replace the injector.

FUEL INJECTOR / NEEDLE MOVEMENT
SENSOR TEST

The needle movement sensor is used only on the

number–1 cylinder fuel injector (Fig. 19). It is not
used on the injectors for cylinders number 2, 3, or 4.

Testing the needle movement sensor requires the

use of a DRB Scan tool. Refer to the Powertrain
Diagnostic Procedures manual for additional infor-
mation.

FUEL INJECTION PUMP TEST

The injection pump is not to be serviced or

the warranty may be voided. If the injection
pump requires service, the complete assembly
must be replaced.

Incorrect injection pump timing (mechanical or

electrical) can cause poor performance, excessive
smoke and emissions and poor fuel economy.

A defective fuel injection pump, defective fuel tim-

ing solenoid or misadjusted mechanical pump timing
can cause starting problems or prevent the engine
from revving up. It can also cause:

• Engine surge at idle

• Rough idle (warm engine)

• Low power

• Excessive fuel consumption

• Poor performance

• Low power

Fig. 18 Typical Inspection of Fuel Injector

1 – FUEL INJECTOR
2 – LINE FITTING
3 – HIGH-PRESSURE FUEL LINE
4 – FUEL DRAIN TUBES

14 - 10

FUEL SYSTEM—2.5L DIESEL ENGINE

XJ

DIAGNOSIS AND TESTING (Continued)

2000 JEEP CHEROKEE

• Black smoke from the exhaust

• Blue or white fog like exhaust

• Incorrect idle or maximum speed
The electronically controlled fuel pump has no

mechanical governor like older mechanically con-
trolled fuel pumps. Do not remove the top cover of
the fuel pump, or the screws fastening the wiring
pigtail to the side of the pump. The warranty of
the injection pump and the engine may be void
if those seals have been removed or tampered
with.

FUEL SUPPLY RESTRICTIONS

LOW–PRESSURE LINES

Restricted or Plugged supply lines or fuel filter can

cause a timing fault that will cause the ECM to oper-
ate the engine in a “Limp Home” mode. See the
introduction of the Fuel Injection System in this
group for more information on the Limp Home mode.
Fuel supply line restrictions can cause starting prob-
lems and prevent the engine from revving up. The
starting problems include; low power and blue or
white fog like exhaust. Test all fuel supply lines for
restrictions or blockage. Flush or replace as neces-
sary. Bleed the fuel system of air once a fuel supply
line has been replaced. Refer to the Air Bleed Proce-
dure section of this group for procedures.

HIGH–PRESSURE LINES

Restricted (kinked or bent) high–pressure lines can

cause starting problems, poor engine performance
and black smoke from exhaust.

Examine all high–pressure lines for any damage.

Each radius on each high–pressure line must be
smooth and free of any bends or kinks.

Replace damaged, restricted or leaking high–pres-

sure fuel lines with the correct replacement line.

CAUTION: The high–pressure fuel lines must be
clamped securely in place in the holders. The lines
cannot contact each other or other components. Do
not attempt to weld high–pressure fuel lines or to
repair lines that are damaged. Only use the recom-
mended lines when replacement of high–pressure
fuel line is necessary.

FUEL SHUTDOWN SOLENOID TEST

Refer to 2000 XJ 2.5L Diesel Powertrain Diagnos-

tic Manual for the Fuel Shutdown Solenoid test.

HIGH-PRESSURE FUEL LINE LEAK TEST

High–pressure fuel line leaks can cause starting

problems and poor engine performance.

WARNING: DUE TO EXTREME FUEL PRESSURES
OF UP TO 45,000 KPA (6526 PSI), USE EXTREME
CAUTION WHEN INSPECTING FOR HIGH–PRES-
SURE FUEL LEAKS. DO NOT GET YOUR HAND, OR
ANY PART OF YOUR BODY NEAR A SUSPECTED
LEAK.

INSPECT

FOR

HIGH–PRESSURE

FUEL

LEAKS WITH A SHEET OF CARDBOARD. HIGH
FUEL INJECTION PRESSURE CAN CAUSE PER-
SONAL INJURY IF CONTACT IS MADE WITH THE
SKIN.

Start the engine. Move the cardboard over the

high–pressure fuel lines and check for fuel spray onto
the cardboard (Fig. 20). If a high–pressure line con-
nection is leaking, bleed the system and tighten the
connection. Refer to the Air Bleed Procedure in this
group for procedures. Replace damaged, restricted or
leaking high–pressure fuel lines with the correct
replacement line.

CAUTION: The high–pressure fuel lines must be
clamped securely in the holders. The lines cannot
contact each other or other components. Do not
attempt to weld high–pressure fuel lines or to repair
lines that are damaged. Only use the recommended
lines when replacement of high–pressure fuel line
is necessary.

Fig. 19 Needle Movement Sensor Location

1 – NEEDLE MOVEMENT SENSOR
2 – FUEL INJECTOR (NUMBER 1 CYLINDER ONLY)
3 – COPPER WASHER
4 – SENSOR CONNECTOR

XJ

FUEL SYSTEM—2.5L DIESEL ENGINE

14 - 11

DIAGNOSIS AND TESTING (Continued)

2000 JEEP CHEROKEE

SERVICE PROCEDURES

AIR BLEED PROCEDURES

AIR BLEEDING AT FUEL FILTER

A certain amount of air may become trapped in the

fuel system when fuel system components are ser-
viced or replaced. Bleed the system as needed after
fuel system service according to the following proce-
dures.

WARNING: DO NOT BLEED AIR FROM THE FUEL
SYSTEM OF A HOT ENGINE. DO NOT ALLOW FUEL
TO SPRAY ONTO THE EXHAUST MANIFOLD WHEN
BLEEDING AIR FROM THE FUEL SYSTEM.

Some air enters the fuel system when the fuel fil-

ter or injection pump supply line is changed. This
small amount of air is vented automatically from the
injection pump through the fuel drain manifold tubes
if the filter was changed according to instructions.
Ensure the the fuel filter/water separator is full of
fuel

It may be necessary to manually bleed the system

if:

• The bowl of the fuel filter/water separator is not

partially filled before installation of a new filter

• The injection pump is replaced

• High–pressure fuel line connections are loosened

or lines replaced

• Initial engine start–up or start–up after an

extended period of no engine operation

• Running fuel tank empty

FUEL INJECTION PUMP BLEEDING

(1) If the fuel injection pump has been replaced,

air should be bled at the overflow valve before
attempting to start engine.

(a) Loosen the overflow valve (Fig. 21) at the

rear of the injection pump.

(b) Place a towel below the valve.

WARNING: WHEN

CRANKING

THE

ENGINE

TO

BLEED AIR FROM THE INJECTION PUMP, THE
ENGINE MAY START. PLACE THE TRANSMISSION
IN NEUTRAL OR PARK AND SET PARKING BRAKE
BEFORE ENGAGING THE STARTER MOTOR.

CAUTION: Do not engage the starter motor for
more than 30 seconds at a time. Allow 2 minutes
between cranking intervals.

(2) Crank the engine for 30 seconds at a time to

allow air trapped in the injection pump to vent out
the fuel injector drain tubes. Continue this procedure
until the engine starts. Observe the previous WARN-
ING and CAUTION.

(3) Tighten overflow valve.

Fig. 20 Typical Fuel Pressure Test at Injection Pump

1 – FITTING
2 – HIGH PRESSURE LINE
3 – CARDBOARD

Fig. 21 Overflow Valve

1 – FUEL INJECTION PUMP ASSEMBLY
2 – FUEL RETURN LINE
3 – FUEL SUPPLY LINE
4 – FUEL INJECTION PUMP 10–WAY CONNECTOR
5 – TIMING SOLENOID
6 – OVERFLOW VALVE

14 - 12

FUEL SYSTEM—2.5L DIESEL ENGINE

XJ

DIAGNOSIS AND TESTING (Continued)

2000 JEEP CHEROKEE

HIGH–PRESSURE FUEL LINE BLEEDING

WARNING: THE INJECTION PUMP SUPPLIES HIGH-
–PRESSURE FUEL OF APPROXIMATELY 45,000 KPA
(6,526

PSI)

TO

EACH

INDIVIDUAL

INJECTOR

THROUGH

THE

HIGH–PRESSURE

LINES.

FUEL

UNDER THIS AMOUNT OF PRESSURE CAN PENE-
TRATE THE SKIN AND CAUSE PERSONAL INJURY.
WEAR SAFETY GOGGLES AND ADEQUATE PRO-
TECTIVE CLOTHING AND AVOID CONTACT WITH
FUEL SPRAY WHEN BLEEDING HIGH–PRESSURE
FUEL LINES.

WARNING: DO NOT BLEED AIR FROM THE FUEL
SYSTEM OF A HOT ENGINE. DO NOT ALLOW FUEL
TO SPRAY ONTO THE EXHAUST MANIFOLD WHEN
BLEEDING AIR FROM THE FUEL SYSTEM.

Bleed air from one injector at time.
(1) Loosen the high–pressure fuel line fitting at

the injector (Fig. 22).

(2) Crank the engine until all air has been bled

from the line. Do not operate the starter motor
for longer than 30 seconds. Wait 2 minutes
between cranking intervals.

(3) Start the engine and bleed one injector at a

time until the engine runs smoothly.

FUEL INJECTION PUMP TIMING

Refer to the Fuel Injection Pump Removal and

Installation procedure in Service Procedures later in
this Group.

REMOVAL AND INSTALLATION

ACCELERATOR PEDAL

REMOVAL

(1) Disconnect electrical connector.
(2) Remove accelerator pedal mounting bracket

nuts. Remove accelerator pedal assembly.

INSTALLATION

(1) Place accelerator pedal assembly over studs

protruding from floor pan. Tighten mounting nuts to
5 N·m (46 in. lbs.) torque.

(2) Connect electrical connector.
(3) Before starting the engine, operate the acceler-

ator pedal to check for any binding.

Fig. 22 Bleeding High–Pressure Fuel Line—Typical

1 – FUEL INJECTOR
2 – LINE FITTING
3 – HIGH-PRESSURE FUEL LINE
4 – FUEL DRAIN TUBES

Fig. 23 Accelerator Pedal Mounting-Typical

1 – PEDAL POSITION SENSOR

XJ

FUEL SYSTEM—2.5L DIESEL ENGINE

14 - 13

SERVICE PROCEDURES (Continued)

2000 JEEP CHEROKEE


Content   ..  348  349  350  351   ..