Jeep XJ. Manual - part 77


  Index      Jeep     Jeep XJ - service repair manual 2001 year


Search            


Content   ..  75  76  77  78   ..


Jeep XJ. Manual - part 77


• Holds Steady: If the pointer remains steady for

two minutes, there are no serious coolant leaks in
the system. However, there could be an internal leak
that does not appear with normal system test pres-
sure. Inspect for interior leakage or do the Internal
Leakage Test. Do this if it is certain that coolant is
being lost and no leaks can be detected.

• Drops Slowly: Shows a small leak or seepage is

occurring. Examine all connections for seepage or
slight leakage with a flashlight. Inspect the radiator,
hoses, gasket edges and heater. Seal any small leak
holes with a Sealer Lubricant or equivalent. Repair
leak holes and reinspect the system with pressure
applied.

• Drops Quickly: Shows that a serious leakage is

occurring. Examine the system for serious external
leakage. If no leaks are visible, inspect for internal
leakage. Large radiator leak holes should be repaired
by a reputable radiator repair shop.

INTERNAL LEAKAGE INSPECTION

Remove the oil pan drain-plug and drain a small

amount of engine oil. Coolant, being heavier will
drain first, or operate engine to churn oil, then exam-
ine dipstick for water globules. Operate the engine
without the pressure/vent cap on the coolant tank
until thermostat opens.

Attach a radiator pressure tester to the tank filler

neck. If pressure builds up quickly, a leak exists as

result of a faulty cylinder head gasket or crack in the
engine. Repair as necessary.

WARNING: DO

NOT

ALLOW

PRESSURE

TO

EXCEED 117 KPA (17 PSI). TURN THE ENGINE OFF.
TO RELEASE THE PRESSURE, ROCK THE TESTER
FROM SIDE TO SIDE. WHEN REMOVING THE
TESTER, DO NOT TURN THE TESTER MORE THAN
1/2 TURN IF THE SYSTEM IS UNDER PRESSURE.

If there is no immediate pressure increase, pump

the pressure tester until the indicated pressure is
within the system range. Vibration of the gauge
pointer indicates compression or combustion leakage
into the cooling system.

PRESSURE/VENT CAP

PRESSURE TESTING

Remove the cap from the coolant tank. Be sure

that sealing surfaces are clean. Moisten rubber gas-
ket with water.

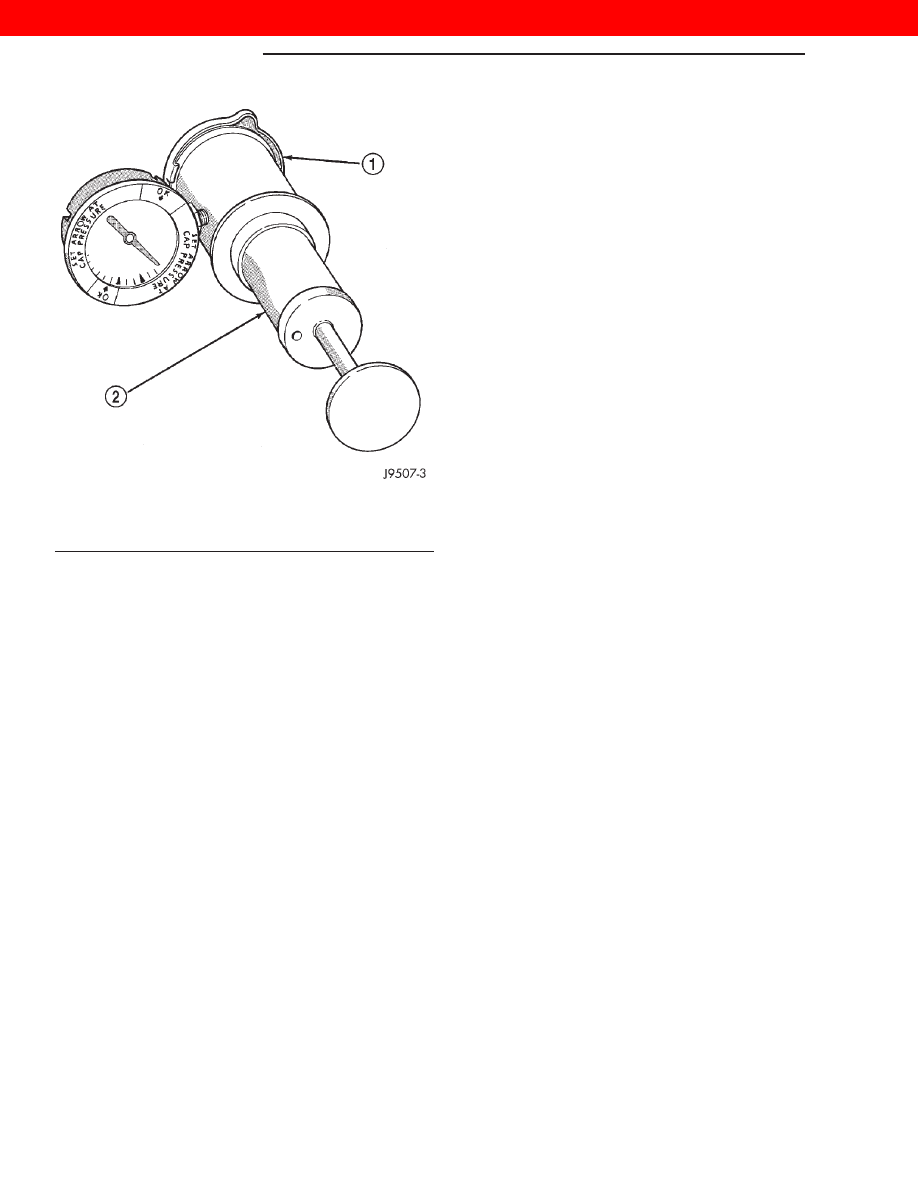
A two-piece, threaded adapter set (Fig. 11) must be

used to adapt a standard pressure-type tester (Fig.
12) when testing either the coolant tank or pressure
cap.

Use

Kent-Moore

t

adapter

set

number

J-24460-92 or Snap-On

t numbers TA-32 and TA-33.

Attach the adapter to the cap. Adapter must first be
threaded to cap. Attach pressure tester to adapter.

Operate the tester pump and observe the gauge

pointer at its highest point. The cap release pressure
should be 90-to-117 kPa (13-to-17 psi). The cap is sat-
isfactory when the pressure holds steady. It is also
good if it holds pressure within the 90-to-117 kPa
(13-to-17 psi) range for 30 seconds or more. If the
pointer drops quickly, replace the cap.

CAUTION: Radiator pressure testing tools are very
sensitive to small air leaks, which will not cause
cooling system problems. A pressure cap that does
not have a history of coolant loss should not be
replaced just because it leaks slowly when tested
with this tool. Add water to tool. Turn tool upside
down and recheck pressure/vent cap to confirm
that cap needs replacement.

LOW COOLANT LEVEL- AERATION

CAUTION: Engine damage could occur if the cool-
ant level is allowed to get this low. Always ensure
that the coolant level is not below the full mark. For
better visibility of the coolant level use a shop lamp
to light the pressurized coolant tank and look
through the pressurized coolant tank.

Fig. 12 Typical Cooling System Pressure Tester

1 – PRESSURE CAP
2 – TYPICAL COOLING SYSTEM PRESSURE TESTER

7 - 16

COOLING SYSTEM

XJ

DIAGNOSIS AND TESTING (Continued)

2000 JEEP CHEROKEE

BELT DIAGNOSIS

When diagnosing serpentine accessory drive belts,

small cracks that run across the ribbed surface of the
belt from rib to rib (Fig. 13), are considered normal.
These are not a reason to replace the belt. However,
cracks running along a rib (not across) are not nor-
mal. Any belt with cracks running along a rib must
be replaced (Fig. 13). Also replace the belt if it has
excessive wear, frayed cords or severe glazing.

Refer to the Serpentine Drive Belt Diagnosis chart

for further belt diagnosis.

CONDITION

POSSIBLE CAUSES

CORRECTION

RIB CHUNKING (ONE OR MORE
RIBS HAS SEPARATED FROM
BELT BODY

1. Foreign objects imbedded in
pulley grooves.

1. Remove foreign objects from
pulley grooves. Replace belt.

2. Installation damage.

2. Replace belt.

RIB OR BELT WEAR

1. Pulley(s) misaligned.

1. Align pulley(s).

2. Abrasive environment.

2. Clean pulley(s). Replace belt if
necessary.

3. Rusted pulley(s).

3. Clean rust from pulley(s).

4. Sharp or jagged pulley groove
tips.

4. Replace pulley.

5. Rubber deteriorated.

5. Replace belt.

LONGITUDINAL BELT CRACKING
(CRACKS BETWEEN TWO RIBS)

1. Belt has mistracked from pulley
groove.

1. Replace belt.

2. Pulley groove tip has worn away
rubber to tensile member

2. Replace belt.

Fig. 13 Serpentine Belt Wear Patterns

1 – NORMAL CRACKS BELT OK
2 – NOT NORMAL CRACKS RELACE BELT

XJ

COOLING SYSTEM

7 - 17

DIAGNOSIS AND TESTING (Continued)

2000 JEEP CHEROKEE

CONDITION

POSSIBLE CAUSES

CORRECTION

BELT SLIPS

1. Belt slipping because of
insufficient tension.

1. Replace automatic belt tensioner.

2. Incorrect belt.

2. Replace belt.

3. Belt or pulley subjected to
substance (belt dressing, oil,
ethylene glycol) that has reduced
friction.

3. Replace belt and clean pulleys.

4. Driven component bearing
failure.

4. Replace faulty component
bearing.

5. Belt glazed and hardened from
heat and exessive slippage.

5. Replace belt.

88

GROOVE JUMPING” (BELT

DOES NOT MAINTAIN CORRECT
POSITION ON PULLEY)

1. Belt tension either too high or too
low.

1. Replace automatic belt tensioner.

2. Incorrect belt.

2. Replace belt.

3. Pulley(s) not within design
tolerance.

Replace pulley(s).

4. Foreign object(s) in grooves.

4 Remove foreign objects from
grooves.

4. Pulley misalignment.

4. Check and replace.

5. Belt cordline is broken.

5. Replace belt.

BELT BROKEN (NOTE: IDENTIFY
AND CORRECT PROBLEM
BEFORE NEW BELT IS
INSTALLED)

1. Excessive tension.

1. Replace belt and automatic belt
tensioner.

2. Incorrect belt.

2. Replace belt.

3. Tensile member damaged during
belt installation.

3. Replace belt.

4. Severe misalignment.

4. Check and replace.

5. Bracket, pulley, or bearing
failure.

5. Replace defective component
and belt.

NOISE (OBJECTIONAL SQUEAL,
SQUEAK, OR RUMBLE IS HEARD
OR FELT WHILE DRIVE BELT IS
IN OPERATION)

1. Belt slippage.

1. Replace belt or automatic belt
tensioner.

2. Bearing noise.

2. Locate and repair.

3. Belt misalignment.

3. Replace belt.

4. Belt-to-pulley mismatch.

4. Install correct belt.

SERPENTINE DRIVE BELT DIAGNOSIS

SERVICE PROCEDURES

COOLANT LEVEL CHECK

The coolant level is checked and adjusted at the

pressurized coolant tank (Fig. 14). The tank is
located at the right-rear side of the engine compart-
ment and is mounted as the highest point of the cool-
ing system. This will allow any air or vapor
exceeding the pressure/vent cap rating to escape
through the cap. The coolant tank is equipped with a

threaded-on pressure/vent cap. Refer to Pressure/
Vent Cap for additional information.

A coolant reserve/overflow system with a separate

tank is not used with the 2.5L diesel engine.

NOTE: The coolant level should be checked after
the engine has been operated at normal operating
temperature for approximately 5–10 minutes.

(1) Add coolant into the coolant tank up to the

FULL mark. If possible, only add coolant when
the engine is cold. Coolant level in a warm

7 - 18

COOLING SYSTEM

XJ

DIAGNOSIS AND TESTING (Continued)

2000 JEEP CHEROKEE

engine will be higher in the tank due to ther-
mal expansion.

(2) After the engine has been operated through a

few heat-up and cool-down cycles, recheck the coolant
level in the tank.

DRAINING COOLING SYSTEM

The cooling system is equipped with a pressurized

coolant tank using a pressure/vent cap.

WARNING: DO

NOT

REMOVE

THE

CYLINDER

BLOCK DRAIN-PLUG, THE COOLANT TANK CAP,
THE RADIATOR FILL VENT VALVE, OR LOOSEN
THE RADIATOR DRAINCOCK WITH THE SYSTEM
HOT AND PRESSURIZED. SERIOUS BURNS FROM
THE COOLANT CAN OCCUR.

WARNING: IF VEHICLE HAS BEEN RUN RECENTLY,
WAIT AT LEAST 15 MINUTES BEFORE REMOVING
COOLANT TANK CAP. WITH A RAG, SQUEEZE THE
UPPER RADIATOR HOSE TO CHECK IF SYSTEM IS
UNDER PRESSURE. PLACE A RAG OVER THE CAP.
VERY

SLOWLY

ROTATE

THE

CAP

COUNTER-

CLOCKWISE ALLOWING PRESSURE TO SLOWLY
RELEASE. AFTER ALL PRESSURE

HAS

BEEN

RELEASED, REMOVE THE COOLANT TANK CAP
COMPLETELY.

DO NOT WASTE reusable coolant. If the solution

is clean, drain the coolant into a clean container for
reuse.

(1) Observe the previous WARNINGS and remove

the coolant tank pressure/vent cap.

(2) The plastic radiator draincock is located on the

bottom of the left radiator tank. It can be accessed by

removing the left front headlamp bezel and the radi-
ator grille assembly from the bottom of vehicle.

(a) Attach one end of a 24 inch long X 1/4 inch

ID drain-hose to the nipple below the radiator
draincock.

(b) Put the other end of drain-hose into a clean

container.

(c) Open

the

draincock

(counterclockwise

as

viewed from left side of vehicle) and drain coolant
from radiator.
(3) If the complete cooling system must be drained,

raise the vehicle and remove the cylinder block
drain-plug. This hex- headed plug is located on the
right/rear side of the engine above the starter motor.

REFILLING COOLING SYSTEM

The cooling system is equipped with a pressurized

coolant tank using a pressure/vent cap. Refilling of
the system is done through this tank.

NOTE:

The radiator draincock is equipped with a

rubber o-ring. Do not over tighten draincock.

(1) Tighten

the

radiator

draincock

and

(if

removed), the cylinder block drain-plug.

(2) Open

the

plastic

radiator

fill

vent

valve

(unscrews counter- clockwise) from the radiator. The
fill vent valve is located on the top of the right radi-
ator tank.

(3) With the fill vent valve open, proceed to fill the

system using a 50/50 mixture of water and antifreeze
as described in the Coolant section of this group.

(4) Continue to fill the cooling system until coolant

is observed escaping from the fill vent opening. When
this occurs, close the fill vent valve. The plastic fill
vent valve is equipped with a rubber o- ring. Do
not over tighten the fill vent valve.

(5) Continue to fill the system until the coolant

tank is full.

(6) Install and tighten the coolant tank pressure/

vent cap. Do not use any type of tool when tight-
ening the cap. Hand tighten only.

(7) Operate engine with coolant tank cap tight-

ened.

(8) After engine has reached normal operating

temperature, shut engine off and allow it to cool.

(9) Remove coolant tank cap.
(10) Add coolant into the coolant tank up to the

FULL mark. If possible, only add coolant when
the engine is cold. Coolant level in a warm
engine will be higher in the tank due to ther-
mal expansion.

(11) After the engine has been operated through a

few heat-up and cool-down cycles, recheck the coolant
level in the tank.

Fig. 14 Coolant Tank and Pressure/Vent Cap

1 – PRESSURE/VENT CAP
2 – PRESSURIZED COOLANT TANK
3 – LOW COOLANT LEVEL SENSOR

XJ

COOLING SYSTEM

7 - 19

SERVICE PROCEDURES (Continued)

2000 JEEP CHEROKEE


Content   ..  75  76  77  78   ..