Jeep XJ. Manual - part 43


  Index      Jeep     Jeep XJ - service repair manual 2001 year


Search            


Content   ..  41  42  43  44   ..


Jeep XJ. Manual - part 43


(4) Remove the pinion mate shaft lock screw (Fig.

40).

(5) Remove the pinion mate shaft. If necessary, use

a drift and hammer (Fig. 41).

(6) Install and lubricate Step Plate 8140–2 (Fig.

42).

(7) Assemble Threaded Adapter 8140-1 into top

side gear. Thread Forcing Screw 6960-4 into adapter
until it becomes centered in adapter plate.

(8) Position

a

small

screw

driver

in

slot

of

Threaded Adapter 8140-1 (Fig. 43) to prevent adapter
from turning.

(9) Tighten forcing screw tool 122 N·m (90 ft. lbs.)

maximum to compress Belleville springs in clutch
packs (Fig. 44).

(10) Using

an

appropriate

size

feeler

gauge,

remove thrust washers from behind the differential
pinions (Fig. 45).

(11) Insert Turning Bar 6960-2 in case (Fig. 46).

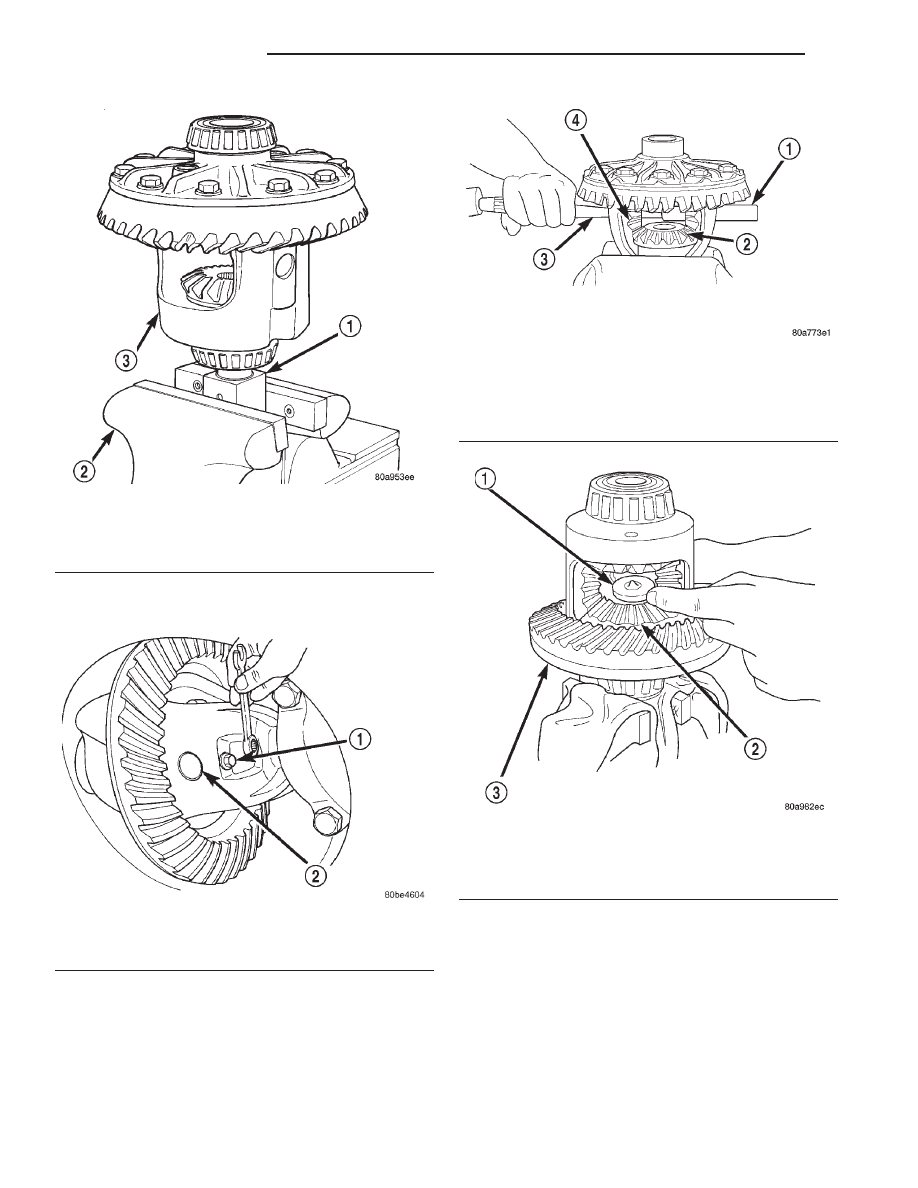
Fig. 39 Differential Case Holding Tool

1 – SIDE GEAR HOLDING TOOL
2 – VISE
3 – DIFFERENTIAL

Fig. 40 Mate Shaft Lock Screw

1 – LOCK SCREW
2 – PINION MATE SHAFT

Fig. 41 Mate Shaft Removal

1 – PINION MATE SHAFT
2 – SIDE GEAR
3 – DRIFT
4 – PINION MATE GEAR

Fig. 42 Step Plate Tool Installation

1 – SPECIAL TOOL 8140–2
2 – LOWER SIDE GEAR
3 – DIFFERENTIAL CASE

3 - 122

8 1/4 REAR AXLE

XJ

DISASSEMBLY AND ASSEMBLY (Continued)

(12) Loosen the Forcing Screw 6960-4 in small

increments until the clutch pack tension is relieved
and the differential case can be turned using Turning
Bar 6960-2.

(13) Rotate differential case until the differential

pinions can be removed.

(14) Remove pinions from differential case.

(15) Remove Forcing Screw 6960-4, Step Plate

8140–2, and Threaded Adapter 8140–1.

(16) Remove top side gear, clutch pack retainer,

and clutch pack. Keep plates in correct order during
removal (Fig. 47).

(17) Remove differential case from Side Gear Hold-

ing Tool 8138. Remove side gear, clutch pack retainer,

Fig. 43 Threaded Adapter Installation

1 – SOCKET
2 – SLOT IN ADAPTER
3 – SCREWDRIVER
4 – DISC 8140–2
5 – THREADED ROD C-6960–4
6 – THREADED ADAPTER DISC 8140–1

Fig. 44 Tighten Belleville Spring Compressor Tool

1 – TORQUE WRENCH
2 – TOOL ASSEMBLED
3 – DIFFERENTIAL CASE

Fig. 45 Remove Pinion Thrust Washer

1 – THRUST WASHER
2 – FEELER GAUGE

Fig. 46 Pinion Gear Removal

1 – PINION GEARS
2 – TOOL

XJ

8 1/4 REAR AXLE

3 - 123

DISASSEMBLY AND ASSEMBLY (Continued)

and clutch pack. Keep plates in correct order during
removal.

ASSEMBLY

NOTE: The clutch discs are replaceable as com-
plete sets only. If one clutch disc pack is damaged,
both packs must be replaced.

Lubricate each component with gear lubricant

before assembly.

(1) Assemble the clutch discs into packs and

secure disc packs with retaining clips (Fig. 48).

(2) Position assembled clutch disc packs on the

side gear hubs.

(3) Install clutch pack and side gear in the ring

gear side of the differential case (Fig. 49). Be sure
clutch pack retaining clips remain in position
and are seated in the case pockets.

(4) Position the differential case on Side Gear

Holding Tool 8138.

(5) Install lubricated Step Plate 8140–2 in lower

side gear (Fig. 50).

(6) Install the upper side gear and clutch disc pack

(Fig. 50).

(7) Hold assembly in position. Insert Threaded

Adapter 8140-1 into top side gear.

(8) Insert Forcing Screw 6960-4.
(9) Tighten forcing screw tool to slightly compress

clutch discs.

(10) Place differential pinions in position in side

gears and verify that the pinion mate shaft holes are
aligned.

(11) Rotate case with Turning Bar 6960-2 until the

pinion mate shaft holes in the differential pinions
align with holes in case. It may be necessary to

Fig. 47 Side Gear & Clutch Disc Removal

1 – DIFFERENTIAL CASE
2 – RETAINER
3 – SIDE GEAR AND CLUTCH DISC PACK

Fig. 48 Clutch Disc Pack

1 – CLUTCH PACK
2 – RETAINER
3 – SIDE GEAR
4 – RETAINER

Fig. 49 Clutch Discs & Lower Side Gear Installation

1 – DIFFERENTIAL CASE
2 – LOWER SIDE GEAR AND CLUTCH DISC PACK

3 - 124

8 1/4 REAR AXLE

XJ

DISASSEMBLY AND ASSEMBLY (Continued)

slightly tighten the forcing screw in order to install
the pinions.

(12) Tighten forcing screw to 122 N·m (90 ft. lbs.)

maximum to compress the Belleville springs.

(13) Lubricate and install thrust washers behind

pinions and align washers with a small screw driver.
Insert mate shaft into each pinion to verify align-
ment.

(14) Remove Forcing Screw 6960-4, Step Plate

8140–2, and Threaded Adapter 8140-1.

(15) Install pinion mate shaft and align holes in

shaft and case.

(16) Install the pinion mate shaft lock screw finger

tight to hold shaft during differential installation.

(17) Lubricate all differential components with

hypoid gear lubricant.

CLEANING AND INSPECTION

8 1/4 AXLE

Wash differential components with cleaning solvent

and dry with dry compressed air. Do not steam
clean the differential components.

Wash bearings with solvent and towel dry, or dry

with compressed air. DO NOT spin bearings with
compressed

air.

Cup

and

bearing

must

be

replaced as matched sets only.

Be sure that the axle tubes and oil channels are

thoroughly cleaned in the housing.

Inspect for:
• Smooth appearance with no broken/dented sur-

faces on the bearing rollers or the roller contact sur-
faces.

• Bearing cups must not be distorted or cracked.

• Machined surfaces should be smooth and with-

out any raised edges.

• Raised metal on shoulders of cup bores should

be removed with a hand stone.

• Wear and damage to pinion mate shaft, pinions,

side gears and thrust washers. Replace as a matched
set only.

• Ring gear and pinion for worn and chipped

teeth.

• Ring gear for damaged bolt threads. Replaced as

a matched set only.

• Pinion yoke for cracks, worn splines, pitted

areas, and a rough/corroded seal contact surface.
Repair or replace as necessary.

• Pinion depth shims for damage and distortion.

Install new shims if necessary.

• The differential case. Replace the case if cracked

or damaged.

• The axle shaft C-locks for cracks and excessive

wear. Replace them if necessary.

• Each threaded adjuster to determine if it rotates

freely. If an adjuster binds, repair the damaged
threads or replace the adjuster.

Polish each axle shaft sealing surface with No. 600

crocus cloth. This can remove slight surface damage.
Do not reduce the diameter of the axle shaft seal con-
tact surface. When polishing, the crocus cloth should
be moved around the circumference of the shaft (not
in-line with the shaft).

TRAC-LOK

Y

Clean all components in cleaning solvent. Dry com-

ponents with compressed air. Inspect clutch pack
plates for wear, scoring or damage. Replace both
clutch packs if any one component in either pack is
damaged. Inspect side gears and pinions. Replace
any gear that is worn, cracked, chipped or damaged.
Inspect differential case and pinion shaft. Replace if
worn or damaged.

PRESOAK PLATES AND DISC

Plates and discs with fiber coating (no grooves or

lines) must be presoaked in Friction Modifier before
assembly. Soak plates and discs for a minimum of 20
minutes.

Fig. 50 Upper Side Gear & Clutch Disc Pack

Installation

1 – UPPER SIDE GEAR AND CLUTCH DISC PACK
2 – DIFFERENTIAL CASE
3 – SPECIAL TOOL 8140–2

XJ

8 1/4 REAR AXLE

3 - 125

DISASSEMBLY AND ASSEMBLY (Continued)


Content   ..  41  42  43  44   ..