Jeep Liberty KJ. Manual - part 934


  Index      Jeep     Jeep Liberty KJ - service repair manual 2006 year


Search            


Content   ..  932  933  934  935   ..


Jeep Liberty KJ. Manual - part 934


EXHAUST SYSTEM AND TURBOCHARGER

DESCRIPTION

GAS ENGINES

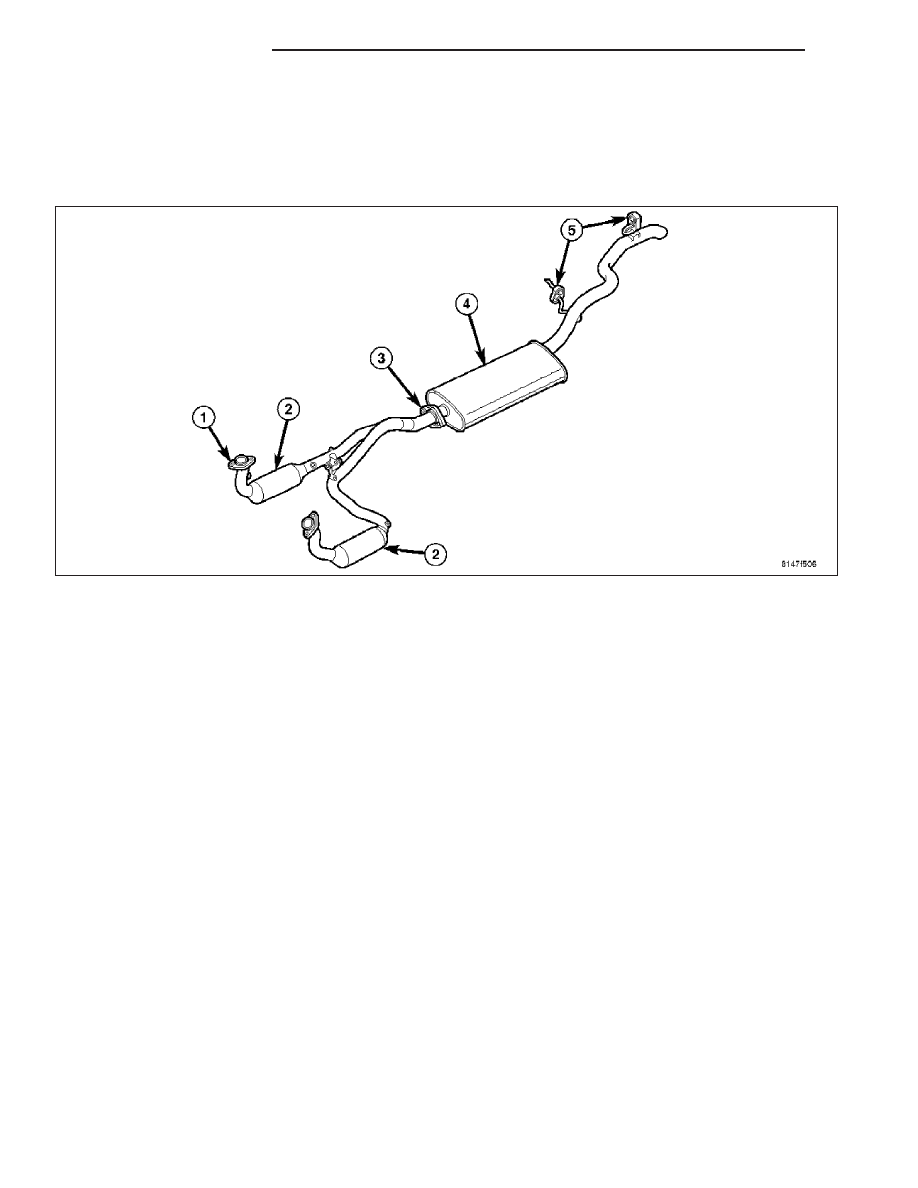
The basic exhaust system consists of a exhaust pipe assembly with catalytic converters (2), muffler (4) and tailpipe
assembly and heat shields.

The exhaust system must be properly aligned to prevent stress, leakage and body contact. Minimum clearance
between any exhaust component and the body or frame is 25 mm (1.0 in.). If the system contacts any body panel,
it may amplify objectionable noises from the engine or body.

When inspecting an exhaust system, critically inspect for cracked or loose joints, stripped screw or bolt threads,
corrosion damage and worn, cracked or broken hangers. Replace all components that are badly corroded or dam-
aged. DO NOT attempt to repair.

When replacement is required, use original equipment parts (or equivalent). This will assure proper engine function
and system alignment.

CAUTION: Avoid application of rust prevention compounds or undercoating materials to exhaust system
floor pan exhaust heat shields. Light overspray near the edges is permitted. Application of coating will
result in excessive floor pan temperatures and objectionable fumes.

2.8L DIESEL

CAUTION: Avoid application of rust prevention compounds or undercoating materials to exhaust system
floor pan exhaust heat shields. Light overspray near the edges is permitted. Application of coating will
result in excessive floor pan temperatures and objectionable fumes.

The diesel engine exhaust system consists of an engine exhaust manifold, turbocharger, EGR valve with intercooler,
front exhaust pipe with catalytic converter, muffler and tailpipe assembly.

The exhaust system must be properly aligned to prevent stress, leakage and body contact. The exhaust compo-
nents should be kept a minimum of 25.4 mm (1.0 in.) away from the body and frame. If the system contacts any
body panel, it may amplify objectionable noises from the engine or body.

11 - 2

EXHAUST SYSTEM

KJ

DIAGNOSIS AND TESTING

DIAGNOSIS AND TESTING - EXHAUST SYSTEM

EXHAUST SYSTEM DIAGNOSIS CHART

CONDITION

POSSIBLE CAUSE

CORRECTION

EXCESSIVE EXHAUST NOISE OR
LEAKING EXHAUST GASES

1. Leaks at pipe joints.

1. Tighten clamps/bolts to specified
torque at leaking joints.

2. Rusted or blown out muffler.

2. Replace muffler. Inspect exhaust
system.

3. Broken or rusted out exhaust
pipe.

3. Replace exhaust pipe.

4. Exhaust pipe leaking at manifold
flange.

4. Tighten/replace flange attaching
nuts/bolts.

5. Exhaust manifold cracked or
broken.

5. Replace exhaust manifold.

6. Leak between exhaust manifold
and cylinder head.

6. Tighten exhaust manifold to
cylinder head bolts.

7. Catalytic converter rusted or
blown out.

7. Replace catalytic converter assy.

8. Restriction in exhaust system.

8. Remove restriction, if possible.
Replace restricted part if necessary.

CAUTION:
When servicing and replacing exhaust system components, disconnect the oxygen sensor connector(s). Allowing
the exhaust to hang by the oxygen sensor wires will damage the harness and/or sensor.

KJ

EXHAUST SYSTEM

11 - 3

DIESEL ENGINE

CAUTION: On high mileage vehicles it is normal to see some exhaust staining around the turbocharger con-
trol rod area. This is not a sign of turbocharger failure.

EXHAUST SYSTEM DIAGNOSIS CHART

CONDITION

POSSIBLE CAUSE

CORRECTION

EXCESSIVE EXHAUST NOISE OR

LEAKING EXHAUST GASES

1. Leaks at pipe joints.

1. Tighten clamps/bolts at leaking
joints.

2. Rusted or blown out muffler.

2. Replace muffler. Inspect exhaust
system.

3. Broken or rusted out exhaust
pipe.

3. Replace exhaust pipe.

4. Exhaust pipe leaking at manifold
flange.

4. Tighten/replace flange attaching
nuts/bolts.

5. Exhaust manifold cracked or
broken.

5. Replace exhaust manifold.

6. Leak between exhaust manifold
and cylinder head.

6. Tighten exhaust manifold to
cylinder head bolts. Replace gasket
if necessary.

7. Turbocharger mounting flange
cracked.

7. Remove turbocharger and
inspect. (Refer to 11 - EXHAUST
SYSTEM/TURBOCHARGER
SYSTEM/TURBOCHARGER -
REMOVAL).

8. Restriction in exhaust system.

8. Remove restriction, if possible.
Replace restricted part if necessary.

9. EGR pipe(s) leak

9. Tighten bolts. Replace gasket.

10. EGR assembly leak

10. Tighten bolts. Replace gaskets.

Drivability Concern - Turbo

1. Vacuum hose disconnected

1. Check connections, replace as
necessary

2. Vacuum system leaks

2. Inspect for damage. Check for
leaks, replace as necessary

3. Boost pressure solenoid filter
clogged

3. Replace the filter.

SPECIFICATIONS

TORQUE

DESCRIPTION

N·m

Ft. Lbs.

In. Lbs.

EGR Pipe to EGR Inlet

32

24

-

Front Exhaust Pipe

Flange-to-Exhaust

Manifold Bolts

36

28

-

Front Exhaust pipe-to-

Muffler Flange Nuts

36

28

-

Turbocharger Support

Bracket Bolts

24

18

-

11 - 4

EXHAUST SYSTEM

KJ

DESCRIPTION

N·m

Ft. Lbs.

In. Lbs.

Turbocharger Downpipe

Nuts

32

24

-

Turbocharger Oil Supply

Line Fitting

24

18

215

Turbocharger Oil Return

Line bolts

11

-

96

Turbocharger to Exhaust

Manifold Nuts

32

24

-

KJ

EXHAUST SYSTEM

11 - 5


Content   ..  932  933  934  935   ..