Content .. 1394 1395 1396 1397 ..
Jeep Liberty KJ. Manual - part 1396
WARNING: USE EXTREME CAUTION WHEN THE ENGINE IS OPERATING. DO NOT STAND IN A DIRECT LINE
WITH THE FAN. DO NOT PUT YOUR HANDS NEAR THE PULLEYS, BELTS OR FAN. DO NOT WEAR LOOSE
CLOTHING.
6. Start the engine and operate at 2400 rpm. Within ten minutes the air temperature (indicated on the dial ther-
mometer) should be up to 93° C (200° F). Fan drive engagement should have started to occur at between 91°
to 96° C (195° to 205° F). Engagement is distinguishable by a definite increase in fan flow noise (roaring). The
timing light also will indicate an increase in the speed of the fan.
7. When the air temperature reaches 93° C (200° F), remove the plastic sheet. Fan drive disengagement should
have started to occur at between 62° to 85° C (145° to 185° F). A definite decrease of fan flow noise (roaring)
should be noticed. If not, replace the defective viscous fan drive unit.
REMOVAL
3.7L ENGINE
1. Disconnect negative battery cable from battery.
NOTE: The thermal viscous fan drive/fan blade
assembly is attached (threaded) to water pump
hub shaft.
2. Remove the accessory drive belt (Refer to 7 -
COOLING/ACCESSORY DRIVE/DRIVE BELTS -
REMOVAL).
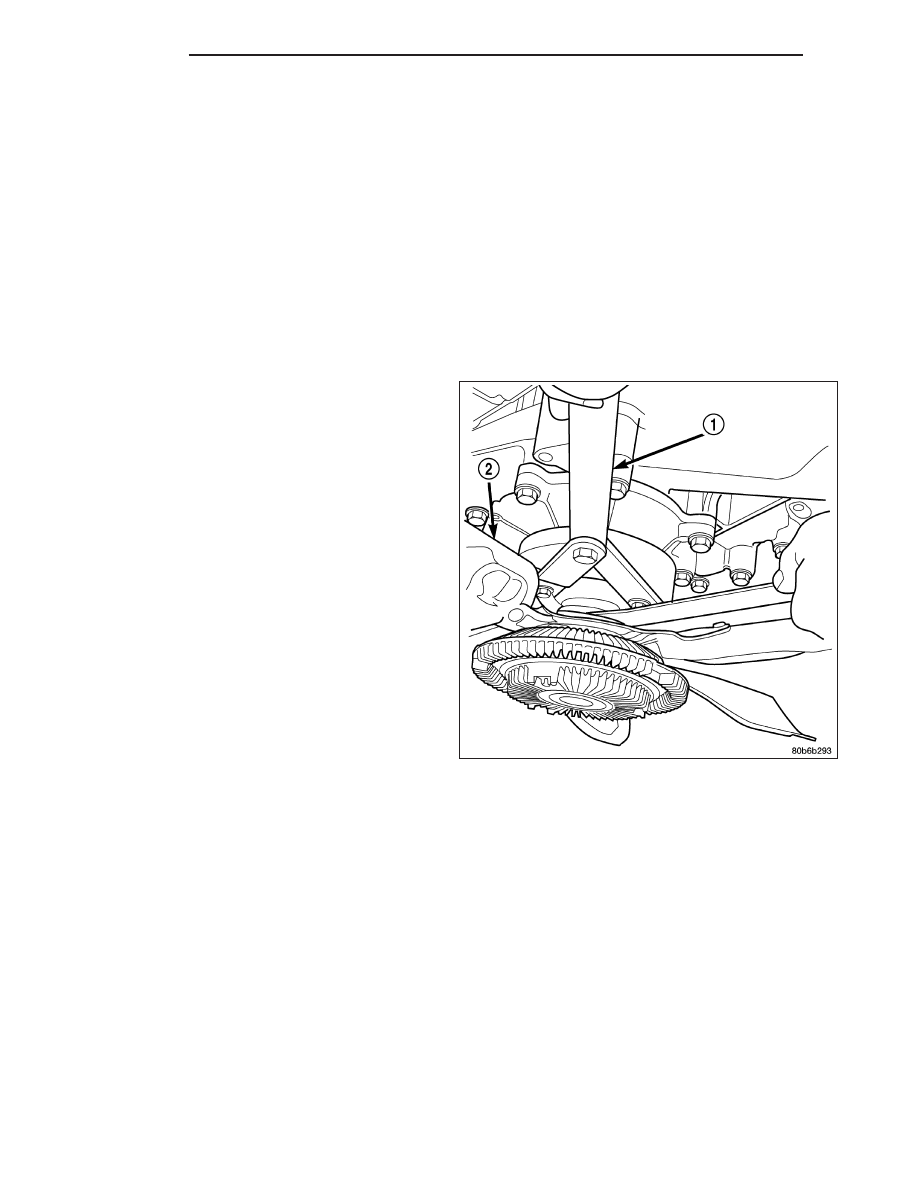
3.
Remove fan blade/viscous fan drive assembly
from water pump using special tool 6958 spanner
wrench and 8346 adapters(1) , by turning mounting
nut counterclockwise as viewed from front. Threads
on viscous fan drive (2) are RIGHT HAND.
4. Do not attempt to remove fan/viscous fan drive
assembly from vehicle at this time.
5. Do not unbolt fan blade assembly from viscous fan
drive at this time.
6. Remove fan shroud to radiator bolts.
7. Remove fan shroud and fan blade/viscous fan drive
assembly as a complete unit from vehicle.
8. After removing fan blade/viscous fan drive assembly, do not place viscous fan drive in horizontal position. If
stored horizontally, silicone fluid in the viscous fan drive could drain into its bearing assembly and contaminate
lubricant.
CAUTION: Do not remove water pump pulley-to-water pump bolts. This pulley is under belt tension.
9. Remove four bolts securing fan blade assembly to viscous fan drive.
7 - 62
ENGINE
KJ