Jeep Liberty KJ. Manual - part 1190


  Index      Jeep     Jeep Liberty KJ - service repair manual 2006 year


Search            


Content   ..  1188  1189  1190  1191   ..


Jeep Liberty KJ. Manual - part 1190


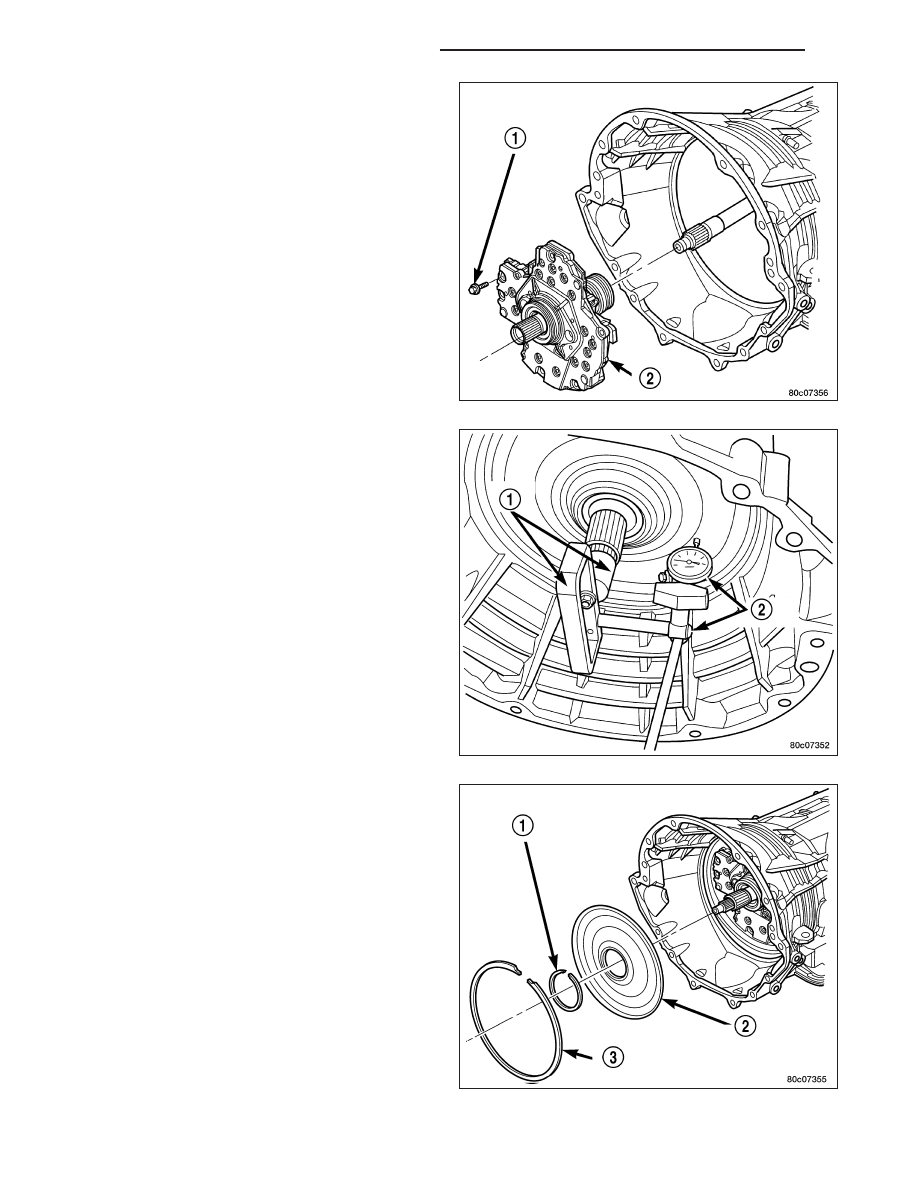
42. Install the oil pump (2) into the transmission case.

43. Install the bolts (1) to hold the oil pump into the

transmission case. Tighten the oil pump bolts to
28 N·m (250 in.lbs.).

44. Using Adapter 8266-1 from End-Play Tool Set

8266 (1) and Dial Indicator C-3339 (2), measure
and record the input shaft end-play. The correct
end-play is 0.46-0.89 mm (0.018-0.035 in.). Adjust
as necessary. Install the chosen thrust plate on
the number 5 thrust bearing and re-measure end-
play to verify selection.

NOTE: When measuring the input shaft end-play,
two

(

stops

(

will be felt. When the input shaft is

pushed inward and the dial indicator zeroed, the
first

(

stop

(

felt when the input shaft is pulled out-

ward is the movement of the input shaft in the
input clutch housing hub. This value should not
be included in the end-play measured value and
therefore must be recorded and subtracted from
the dial indicator reading.

45. Install the transmission front cover (2) into the

transmission case.

46. Install the outer snap-ring (3) to hold the transmis-

sion front cover (2) into the transmission case.

47. Partially install the inner transmission front cover

snap-ring (1) onto the oil pump.

21 - 704

AUTOMATIC TRANSMISSION - 545RFE

KJ

48. Using Snap-ring Installer 8255 (1), install the inner

transmission front cover snap-ring (2) the remain-
der of the way onto the oil pump.

49. Install the valve body. Verify that the pin on the

manual lever has properly engaged the TRS
selector plate. Tighten the valve body to transmis-
sion case bolts (1) to 12 N·m (105 in.lbs.).

CAUTION: The primary oil filter seal MUST be fully
installed flush against the oil pump body. DO NOT
install the seal onto the filter neck and attempt to
install the filter and seal as an assembly. Damage
to the transmission will result.

50. Install a new primary oil filter seal in the oil pump

inlet bore. Seat the seal in the bore with the butt
end of a hammer, or other suitable tool.

51. Install the primary oil filter (1) and the oil cooler

return filter (2). Tighten the screw to hold the pri-
mary oil filter to the valve body to 4.5 N·m (40
in.lbs.). Using Filter Wrench 8321, tighten the
cooler return oil filter to the transmission case to
9.5 N·m (7 ft.lbs.).

52. Apply RTV silicone to the oil pan and install the

transmission oil pan. Tighten the bolts to 12 N·m (105 in.lbs.).

KJ

AUTOMATIC TRANSMISSION - 545RFE

21 - 705

53. Install the input (3), output (1), and line pressure

sensors (2). Tighten the bolts to 12 N·m (105
in.lbs.).

INSTALLATION

1. Check torque converter hub and hub drive flats for

sharp edges burrs, scratches, or nicks. Polish the
hub and flats with 320/400 grit paper and crocus
cloth if necessary. Verify that the converter hub
o-ring is properly installed and is free of any debris.
The hub must be smooth to avoid damaging pump
seal at installation.

2. If a replacement transmission is being installed,

transfer any components necessary, such as the
manual shift lever and shift cable bracket, from the
original transmission onto the replacement trans-
mission.

3. Lubricate oil pump seal lip with transmission fluid.

4. Align converter and oil pump.

5. Carefully insert converter in oil pump. Then rotate

converter back and forth until fully seated in pump
gears.

6. Check converter seating with steel scale (1) and

straightedge (2). Surface of converter lugs should
be at least 13 mm (1/2 in.) to rear of straightedge when converter is fully seated.

7. Temporarily secure converter with C-clamp.

8. Position transmission on jack and secure it with

chains.

9. Check condition of converter driveplate. Replace

the plate if cracked, distorted or damaged. Also be
sure transmission dowel pins are seated in
engine block and protrude far enough to hold
transmission in alignment.

10. Apply a light coating of Mopar

T

High Temp

Grease to the torque converter hub pocket in the
rear pocket of the engine’s crankshaft.

11. Raise transmission (2) and align the torque con-

verter with the drive plate and transmission con-
verter housing with the engine block.

21 - 706

AUTOMATIC TRANSMISSION - 545RFE

KJ

12. Move transmission forward. Then raise, lower or

tilt transmission to align the converter housing
with engine block dowels.

13. Carefully work transmission forward and over

engine block dowels until converter hub is seated
in crankshaft. Verify that no wires, or the transmis-
sion vent hose, have become trapped between
the engine block and the transmission.

14. Install two bolts to attach the transmission to the

engine.

15. Install remaining torque converter housing to

engine bolts. Tighten to 68 N·m (50 ft.lbs.).

16. Install transfer case, if equipped. Tighten transfer

case nuts to 35 N·m (26 ft.lbs.).

17. Install rear transmission crossmember. Tighten

crossmember to frame bolts to 68 N·m (50 ft.lbs.).

18. Install rear support to transmission. Tighten bolts to 47 N·m (35 ft.lbs.).

19. Lower transmission onto crossmember and install bolts attaching transmission mount to crossmember. Tighten

clevis bracket to crossmember bolts to 47 N·m (35 ft.lbs.). Tighten the clevis bracket to rear support bolt to 68
N·m (50 ft.lbs.).

20. Remove engine support fixture.

21. Connect gearshift cable (3) to support bracket and transmission manual lever.

22. Connect wires to solenoid and pressure switch

assembly (2).

23. Connect wires to input speed sensor (2).

KJ

AUTOMATIC TRANSMISSION - 545RFE

21 - 707


Content   ..  1188  1189  1190  1191   ..