Jeep Grand Cherokee WK. Manual - part 1784


  Index      Jeep     Jeep Grand Cherokee WK - service repair manual 2005 year


Search            


Content   ..  1782  1783  1784  1785   ..


Jeep Grand Cherokee WK. Manual - part 1784


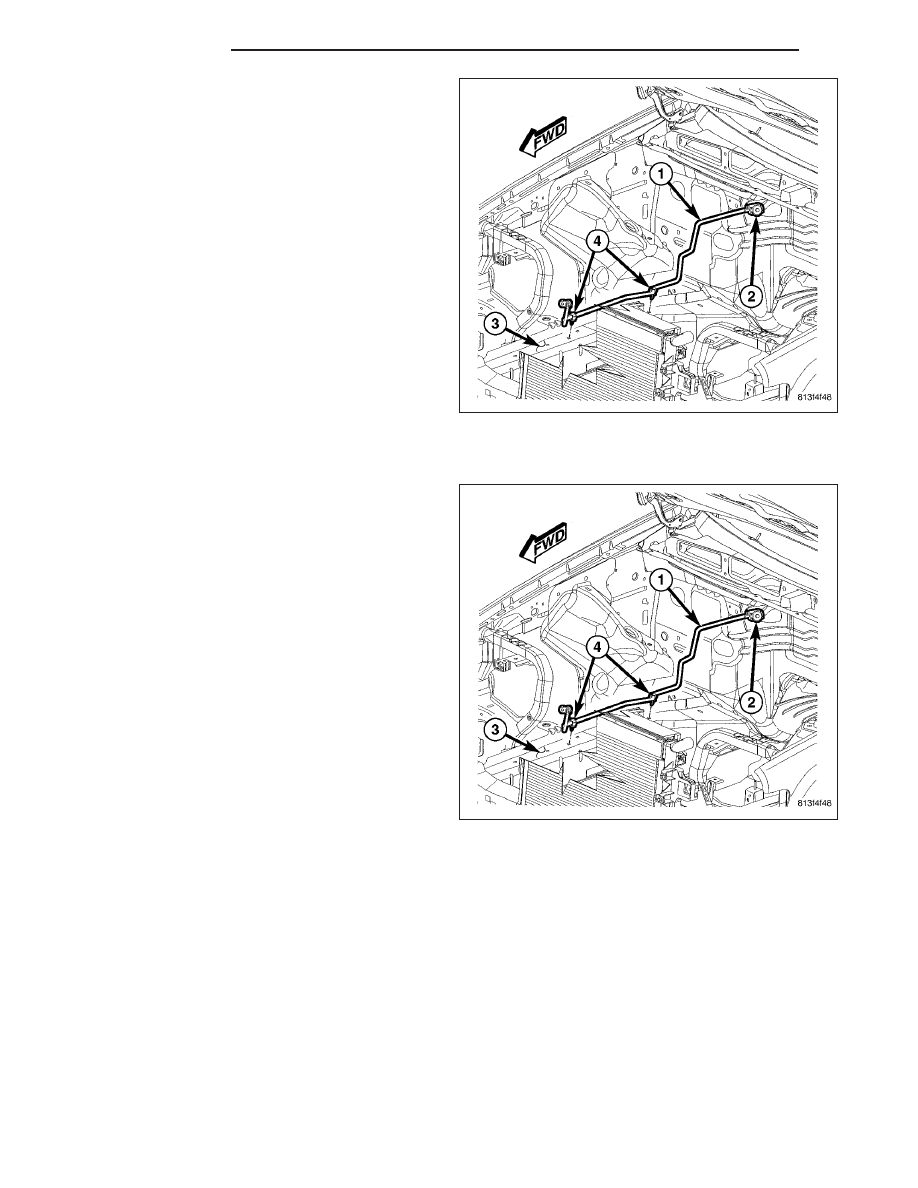
8. Disengage the two liquid line retainer clips (4) from

the right frame rail (3). If required remove the clips
from the liquid line

9. Disconnect the A/C liquid line (1) from the A/C

expansion valve (2) and remove and discard the
O-ring seal.

10. Install plugs in, or tape over the opened liquid and

suction line fittings and the receiver/drier and
expansion valve ports.

11. Remove the A/C liquid line from the engine

compartment.

INSTALLATION

1. Position the A/C liquid line (1) into the engine com-

partment.

2. Remove the tape or plugs from the opened liquid

and suction line fittings and the receiver/drier and
expansion valve ports.

3. Lubricate a new O-ring seal with clean refrigerant

oil and install it onto the rear liquid line fitting. Use
only the specified seal as it is made of a special
material for the R-134a system. Use only refriger-
ant oil of the type recommended for the A/C com-
pressor in the vehicle.

4. Connect the A/C liquid line to the A/C expansion

valve (2) and engage the two liquid line retainer
clips (4) to the frame rail (3).

24 - 484

PLUMBING

WK

5. Lubricate a new dual plane seal with clean refrig-

erant oil and install it onto the front liquid line fit-
ting. Use only the specified seal as it is made of a
special material for the R-134a system. Use only
refrigerant oil of the type recommended for the A/C
compressor in the vehicle.

6. Connect the A/C liquid line (2) to the receiver/drier

(3).

7. Install the nut (1) that secures the A/C liquid line to

the receiver/drier. Tighten the nut to 20 N·m (15 ft.
lbs.).

8. Lubricate a new O-ring seal with clean refrigerant

oil and install it onto the rear suction line fitting.
Use only the specified seal as it is made of a spe-
cial material for the R-134a system. Use only
refrigerant oil of the type recommended for the A/C
compressor in the vehicle.

NOTE: 4.7L engine shown in illustration. Vehicles
equipped with other engines are similar.

9. Connect the A/C suction line (2) to the A/C expan-

sion valve (1).

10. Install the nut (3) that secures the A/C suction line

and the A/C liquid line (10) to the A/C expansion
valve. Tighten the nut to 23 N·m (17 ft. lbs.).

11. Install the air cleaner housing, air intake tube and

the resonator (Refer to 9 - ENGINE/AIR INTAKE
SYSTEM/HOUSING-AIR CLEANER - INSTALLA-
TION).

12. Reconnect the negative battery cable.

13. Evacuate the refrigerant system (Refer to 24 - HEATING & AIR CONDITIONING/PLUMBING - STANDARD

PROCEDURE - REFRIGERANT SYSTEM EVACUATE).

14. Charge the refrigerant system (Refer to 24 - HEATING & AIR CONDITIONING/PLUMBING - STANDARD PRO-

CEDURE - REFRIGERANT SYSTEM CHARGE).

LINE-A/C SUCTION

DESCRIPTION

NOTE: 4.7L engine shown in illustration. A/C discharge line for other engines are similar.

WK

PLUMBING

24 - 485

The A/C suction line (1) is the refrigerant line that car-
ries refrigerant from the evaporator and A/C expansion
valve (2) to the A/C compressor (3). The A/C suction
line includes the low side service port (4).

CAUTION: Use only seals specified for the vehicle.
Failure to use the correct seals will cause the
refrigerant system connections to leak.

The A/C suction line has no serviceable parts except
for the O-ring and dual plane seal, low-side service
port valve and protective cap. The seals used on the
connections are made from a special type of rubber
not affected by R-134a refrigerant. The seals must be
replaced whenever the A/C suction line is removed
and installed.

If the A/C suction line is found to be leaking or dam-
aged, it must be replaced.

REMOVAL

3.7L/4.7L ENGINES

WARNING: Refer to the applicable warnings and cautions for this system before performing the following
operation (Refer to 24 - HEATING & AIR CONDITIONING/PLUMBING - WARNINGS) and (Refer to 24 - HEAT-
ING & AIR CONDITIONING/PLUMBING - CAUTIONS). Failure to follow the warnings and cautions could result
in possible personal injury or death.

1. Recover the refrigerant from the refrigerant system

(Refer to 24 - HEATING & AIR CONDITIONING/
PLUMBING

-

STANDARD

PROCEDURE

-

REFRIGERANT SYSTEM RECOVERY).

2. Disconnect and isolate the negative battery cable.

3. Remove the air intake tube and the resonator

(Refer to 9 - ENGINE/AIR INTAKE SYSTEM/
HOUSING-AIR CLEANER - REMOVAL).

4. Remove the nut (1) that secures the A/C suction

line (6) to the A/C compressor (2).

5. Disconnect the A/C suction line from the A/C com-

pressor and remove and discard the dual plane
seal.

6. Remove the nut (7) that secures the A/C suction

line to the A/C expansion valve (8).

7. Disconnect the A/C suction line from the A/C

expansion valve and remove and discard the
O-ring seal.

8. Install plugs in, or tape over the opened suction line fittings and the compressor and expansion valve ports.

9. Remove the A/C suction line from the engine compartment.

24 - 486

PLUMBING

WK

5.7L ENGINE

1. Recover the refrigerant from the refrigerant system

(Refer to 24 - HEATING & AIR CONDITIONING/
PLUMBING

-

STANDARD

PROCEDURE

-

REFRIGERANT SYSTEM RECOVERY).

2. Disconnect and isolate the negative battery cable.

3. Remove the air intake tube and the resonator

(Refer to 9 - ENGINE/AIR INTAKE SYSTEM/
HOUSING-AIR CLEANER - REMOVAL).

4. Remove the nut (3) that secures the A/C suction

line (2) to the A/C expansion valve (1).

5. Disconnect the A/C suction line from the A/C

expansion valve and the retaining bracket (9) and
remove and discard the O-ring seal.

6. Remove the nut (2) that secures the A/C suction

line (3) to the A/C compressor (4).

7. Disconnect the A/C suction line from the A/C com-

pressor and remove and discard the dual plane
seal.

8. Install plugs in, or tape over the opened suction

line fittings and the compressor and expansion
valve ports.

9. Remove the A/C suction line from the engine

compartment.

WK

PLUMBING

24 - 487


Content   ..  1782  1783  1784  1785   ..