Jeep Grand Cherokee WK. Manual - part 1501


  Index      Jeep     Jeep Grand Cherokee WK - service repair manual 2005 year


Search            


Content   ..  1499  1500  1501  1502   ..


Jeep Grand Cherokee WK. Manual - part 1501


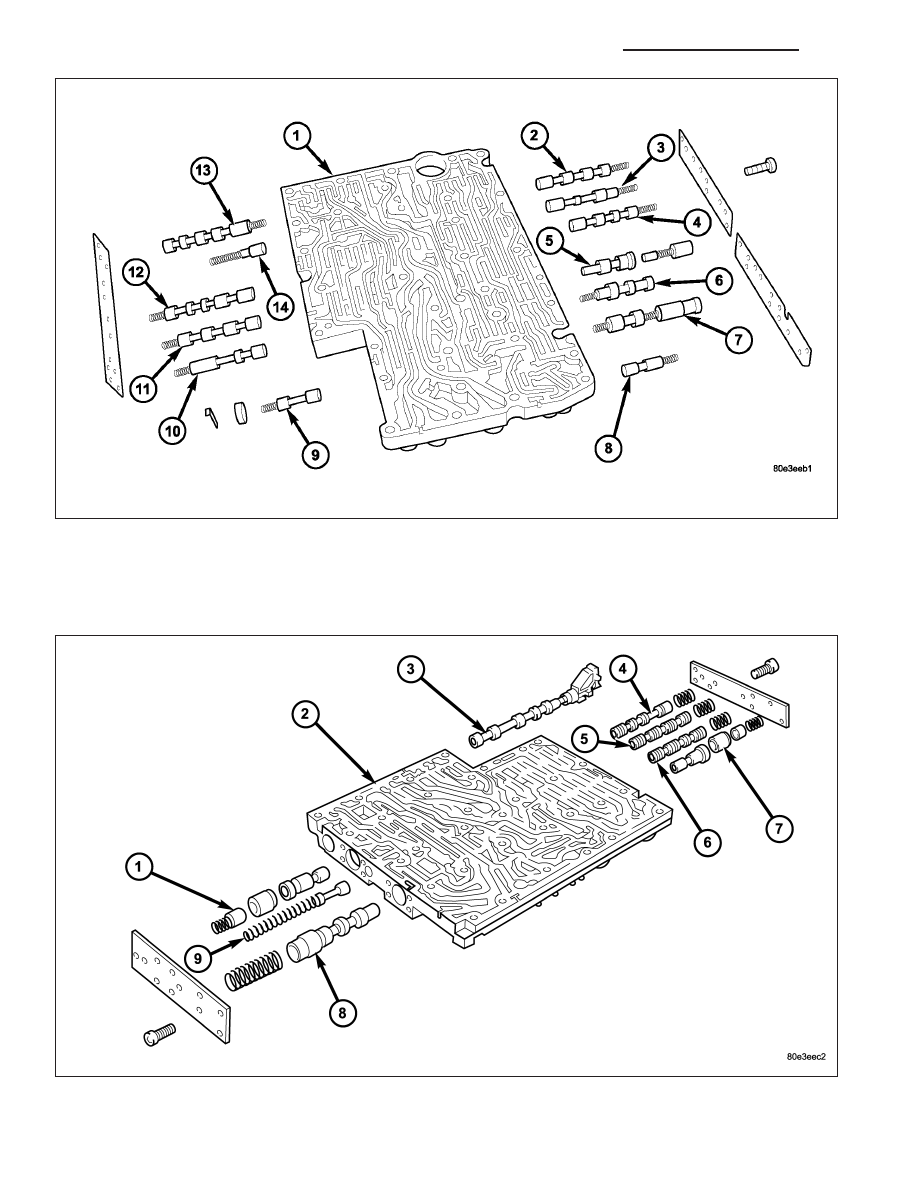
16. Remove the screws holding the side covers to the valve body and valve housing.

17. Remove all valves and springs from the valve body (1). Check all valves for ease of movement and shavings.

NOTE: The sleeves and pistons of the overlap regulating valves must not be mixed up.

21 - 814

AUTOMATIC TRANSMISSION - NAG1 - SERVICE INFORMATION

WK

18. Remove all valves and springs from the valve housing (2). Check all valves for ease of movement and

shavings.

19. Remove the pressure supply valve (1) from the

valve body.

ASSEMBLY

NOTE: Pay great attention to cleanliness for all work on the shift plate. Fluffy cloths must not be used.
Leather cloths are particularly good. After dismantling, all parts must be washed and blown out with com-
pressed-air, noting that parts may be blown away.

1. Install the pressure supply valve (1) into the valve

body.

WK

AUTOMATIC TRANSMISSION - NAG1 - SERVICE INFORMATION

21 - 815

NOTE: The sleeves and pistons of the overlap regulating valves must not be mixed up.

2. Install all valves and springs from the valve body (1). Check all valves for ease of movement and shavings.

3. Install the screws to hold the side covers to the valve body. Tighten the screws to 4 N·m (35 in.lbs.).

4. Install all valves and springs into the valve housing (2). Check all valves for ease of movement and shavings.

21 - 816

AUTOMATIC TRANSMISSION - NAG1 - SERVICE INFORMATION

WK

5. Install the screws to hold the side covers to the valve housing. Tighten the screws to 4 N·m (35 in.lbs.).

NOTE: A total of 12 valve balls are located in the
valve body, four made from plastic (4) and eight
from steel (1, 3).

6. Install all check balls (1, 3, 4) and the central

strainer (2).

7. Install the strainer (1) in the inlet to torque con-

verter lock-up control solenoid valve.

8. Position the sealing plate (3) onto the valve body

(4).

9. Install the valve housing (2) onto the valve body (4)

and sealing plate (3).

10. Install the shift plate Torx

T

bolts (1). Tighten the

bolts to 8 N·m (71 in.lbs.).

11. Install leaf spring (5).

WK

AUTOMATIC TRANSMISSION - NAG1 - SERVICE INFORMATION

21 - 817


Content   ..  1499  1500  1501  1502   ..