Content .. 1157 1158 1159 1160 ..
Jeep Grand Cherokee WK. Manual - part 1159
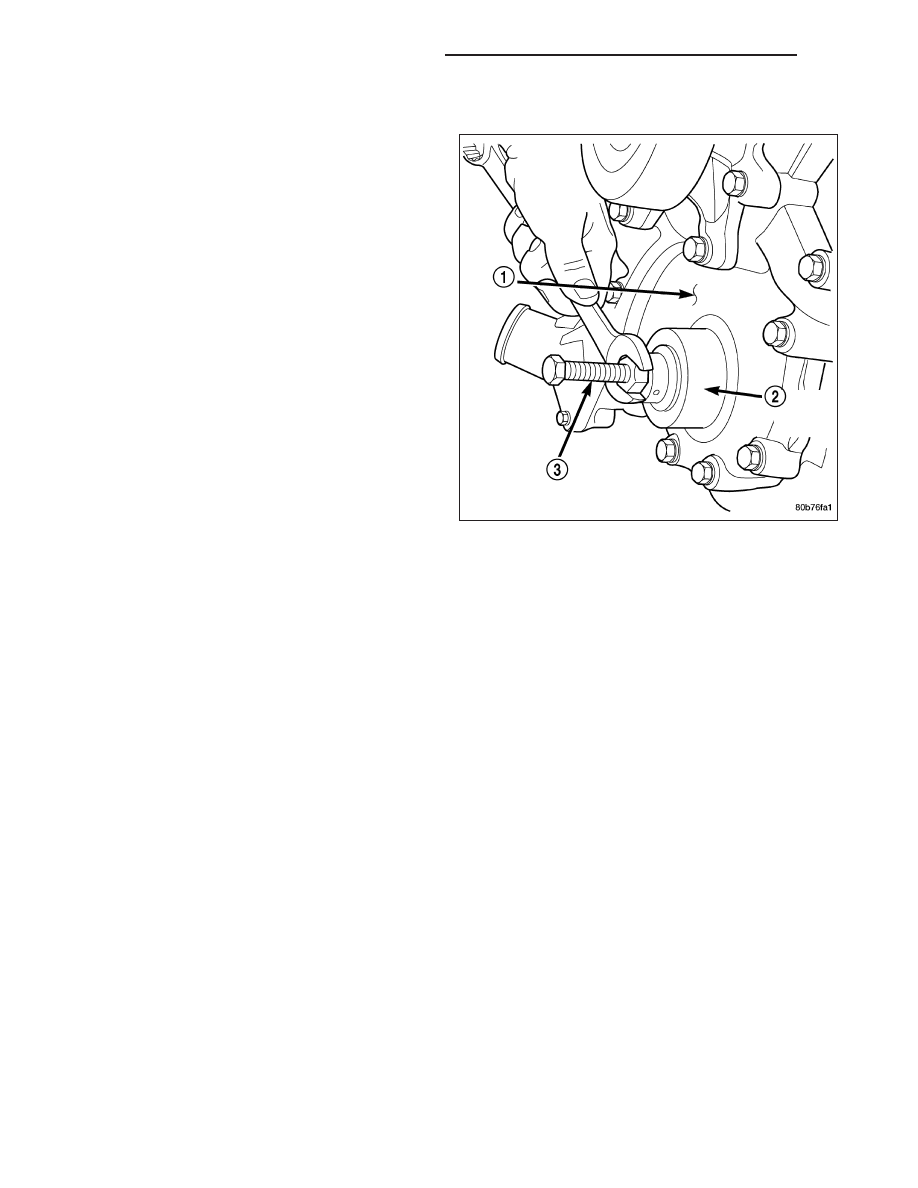
INSTALLATION
CAUTION: To prevent severe damage to the Crank-
shaft, Damper or Special Tool 8512, thoroughly
clean the damper bore and the crankshaft nose
before installing Damper.
1. Using Special Tool 8348 (2) and 8512 (3) , install
crankshaft front seal.
2. Install vibration damper (Refer to 9 - ENGINE/EN-
GINE BLOCK/VIBRATION DAMPER - INSTALLA-
TION).
3. Install radiator cooling fan and shroud (Refer to 7 -
COOLING/ENGINE/RADIATOR FAN - INSTALLA-
TION).
4. Install upper radiator hose.
5. Install A/C compressor and tighten fasteners to 54
N·m (40 ft. lbs.).
6. Install accessory drive belt (Refer to 7 - COOLING/
ACCESSORY DRIVE/DRIVE BELTS - INSTALLA-
TION).
7. Refill cooling system (Refer to 7 - COOLING -
STANDARD PROCEDURE).
8. Connect negative cable to battery.
CRANKSHAFT OIL SEAL - REAR
DIAGNOSIS AND TESTING - REAR SEAL AREA LEAKS
Since it is sometimes difficult to determine the source of an oil leak in the rear seal area of the engine, a more
involved inspection is necessary. The following steps should be followed to help pinpoint the source of the leak.
If the leakage occurs at the crankshaft rear oil seal area:
1. Disconnect the battery.
2. Raise the vehicle.
3. Remove torque converter or clutch housing cover and inspect rear of block for evidence of oil. Use a black light
to check for the oil leak:
a. Circular spray pattern generally indicates seal leakage or crankshaft damage.
b. Where leakage tends to run straight down, possible causes are a porous block, distributor seal, camshaft
bore cup plugs, oil galley pipe plugs, oil filter runoff, and main bearing cap to cylinder block mating surfaces.
See Engine, for proper repair procedures of these items.
4. If no leaks are detected, pressurized the crankcase as outlined in the section, Inspection (Engine oil Leaks in
general)
CAUTION: Do not exceed 20.6 kPa (3 psi).
5. If the leak is not detected, very slowly turn the crankshaft and watch for leakage. If a leak is detected between
the crankshaft and seal while slowly turning the crankshaft, it is possible the crankshaft seal surface is damaged.
The seal area on the crankshaft could have minor nicks or scratches that can be polished out with emery cloth.
9 - 1232
ENGINE - 3.7L SERVICE INFORMATION
WK