Jeep Grand Cherokee WJ. Manual - part 535


  Index      Jeep     Jeep Grand Cherokee WJ - service repair manual 2001 year


Search            


Content   ..  533  534  535  536   ..


Jeep Grand Cherokee WJ. Manual - part 535


(2) Install screws attaching striker to B-pillar.

Tighten screws to 28 N·m (20 ft. lbs.) torque.

FRONT DOOR INSIDE HANDLE ACTUATOR

REMOVAL

(1) Remove door trim panel.
(2) Disconnect latch and lock rods from inside han-

dle actuator.

(3) Remove screws attaching inside handle actua-

tor to trim panel (Fig. 24).

(4) Separate inside handle actuator from trim

panel.

INSTALLATION

(1) Position inside handle actuator in trim panel.
(2) Install screws attaching inside handle actuator

to trim panel.

(3) Connect latch and lock rods to inside handle

actuator.

(4) Install door trim panel.

FRONT DOOR INNER BELT SEAL

REMOVAL

(1) Remove door trim panel.
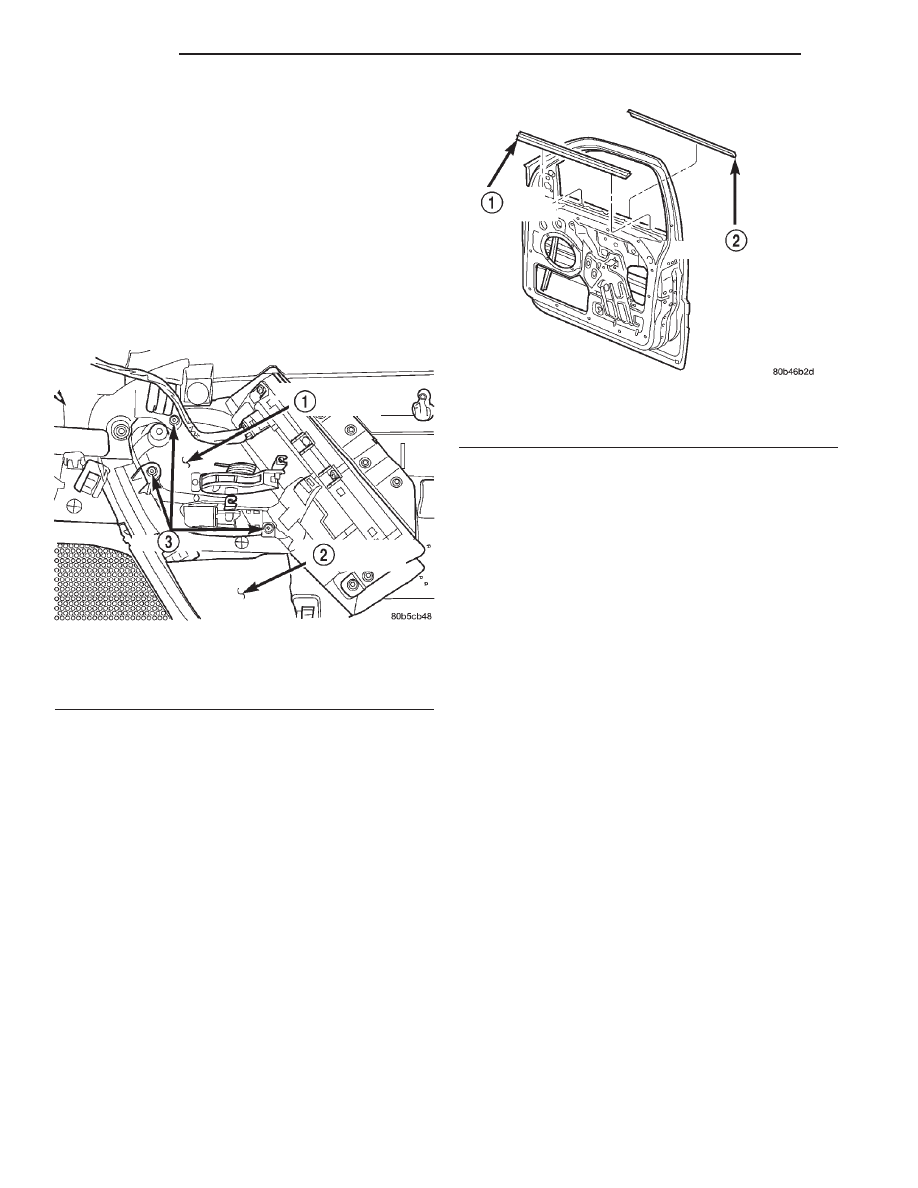
(2) Using a trim stick or other suitable device,

carefully pry up inner edge of seal (Fig. 25).

(3) Grasp the edge of the seal and pull upward to

remove seal from door flange.

INSTALLATION

(1) Position the seal on the door flange.
(2) Firmly press downward to seat seal on the door

flange.

(3) Install the door trim panel.

FRONT DOOR OUTER BELT SEAL

REMOVAL

(1) Lower the door glass.
(2) Remove the screw from the inner door panel

attaching the seal to outer door panel (Fig. 25).

(3) Pull the seal rearward to release from the side

view mirror bezel.

(4) Lift seal and separate from door panel.

INSTALLATION

(1) Position seal on the door panel.
(2) Push the seal forward to install under the side

view mirror bezel.

(3) Install the screw from the inner door panel

attaching the seal to outer door panel.

(4) Raise the door glass.

FRONT DOOR GLASS RUN CHANNEL
WEATHERSTRIP

REMOVAL

(1) Remove trim panel.
(2) Remove inner belt weatherstrip.
(3) Remove outer belt weatherstrip.
(4) Grasp seal from upper run channel corner and

firmly pull weatherstrip from flange and run channel
(Fig. 26).

INSTALLATION

NOTE: Soapy water may be used to aid in installa-
tion.

Fig. 24 Front Door Inside Handle Actuator

1 – INSIDE HANDLE ACTUATOR
2 – DRIVER’S DOOR TRIM PANEL
3 – SCREW

Fig. 25 Inner/Outer Belt Weather Strip

1 – INNER BELT WEATHERSTRIP
2 – OUTER BELT WEATHERSTRIP

23 - 38

BODY

WJ

REMOVAL AND INSTALLATION (Continued)

(1) Remove front door speaker.
(2) Position weatherstrip on flange aligning each

corner.

(3) Press weatherstrip into position.
(4) Carefully move door glass for and aft and press

weatherstrip into glass run channels.

(5) Install front door speaker.
(6) Install outer belt weatherstrip.
(7) Install inner belt weatherstrip.
(8) Install trim panel.

FRONT DOOR GLASS RUN CHANNEL

REMOVAL

NOTE: Only the rearward glass run channel is ser-
viceable.

(1) Remove door trim panel.
(2) Remove isolator.
(3) Remove inner and outer belt weatherstrip.
(4) Remove bolt attaching run channel to inner

door panel (Fig. 27).

(5) Peel back glass run channel weatherstrip on

rear run channel.

(6) Pull glass run channel downward to separate

from door.

(7) Remove glass run channel from door.

INSTALLATION

(1) Position glass run channel in door.
(2) Align glass run channel with door frame run

channel and slide channel upward to secure door.

(3) Press glass run channel weatherstrip into rear

run channel.

(4) Install bolt attaching run channel to inner door

panel.

(5) Install inner and outer belt weatherstrip.
(6) Install isolator.
(7) Install door trim panel.

FRONT DOOR OPENING WEATHERSTRIP

REMOVAL

(1) Remove A-pillar trim.
(2) Remove B-pillar upper trim.
(3) Remove B-pillar lower trim.
(4) Pull weatherstrip from door opening flange.

INSTALLATION

(1) Position weatherstrip at corners.
(2) Move upward and around edge of door opening

seating weatherstrip onto flange (Fig. 28).

(3) Engage connector plug with each end of weath-

erstrip at bottom of door opening.

(4) Install B-pillar lower trim.
(5) Install B-pillar upper trim.
(6) Install A-pillar trim.

FRONT DOOR SECONDARY WEATHERSTRIP

REMOVAL

The front door secondary weatherstrip is attached

to the door shutface with push-in fasteners.

(1) Open door.
(2) Using a trim panel removal tool, remove

push-in fasteners attaching secondary weatherstrip
to door shutface (Fig. 29).

(3) Separate secondary weatherstrip from door.

Fig. 26 Front Door Glass Run Channel Weatherstrip

1 – GLASS RUN CHANNEL WEATHERSTRIP
2 – DOOR

Fig. 27 Front Door Glass Run Channel

1 – DOOR
2 – GLASS
3 – GLASS RUN CHANNEL
4 – REGULATOR

WJ

BODY

23 - 39

REMOVAL AND INSTALLATION (Continued)

INSTALLATION

(1) Clean contact area as necessary.
(2) Position secondary weatherstrip on door shut-

face.

(3) Install push-in fasteners attaching secondary

weatherstrip to door shutface.

FRONT DOOR WINDOW REGULATOR

REMOVAL

(1) Remove door trim panel.
(2) Remove isolator.
(3) Remove front door glass.
(4) Loosen bolts attaching regulator to inner door

panel (Fig. 30).

(5) Remove bolt attaching regulator to inner door

panel (Fig. 31).

(6) Lift regulator upward to disengage bolts from

door inner panel.

(7) Disengage power window regulator harness

connector, if equipped.

(8) Remove regulator through access hole in door.

INSTALLATION

(1) Position regulator in door through access hole.
(2) Engage power window regulator harness con-

nector, if equipped.

(3) Lift regulator upward and engage bolts in door

inner panel key hole slots.

(4) Install bolt attaching regulator to inner door

panel.

(5) Tighten bolts attaching regulator to inner door

panel.

(6) Install front door glass.
(7) Install isolator.
(8) Install door trim panel.

FRONT DOOR GLASS

REMOVAL

(1) Locate glass to full down position.
(2) Remove trim panel.

Fig. 28 Door Opening Weatherstrip

1 – REAR DOOR OPENING WEATHERSTRIP
2 – FRONT DOOR OPENING WEATHERSTRIP

Fig. 29 Front Door Secondary Weatherstrip

1 – SECONDARY WEATHERSTRIP

Fig. 30 Front Door Regulator Bolts

1 – FRONT DOOR
2 – REMOVE BOLT
3 – LOOSEN BOLTS

23 - 40

BODY

WJ

REMOVAL AND INSTALLATION (Continued)

(3) Remove inner belt weatherstrip.
(4) Remove outer belt weatherstrip.
(5) Locate glass to 3/4 up position.
(6) Remove front door insulator.
(7) Using a long flat blade or hook type tool, dis-

engage clips (Fig. 32) attaching glass retainer to
glass lift plate.

(8) Carefully push bottom of glass panel outward

to disengage glass retainer studs from lift plate (Fig.
33).

(9) Lift glass upward and out of door.

INSTALLATION

(1) Lower glass into position.
(2) Carefully align glass retainer studs with lift

plate and insert studs into lift plate.

(3) Engage clips attaching glass retainer to glass

lift plate.

(4) Install front door insulator.
(5) Locate glass to full down position.
(6) Install outer belt weatherstrip.
(7) Install inner belt weatherstrip.
(8) Install trim panel.

REAR DOOR B-PILLAR SEAL

REMOVAL

The B-pillar seal is attached to the rear door with

adhesive tape.

(1) Peel seal from the door (Fig. 34).

INSTALLATION

(1) Clean contact area with Mopar Super Kleen or

equivalent.

(2) Remove carrier from seal.
(3) Align seal on door and press into place.

REAR DOOR TRIM PANEL

REMOVAL

(1) Remove screws attaching trim panel to door

(Fig. 35).

(2) Using trim remover (C-4829 or equivalent),

detach trim panel perimeter push-in fasteners from
door inner panel.

(3) Lift trim panel upward and separate from door.

Fig. 31 Front Door Window Regulator

1 – FRONT DOOR
2 – REGULATOR

Fig. 32 Front Door Glass Clips

1 – GLASS
2 – RETAINER
3 – CLIP
4 – LIFT PLATE
5 – REGULATOR
6 – CLIP

Fig. 33 Front Door Glass Retainer Studs

1 – GLASS
2 – RETAINER
3 – LIFT PLATE
4 – STUD

WJ

BODY

23 - 41

REMOVAL AND INSTALLATION (Continued)


Content   ..  533  534  535  536   ..