Jeep Grand Cherokee WJ. Manual - part 56


  Index      Jeep     Jeep Grand Cherokee WJ - service repair manual 2001 year


Search            


Content   ..  54  55  56  57   ..


Jeep Grand Cherokee WJ. Manual - part 56


ASSEMBLY

CAUTION: Dirt, oil, and solvents can damage cali-
per seals. Insure assembly area is clean and dry.

(1) Lubricate caliper pistons, piston seals and pis-

ton bores with clean brake fluid.

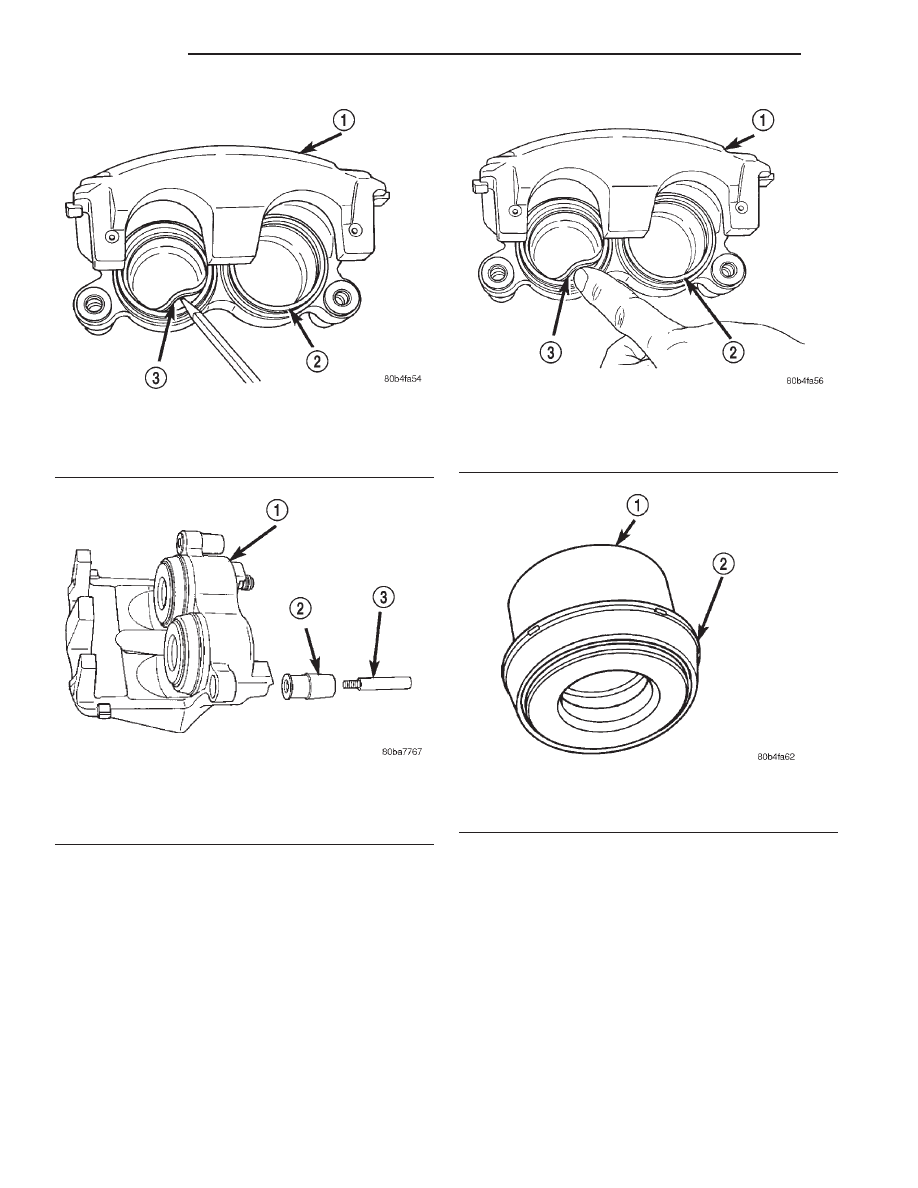
(2) Install new piston seals into seal groove with

finger (Fig. 69).

NOTE: Verify seal is fully seated and not twisted.

(3) Install new dust boot on caliper piston and seat

boot lip into piston groove (Fig. 70).

(4) Stretch boot rearward to straighten boot folds,

then move boot forward until folds snap into place.

(5) Install piston into caliper bore and press piston

down to the bottom of the caliper bore by hand or
with hammer handle (Fig. 71).

(6) Seat

dust

boot

in

caliper

(Fig.

72)

with

Installer 8280 and Handle C-4171.

(7) Install the second piston and dust boot.
(8) Install caliper slide pin bushings into the cali-

per.

(9) Install caliper bleed screw.

Fig. 67 Piston Seal

1 – CALIPER
2 – PISTON BORE
3 – PISTON SEAL

Fig. 68 Caliper Slide Pin Bushings

1 – CALIPER
2 – BUSHING
3 – CALIPER SLIDE PIN

Fig. 69 Piston Seal

1 – CALIPER
2 – PISTON BORE
3 – PISTON SEAL

Fig. 70 Dust Boot On Piston

1 – PISTON
2 – DUST BOOT

5 - 32

BRAKES

WJ

DISASSEMBLY AND ASSEMBLY (Continued)

REAR DISC BRAKE CALIPER

DISASSEMBLY

(1) Drain brake fluid out of caliper.
(2) Take a piece of wood and pad it with one-inch

thickness of shop towels. Place this piece in the out-
board shoe side of the caliper in front of the piston.
This will cushion and protect caliper piston during
removal (Fig. 73).

(3) To remove caliper piston direct short bursts

of low pressure air with a blow gun through the
caliper brake hose port (Fig. 74). Use only enough air
pressure to ease the piston out.

CAUTION: Do not blow the piston out of the bore
with sustained air pressure. This could result in a
cracked piston.

WARNING: NEVER ATTEMPT TO CATCH THE PIS-
TON AS IT LEAVES THE BORE. THIS MAY RESULT
IN PERSONAL INJURY.

(4) Remove caliper piston dust boot with a suitable

pry tool (Fig. 75) and discard.

(5) Remove piston seal from the caliper (Fig. 76)

and discard.

CAUTION: Do not scratch the piston bore while
removing the seal.

Fig. 71 Caliper Piston Installation

1 – CALIPER
2 – DUST BOOT
3 – PISTON

Fig. 72 Seating Dust Boot

1 – HANDLE
2 – CALIPER
3 – DUST BOOT INSTALLER

Fig. 73 Padding Caliper Interior

1 – SHOP TOWELS OR CLOTHS
2 – CALIPER

Fig. 74 Caliper Piston Removal

1 – CALIPER PISTON
2 – AIR GUN
3 – PADDING MATERIAL

WJ

BRAKES

5 - 33

DISASSEMBLY AND ASSEMBLY (Continued)

(6) Remove caliper slide pin bushings (Fig. 77).
(7) Remove caliper bleed screw.

ASSEMBLY

CAUTION: Dirt, oil, and solvents can damage cali-
per seals. Insure assembly area is clean and dry.

(1) Lubricate caliper piston, piston seal and piston

bore with clean brake fluid.

(2) Install new piston seal into seal groove with

finger (Fig. 78).

NOTE: Verify seal is fully seated and not twisted.

Fig. 75 Caliper Piston Dust Boot Removal

1 – PISTON DUST BOOT
2 – CALIPER

Fig. 76 Piston Seal Removal

1 – CALIPER
2 – PISTON BORE
3 – PISTON SEAL

Fig. 77 Slide Pin And Bushing

1 – BUSHING
2 – CALIPER SLIDE PIN

Fig. 78 Piston Seal Installation

1 – SEAL GROOVE
2 – PISTON SEAL

5 - 34

BRAKES

WJ

DISASSEMBLY AND ASSEMBLY (Continued)

(3) Install new dust boot on caliper piston and seat

boot lip into piston groove (Fig. 79).

(4) Stretch boot rearward to straighten boot folds,

then move boot forward until folds snap into place.

(5) Install piston into caliper bore and press piston

down to the bottom of the caliper bore by hand or
with hammer handle (Fig. 80).

(6) Seat dust boot in caliper with Installer 8280

and Handle C-4171 (Fig. 81).

(7) Install caliper slide pin bushings into the cali-

per (Fig. 82).

(8) Install caliper bleed screw.

CLEANING AND INSPECTION

CALIPER

CLEANING

Clean the caliper components with clean brake

fluid or brake clean only. Wipe the caliper and piston
dry with lint free towels or use low pressure com-
pressed air.

CAUTION: Do not use gasoline, kerosene, paint
thinner, or similar solvents. These products may
leave a residue that could damage the piston and
seal.

Fig. 79 Dust Boot On Piston

1 – PISTON
2 – DUST BOOT

Fig. 80 Caliper Piston Installation

1 – PISTON
2 – BOOT

Fig. 81 Piston Dust Boot Installation

1 – HANDLE
2 – INSTALLER
3 – DUST BOOT

Fig. 82 Slide Pin And Bushing

1 – CALIPER SLIDE PIN
2 – BUSHING

WJ

BRAKES

5 - 35

DISASSEMBLY AND ASSEMBLY (Continued)


Content   ..  54  55  56  57   ..