Jaguar X-Type Sedan and Estate (Wagon). Manual - part 429


  Index      Jaguar     Jaguar X-Type Sedan and Estate (Wagon) (2.0 L, 2.5 L and 3.0 L Gasoline; 2.0 L and 2.2 L, Diesel) - manual 2001-2009 year


Search            


Content   ..  427  428  429  430   ..


Jaguar X-Type Sedan and Estate (Wagon). Manual - part 429


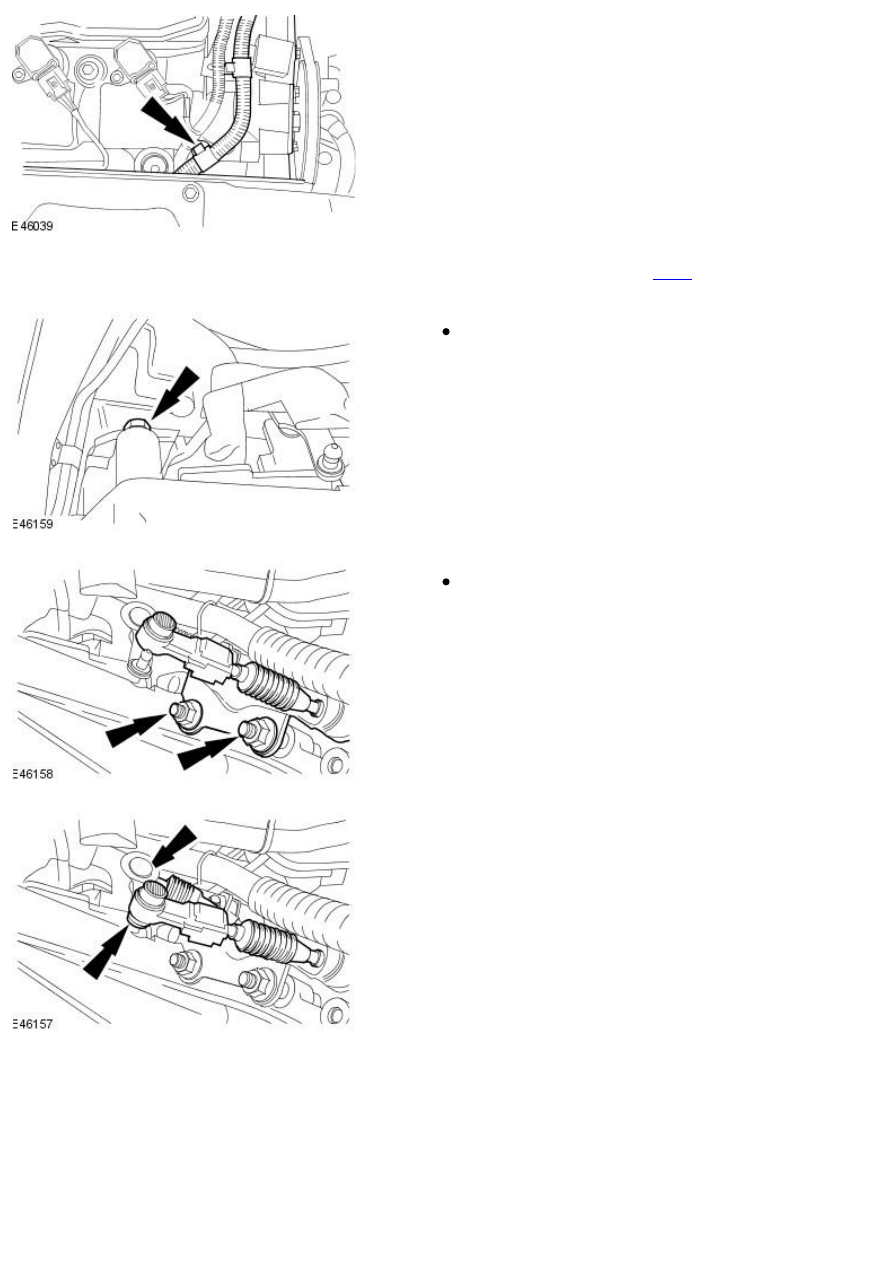
28. Attach the generator wiring harness retaining clip to the camshaft

cover retaining clip.

29. Raise the vehicle.

For additional information, refer to: 

Lifting

 (100-02 Jacking and Lifting,

Description and Operation).

30. Install the transaxle mount bracket retaining bolt.

Tighten to 80 Nm.

31. Attach the gearshift cable support bracket to the transaxle.

Tighten to 25 Nm.

32. Attach the gearshift cables to the transaxle.

33. NOTE: Remove the transaxle plug.

Using the special tool, install a new halfshaft seal.

34. Install a new halfshaft snap ring.

35. 

CAUTION: Make sure the halfshaft constant velocity (CV) joints

do not over articulate. Failure to follow this instruction may result in
damage to the CV joints.

Detach the left-hand halfshaft.

36. CAUTIONS:

 Make sure the halfshaft constant velocity (CV) joints do not over

articulate. Failure to follow this instruction may result in damage to the CV
joints.

 Make sure the halfshaft seal is not damaged. Failure to follow this

instruction may result in an transaxle fluid leak.

Attach the left-hand halfshaft to the transaxle.

Make sure the halfshaft snap ring is correctly seated.

37. Detach the power steering fluid pipe.

Vehicles with 2.0L engine

38. NOTE: Remove the transaxle plug.

Using the special tool, install a new halfshaft seal.

39. 

CAUTION: Make sure the halfshaft constant velocity (CV) joints

do not over articulate. Failure to follow this instruction may result in
damage to the CV joints.

Attach the right hand halfshaft.

Engage the right-hand halfshaft from the transaxle.

Tighten to 25 Nm.

Vehicles with 2.5L or 3.0L engine

40. Install the transfer case.

For additional information, refer to: 

Transfer Case

 (308-07 Transfer

Case, Installation).

41. Install the steering gear heat shield.

42. Install the steering gear heat shield bracket.

All vehicles

43. Install the fender splash shield access panel.

44. Install the front subframe.

For additional information, refer to: 

Front Subframe - 2.0L NA V6 -

AJV6/2.5L NA V6 - AJV6/3.0L NA V6 - AJ27

 (502-00 Uni-Body, Subframe

and Mounting System, Removal and Installation).

45. Tighten the right-hand shock absorber and spring assembly securing

nuts.

Tighten to 25 Nm.

46. Tighten the left-hand shock absorber and spring assembly securing

nuts.

Tighten to 25 Nm.

47. Install the air cleaner.

For additional information, refer to: 

Air Cleaner

 (303-12A Intake Air

Distribution and Filtering - 2.0L NA V6 - AJV6/2.5L NA V6 - AJV6/3.0L NA
V6 - AJ27, Removal and Installation).

48. Install the battery tray.

For additional information, refer to: 

Battery

 (414-01 Battery, Mounting

and Cables, Removal and Installation).

49. Fill the manual transaxle to the correct oil level.

For additional information, refer to: 

Transaxle Draining and Filling -

Vehicles W ith: 5-Speed Manual Transmission - MT75

 (308-03 Manual

Transmission/Transaxle, General Procedures).


Content   ..  427  428  429  430   ..