Jaguar X-Type Sedan and Estate (Wagon). Manual - part 187


  Index      Jaguar     Jaguar X-Type Sedan and Estate (Wagon) (2.0 L, 2.5 L and 3.0 L Gasoline; 2.0 L and 2.2 L, Diesel) - manual 2001-2009 year


Search            


Content   ..  185  186  187  188   ..


Jaguar X-Type Sedan and Estate (Wagon). Manual - part 187


9. Install the access cover.

Tighten to 10 Nm.

10. Install the dust cover.

Tighten to 10 Nm.

11. Install the starter motor.

Tighten to 35 Nm.

Vehicles with 2.5L or 3.0L engine

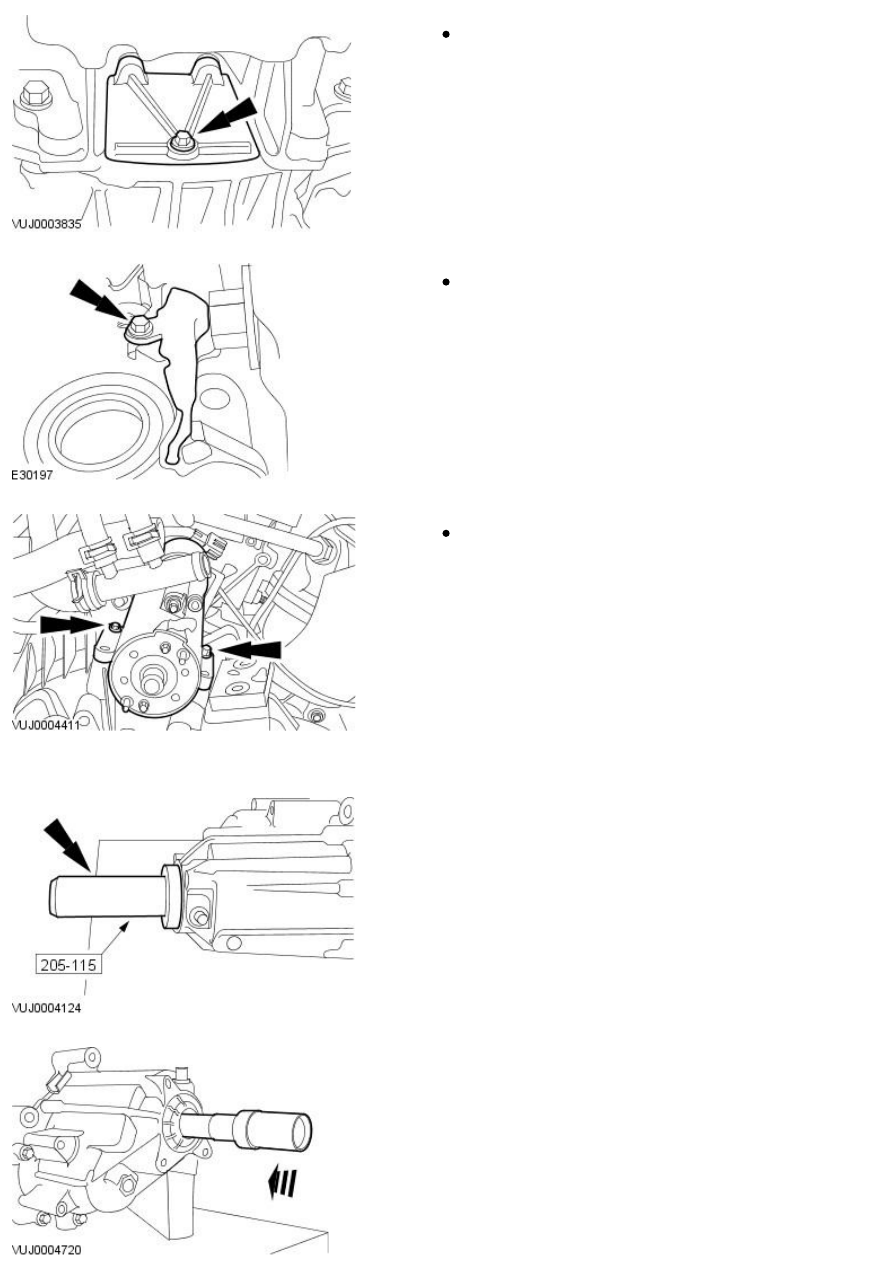
12. NOTE: Using a suitable surface cleaner, W SE-M5B392-A or equivalent,
meeting the Jaguar specification. Clean the seal face on the transfer case
before installing the new link shaft oil seal.

Using the special tool, install a new link shaft oil seal.

13. Install the link shaft.

14. Install a new link shaft snap ring.

15. Install a new transfer case O-ring seal.

16. NOTE: Engage the link shaft into the transaxle.

Install the transfer case.

Tighten to 90 Nm.

17. NOTE: Do not tighten the engine roll restrictor bracket top retaining
bolts at this stage at this stage.

Install the engine roll restrictor bracket.

Install the engine roll restrictor bracket top retaining bolts.

18. NOTE: Do not tighten the engine roll restrictor bracket retaining nuts
at this stage.

Install the engine roll restrictor bracket.

19. Install the engine roll restrictor bracket side retaining bolts.

Tighten to 35 Nm.

20. Tighten the engine roll restrictor bracket retaining nuts.

Tighten to 35 Nm.

21. Tighten the engine roll restrictor bracket top retaining bolts.

Tighten to 55 Nm.

22. NOTE: Do not tighten the catalytic converter retaining bolts at this
stage.

Install the catalytic converter mount bracket.

23. Install the catalytic converter mount bracket retaining bolt.

Tighten to 25 Nm.

24. Tighten the catalytic converter mount bracket retaining bolts.

Tighten to 55 Nm.

25. Install a new catalytic converter sealing ring.

26. Install new catalytic converter retaining studs.

Tighten to 9 Nm.

27. 

CAUTION: Never use jointing compound forward of the catalytic

converter. Failure to follow this instruction may result in damage to the
component.

• NOTE: Make sure the retaining nuts are tightened twice in the sequence
shown.

Install the right-hand catalytic converter.

Install new retaining nuts.

Tighten in the sequence shown to 25 Nm.

28. Connect the right-hand heated oxygen sensor (HO2S) electrical

connector.


Content   ..  185  186  187  188   ..