Isuzu Trooper (1998-2002 year). Manual - part 574


  Index      Isuzu     Isuzu Trooper - service repair manual 1998-2002 year


Search            


Content   ..  572  573  574  575   ..


Isuzu Trooper (1998-2002 year). Manual - part 574


6B – 4 ENGINE COOLING

ANTI-FREEZE SOLUTION

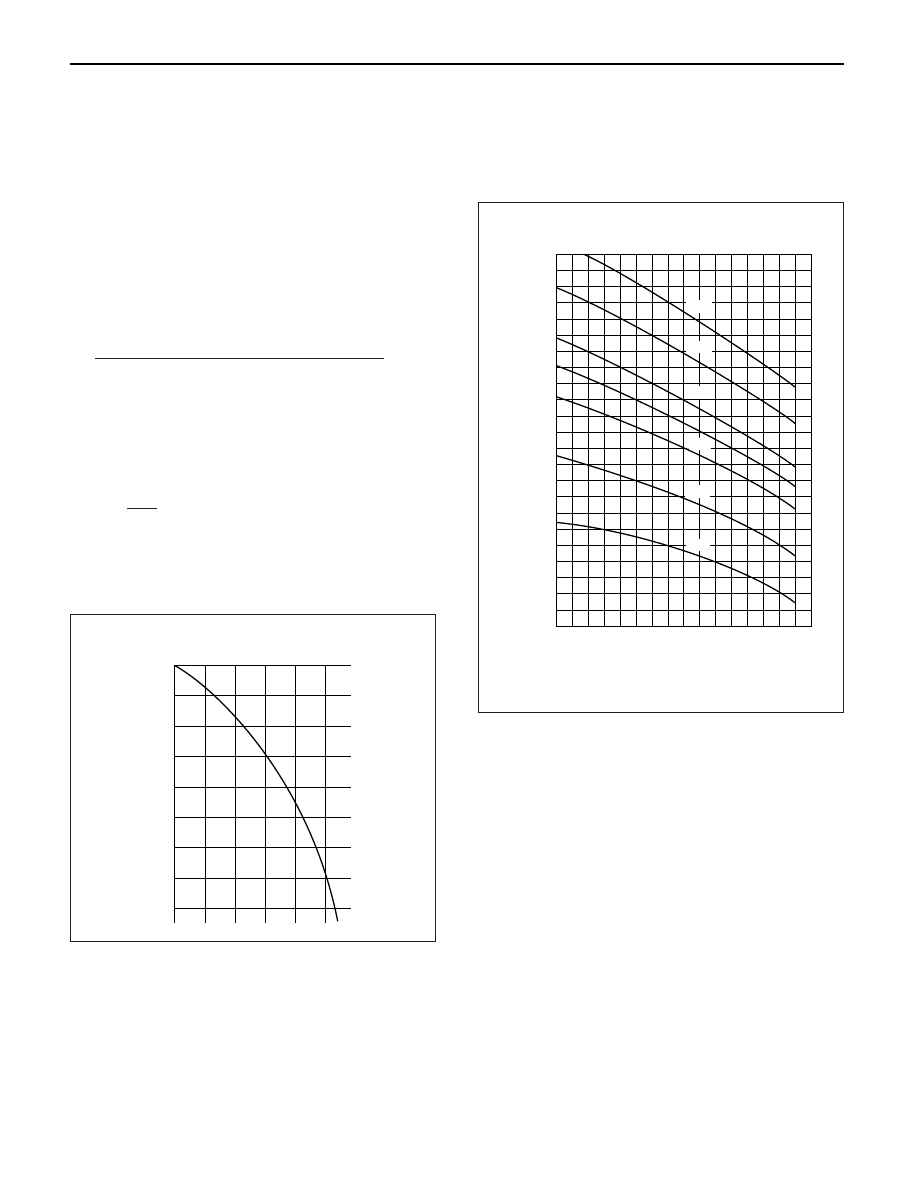
Relation between Mixing ratio and Freezing point
Freezing temperature of the engine coolant varies
with the ratio of anti-freeze solution in water. 
Proper mixing ratio can be determined by refering
to the chart.  Supplemental inhibitors or additives
claiming to increase cooling capability that have not
been specifically approved by Isuzu are not
recommended for addition to the cooling system.

Calculation of mixing ratio

Mixing ratio (%)

=

Anti-freeze solution (Lit/qt.)

×

100

Anti-freeze solution (Lit/qt.) + Water (Lit/qt.)

For example
In case total coolant capacity = 10 

l

It is necessary to mix about 35% anti-freeze
solution at ambient temperature minus 20°C.
Capacity of anti-freeze solution:

35 

×

10 = 3.5 

l

100

Water capacity: 10 

l

– 3.5 

l

= 6.5 

l

Therefore, you prepare the water 6.5 

l

and anti-

freeze solution 3.5 

l

, then mix them to get total 

10 

l

coolant.

Mixing ratio
Check the specific gravity of engine coolant in the
cooling system in temperature ranges from 0° C to
50° C using a suction type hydrometer, then
determine the density of the coolant by referring to
the table at below.

-10

10

0

Freezing T

emperature(

°

C)

20

30

Antifreeze Solution Density(%)

40

50

-20

-30

-40

B06RW018

1,100

20

10

30

40

60%

50%

40%

20%

10%

30%

Antifreeze Solution Temperature(

°

C)

50

60

70

0

Specific Gravity

1,090

1,080

1,070

1,060

1,050

1,040

1,030

1,020

1,010

1,000

B06RW017

ENGINE COOLING  6B – 5

ENGINE COOLANT CHANGE
PROCEDURE

1. To change engine coolant, make sure that the

engine is cool.

WARNING:
When the coolant is heated to a high temperature,
be sure not to loosen or remove the radiator cap.
Otherwise you might get scalded by hot vapor or
boiling water. To open the radiator cap, put a piece
of thick cloth on the cap and loosen the cap slowly
to reduce the pressure once the coolant has
become cooler.

2. Open radiator cap and drain the cooling system by

loosening the drain valve on the radiator and on the
cylinder body.

NOTE: For best results it is suggested that the engine
cooling system be flushed at least once a year. It is
advisable to flush the interior of the cooling system
including the radiator before using anti-freeze
(ethylene-glycol based).
Replace damaged rubber hoses as the engine anti-
freeze coolant is liable to leak out even minor cracks.
Isuzu recommends using Isuzu genuine anti-freeze
(ethylene-glycol based) or equivalent, for the cooling
system and not add any inhibitors or additives.

CAUTION:
A failure to correctly fill the engine cooling system
in changing or topping off coolant may sometimes
cause the coolant to overflow from the filler neck
even before the engine and radiator are completely
full.
If the engine runs under this condition, shortage of
coolant may possibly result in engine overheating.
To avoid such trouble, the following precautions
should be taken in filling the system.

3. To refill engine coolant, pour coolant up to filler neck

using a filling hose which is smaller in outside
diameter than the filler neck. Otherwise air between
the filler neck and the filling hose will block entry,
preventing the system from completely filling up.

4. Keep a filling rate of 9 liter/min. or less. Filling over

this maximum rate may force air inside the engine
and radiator.
And also, the coolant overflow will increase, making
it difficult to determine whether or not the system is
completely full.

5. After filling the system full, pull out the filling hose

and check to see if air trapped in the system is
dislodged and the coolant level goes down. Should
the coolant level go down, repeat topping-off until
there is no more drop in the coolant level.

6. Directly after filling the radiator, fill the reservoir to

the maximum level.

7. Install and tighten radiator cap and start the engine.

After idling for 2 to 3 minutes, stop the engine and
reopen radiator cap. If the water level is lower,
replenish.

WARNING:
When the coolant is heated to a high temperature,
be sure not to loosen or remove the radiator cap.
Otherwise you might get scalded by hot vapor or
boiling water. To open the radiator cap, put a piece
of thick cloth on the cap and loosen the cap slowly
to reduce the pressure once the coolant has
become cooler.

8. After tightening radiator cap, warm up the engine at

about 2,000 rpm.
Set heater adjustment to the highest temperature
position, and let the coolant circulate also into
heater water system.

9. Check to see the thermostat has opened by the

needle position of a water thermometer, conduct a
5-minute idle again and stop the engine.

10. When the engine has been cooled, check filler neck

for water level and replenish if required. Should
extreme shortage of coolant be found, check the
coolant system and reservoir tank hose for leakage.

11. Fill the coolant into the reservoir tank up to “MAX”

line.

6B – 6 ENGINE COOLING

REMOVAL

1. Drain coolant.
2. AC Generator Drive Belt

1) Loosen AC Generator mounting bolt, adjust

plate lock bolt, and remove the drive belt.

3. Cooling Fan Assembly

1) Remove lock nut and take out cooling fan

assembly with cooling fan clutch.

4. Water Pump Assembly

INSPECTION

Make necessary repair and parts replacement if
excessive wear or damage is found during inspection.
Should any of the following problems occur, the entire
water pump assembly must be replaced.

1) Cracks in the water pump body
2) Coolant leakage from the seal unit
3) Excessive play in radial direction or abnormal noise
4) Excessive play in thrust direction

Limit : 0.2mm (0.008in) or less

5) Cracks or corrosion in the impeller

INSTALLATION

1. Gasket

1) Set gasket to gear case.

2. Water Pump Assembly

1) Install water pump assembly, and tighten to

specified torque.

Torque: 20 N·m (2.0 kg·m/14 lb ft)

3. Cooling Fan Assembly

1) Install cooling fan assembly, and tighten to

specified torque.

Torque: 8 N·m (0.8 kg·m/5.8 lb ft)

4. AC Generator Drive Belt

1) Install AC Generator drive belt and adjust belt

tension.

Torque: 40 N·m (4.1 kg·m/29.7 lb ft)

For ACG to bracket

20 N·m (2.0 kg·m/14.5 lb ft)
For ACG to adjust plate

5. Fill coolant to specified capacity.

1

2

Legend

(1)

Fan Pulley

(2)

Water Pump Assembly

030RW009

ON-VEHICLE SERVICE

WATER PUMP

ENGINE COOLING  6B – 7

THERMOSTAT

REMOVAL

1. Disconnect battery ground cable.
2. Drain coolant from the radiator and engine.
3. Thermostat housing

1) Remove mounting bolt and remove thermostat

housing together with radiator hose.

4. Gasket
5. Thermostat

INSPECTION

Make necessary repair and parts replacement if
excessive wear or damage is found during inspection.
Submerge the thermostat assembly in the water.
Place wooden blocks on the bottom of the water
container.
Do not heat the thermostat directly.
Gradually increase the water temperature. Stir the
water so that the entire water is the same temperature.

1) Make sure that valve begins to open at the

specified temperature.

Valve Opening Temperature: 85°C (185°F)

2) Make sure that valve opens fully at the specified

temperature.

Valve Full Open Temperature: 100°C (212°F)

1

2

3

4

Legend

(1)

Bolt

(2)

Thermostat Housing

(3)

Thermostat

(4)

Intake Manifold

035RW002

031RS003


Content   ..  572  573  574  575   ..