Infiniti Q70 Hybrid (2018 year). Manual - part 14


  Index      Infiniti     Infiniti Q70 Hybrid (2018 year) - manual in english


Search            copyright infringement  


Content      ..     12      13      14      15     ..


Infiniti Q70 Hybrid (2018 year). Manual - part 14


sunshade inlet port. Doing so may
entangle these objects in the sun-
shade when it is extending or retract-
ing, causing improper operation or
damage to the sunshade.

Do not push the sunshade arm with

your hands, etc., as this may deform
it. Improper operation or damage to
the sunshade may result.

Do not put any object into the

sunshade inlet port as this may result
in improper operation or damage the
sunshade.

Do not hang any object on the arm

rail as this may result in improper
operation or damage the sunshade.

Do not forcefully pull the sunshade.

Doing so may elongate the sunshade.
Improper operation or damage to the
sunshade may result.

SIC4328

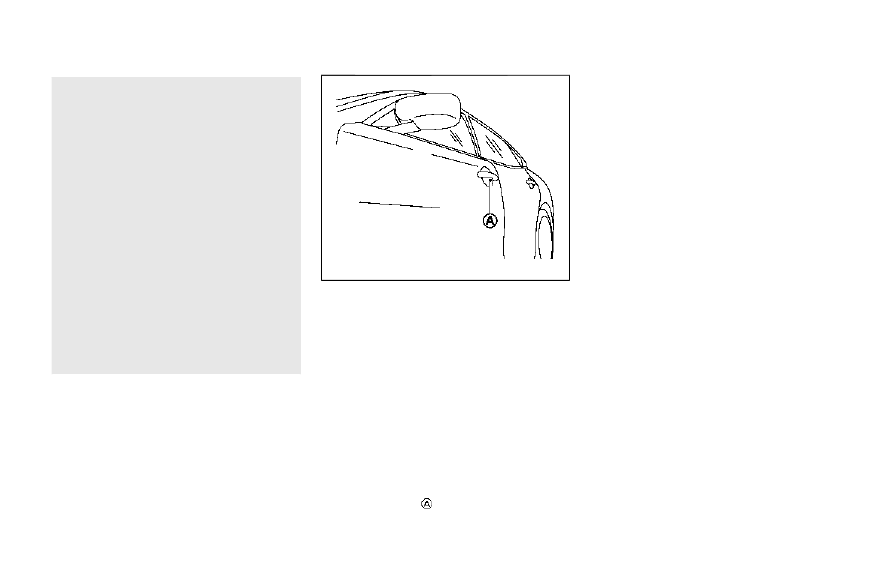
To activate or deactivate the welcome light
function, perform the following procedure.
1. Push the ignition switch to the ON

position.

2. Open the driver’s side door.
3. Within 20 seconds after the ignition

switch is pushed to the ON position,
push the door open request switch on
the driver’s side door handle for more
than 5 seconds with the driver’s door
open.

4. A chime sounds when the setting is

completed.

Once the welcome light function is active,
the courtesy light

and the passenger cabin

illumination will illuminate when you ap-
proach the vehicle with the Intelligent Key
(within approximately 3.3 ft (1 m) of the
antenna built inside the door handles) and
the following conditions are met.
. All doors are closed and locked.

. The ignition switch is in the LOCK or OFF

position.

. The Intelligent Key is outside the vehicle.

. The courtesy light operates within a set

duration.

In order to help maximize 12-volt battery
life, do not store the Intelligent Key within
the vehicle detection range.

BATTERY SAVER SYSTEM

The welcome light function will be deacti-
vated automatically to prevent 12-volt bat-
tery discharge under the following
conditions.
. If the welcome light function does not

operate within a set duration. Note that
the duration is set to 9 days as the
factory default setting. To activate the
welcome light function again, start the
hybrid system.

. If the welcome light function is activated

15 consecutive times when you approach
and leave the vehicle with the Intelligent
Key without the doors being unlocked.
To activate the welcome light function

Instruments and controls

2-59

WELCOME LIGHT

-------------------------------------------------------------------------------------------------------------------------------------------------------------

2-60

Instruments and controls

again, unlock any door.

SIC4356

MAP LIGHTS

Push the button as illustrated to turn the
light on or off.

SIC3250

PERSONAL LIGHTS

Rear

Push the button as illustrated to turn the
light on or off.

INTERIOR LIGHTS

-------------------------------------------------------------------------------------------------------------------------------------------------------------

SIC4357

INTERIOR LIGHT CONTROL
SWITCH

ON switch

When the ON switch

is pushed on, the

map lights and rear personal lights will
illuminate. When the switch is turned off,
the lights will not illuminate, regardless of
the condition.

DOOR OFF switch

When the DOOR OFF switch

is not

pushed on, the map lights and rear personal
lights will illuminate under the following
conditions:

. ignition switch is switched to the OFF

position
— remain on for about 15 seconds.

. doors are unlocked by pushing the UN-

LOCK button on the Intelligent Key or
door handle request switch with the
ignition switch in the LOCK position
— remain on for about 15 seconds.

. any door is opened and then closed with

the ignition switch in the LOCK position
— remain on for about 15 seconds.

. any door is opened

— remain on while the door is opened.

When the door is closed, the lights go
off.

When the DOOR OFF switch

is pushed

on, the map and rear personal lights will not
illuminate under the above condition. The
map and rear personal lights can be turned
on only with the ON switch

.

The lights will also turn off after a period of
time when the lights remain illuminated
after the ignition switch has been pushed
to the OFF or LOCK position to prevent the
12-volt battery from becoming discharged.
When the “Lamp ON When Door Unlocks”
key is set to the OFF position (see the Infiniti
InTouch Owner’s Manual), the lights will
illuminate under the following condition:

. any door is opened with the ignition

switch in any position
— remain on while the door is opened.

When the door is closed, the lights go
off.

CAUTION

Do not use for extended periods of time
with the INFINITI Direct Response Hy-
brid

®

System stopped. This could result

in a discharged 12-volt battery.

Instruments and controls

2-61

-------------------------------------------------------------------------------------------------------------------------------------------------------------

2-62

Instruments and controls

SIC3869

The light on the vanity mirror will turn on
when the cover on the vanity mirror is
opened.
When the cover is closed, the light will turn
off.
The lights will also turn off after a period of
time when the lights remain illuminated to
prevent the 12-volt battery from becoming
discharged.

The light illuminates when the trunk lid is
opened. When the trunk lid is closed, the
light will turn off.
The light will also turn off after a period of
time when the light remains illuminated
after the ignition switch has been pushed
to the OFF or LOCK position to prevent the
12-volt battery from becoming discharged.

The HomeLink

®

Universal Transceiver pro-

vides a convenient way to consolidate the
functions of up to three individual hand-held
transmitters into one built-in device.
HomeLink

®

Universal Transceiver:

. Will operate most Radio Frequency (RF)

devices such as garage doors, gates,
home and office lighting, entry door
locks and security systems.

. Is powered by your vehicle’s 12-volt

battery. No separate batteries are re-
quired. If the vehicle’s 12-volt battery is
d i s c h a r g e d o r i s d i s c o n n e c t e d ,
HomeLink

®

will retain all programming.

When the HomeLink

®

Universal Transceiver

is programmed, retain the original trans-
mitter for future programming procedures
(Example: new vehicle purchases). Upon
sale of the vehicle, the programmed
HomeLink

®

Universal Transceiver buttons

should be erased for security purposes. For
additional information, refer to “Program-
ming HomeLink

®

” (P.2-63).

WARNING

Do not use the HomeLink

®

Universal

Transceiver with any garage door
opener that lacks safety stop and
reverse features as required by fed-
eral safety standards. (These stan-

VANITY MIRROR LIGHTS

TRUNK LIGHT

HomeLink

®

UNIVERSAL TRANSCEIVER

-------------------------------------------------------------------------------------------------------------------------------------------------------------

dards became effective for opener
models manufactured after April 1,
1982). A garage door opener which
cannot detect an object in the path of
a closing garage door and then auto-
matically stop and reverse, does not
meet current federal safety stan-
dards. Using a garage door opener
without these features increases the
risk of serious injury or death.

During the programming, procedure

your garage door or security gate will
open and close (if the transmitter is
within range). Make sure that people
or objects are clear of the garage
door, gate, etc. that you are pro-
gramming.

Your vehicle’s INFINITI Direct Re-

sponse Hybrid

®

System should be

turned off while programming the
HomeLink

®

Universal Transceiver.

Do not breathe exhaust gases: they
contain colorless and odorless carbon
monoxide. Carbon monoxide is dan-
gerous. It can cause unconsciousness
or death.

PROGRAMMING HomeLink

®

If you have any questions or are having
difficulty programming your HomeLink

®

buttons, refer to the HomeLink

®

web site

at: www.homelink.com or call 1-800-355-
3515.

NOTE:
It is also recommended that a new battery
be placed in the hand-held transmitter of
t h e d e v i c e b e i n g p r o g r a m m e d t o
HomeLink

®

for quicker programming and

accurate transmission of the radio-fre-
quency.
1. Position the end of your hand-held

transmitter 1-3 in (26-76 mm) away
from the HomeLink

®

surface, keeping

the HomeLink

®

indicator light

in view.

JVI0428X

2. Using both hands, simultaneously press

and hold the desired HomeLink

®

button

and handheld transmitter button. DO
NOT release until the HomeLink

®

indi-

cator light

flashes slowly and then

rapidly. When the indicator light flashes
rapidly, both buttons may be released.
(The rapid flashing indicates successful
programming.)

NOTE:
Some devices to be programmed may
require you to replace Step 2 with the
cycling procedure noted in the “Pro-
gramming HomeLink

®

for Canadian cus-

tomers and gate openers” (P.2-64).

Instruments and controls

2-63

-------------------------------------------------------------------------------------------------------------------------------------------------------------

2-64

Instruments and controls

JVI0429X

3. Press and hold the programmed

HomeLink

®

button and observe the in-

dicator light.

.

If the indicator light

is solid/con-

tinuous, programming is complete
and your device should activate when
the HomeLink

®

button is pressed and

released.

.

If the indicator light

blinks rapidly

for two seconds and then turns to a
solid/continuous light, continue with
Steps 4-6 for a rolling code device. A
second person may make the follow-
ing steps easier. Use a ladder or other
device. Do not stand on your vehicle
to perform the next steps.

4. At the receiver located on the garage

door opener motor in the garage, locate
the “learn” or “smart” button (the name
and color of the button may vary by
manufacturer but it is usually located
near where the hanging antenna wire is
attached to the unit). If there is difficulty
locating the button, reference the garage
door opener’s manual.

5. Press and release the “learn” or “smart”

button.

NOTE:
Once the button is pressed, you have
approximately 30 seconds to initiate the
next step.

6. Return to the vehicle and firmly press

and hold the programmed HomeLink

®

button for two seconds and release.
Repeat the “press/hold/release” se-
quence up to 3 times to complete the
programming process. HomeLink

®

should now activate your rolling code
equipped device.

7. If you have any questions or are having

difficulty programming your HomeLink

®

buttons, refer to the HomeLink

®

web

site at: www.homelink.com or call 1-
800-355-3515.

PROGRAMMING HomeLink

®

FOR

CANADIAN CUSTOMERS AND
GATE OPENERS

Canadian radio-frequency laws require
transmitter signals to “time-out” (or quit)
after several seconds of transmission –
which may not be long enough for
HomeLink

®

to pick up the signal during

programming. Similar to this Canadian law,
some U.S. gate operators are designed to
“time-out” in the same manner.
If you live in Canada or you are having
difficulties programming a gate operator or
garage door opener by using the “Program-
ming HomeLink

®

” procedures, replace “Pro-

gramming HomeLink

®

” Step 2 with the

following:

NOTE:
When programming a garage door opener,
etc., unplug the device during the “cycling”
process to prevent possible damage to the
garage door opener components.
Step 2: Using both hands, simultaneously
press and hold the desired HomeLink

®

button and the hand-held transmitter but-
ton. During programming, your hand-held
transmitter may automatically stop trans-
mitting. Continue to press and hold the
desired HomeLink

®

button while you press

and re-press (“cycle”) your hand-held trans-

-------------------------------------------------------------------------------------------------------------------------------------------------------------

mitter every two seconds until the frequency
signal has been learned. The HomeLink

®

indicator light will flash slowly and then
rapidly after several seconds upon success-
ful programming. DO NOT release until the
HomeLink

®

indicator light flashes slowly and

then rapidly. When the indicator light flashes
rapidly, both buttons may be released. The
rapid flashing indicates successful program-
ming.
Proceed with “Programming HomeLink

®

Step 3 to complete.
Remember to plug the device back in when
programming is completed.

OPERATING THE HomeLink

®

UNIVERSAL TRANSCEIVER

The HomeLink

®

Universal Transceiver, after

it is programmed, can be used to activate the
programmed device. To operate, simply
press and release the appropriate pro-
grammed HomeLink

®

Universal Transceiver

button. The amber indicator light will illumi-
nate while the signal is being transmitted.
For convenience, the hand-held transmitter
of the device may also be used at any time.

PROGRAMMING TROUBLE-
SHOOTING

If the HomeLink

®

does not quickly learn the

hand-held transmitter information:
. replace the hand-held transmitter bat-

teries with new batteries.

. position the hand-held transmitter with

its battery area facing away from the
HomeLink

®

surface.

. press and hold both the HomeLink

®

and

hand-held transmitter buttons without
interruption.

. position the hand-held transmitter 1-3 in

(26-76 mm) away from the HomeLink

®

surface. Hold the transmitter in that
position for up to 15 seconds. If
HomeLink

®

is not programmed within

that time, try holding the transmitter in
another position - keeping the indicator
light in view at all times.

If you have any questions or are having
difficulty programming your HomeLink

®

buttons, refer to the HomeLink

®

web site

at: www.homelink.com or 1-800-355-
3515.

CLEARING THE PROGRAMMED
INFORMATION

The following procedure clears the pro-
grammed information from both buttons.
Individual buttons cannot be cleared. How-
ever, individual buttons can be repro-
grammed, see “Reprogramming a single
HomeLink

®

button” (P.2-65).

To clear all programming

1. Press and hold the two outer HomeLink

®

buttons until the indicator light begins to
flash in approximately 10 seconds. Do
not hold for longer than 20 seconds.

2. Release both buttons.
HomeLink

®

is now in the programming mode

and can be programmed at any time begin-
ning with “Programming HomeLink

®

” - Step

1.

REPROGRAMMING A SINGLE
HomeLink

®

BUTTON

To reprogram a HomeLink

®

Universal Trans-

ceiver button, complete the following.
1. Press and hold the desired HomeLink

®

button. Do not release the button.

2. The indicator light will begin to flash

after 20 seconds. Without releasing the
HomeLink

®

button, proceed with “Pro-

gramming HomeLink

®

” - Step 1.

Instruments and controls

2-65

-------------------------------------------------------------------------------------------------------------------------------------------------------------

2-66

Instruments and controls

For questions or comments, contact
HomeLink

®

at: www.homelink.com or 1-

800-355-3515.
The HomeLink

®

Universal Transceiver but-

ton has now been reprogrammed. The new
device can be activated by pushing the
HomeLink

®

button that was just pro-

grammed. This procedure will not affect
any other programmed HomeLink

®

buttons.

IF YOUR VEHICLE IS STOLEN

If your vehicle is stolen, you should change
the codes of any non-rolling code device that
has been programmed into HomeLink

®

.

Consult the Owner’s Manual of each device
or call the manufacturer or retailer of those
devices for additional information.
When your vehicle is recovered, you will
need to reprogram the HomeLink

®

Univer-

sal Transceiver with your new transmitter
information.
FCC Notice:
For USA:
This device complies with Part 15 of the
FCC Rules. Operation is subject to the
following two conditions: (1) This device
may not cause harmful interference, and (2)
this device must accept any interference
received, including interference that may
cause undesired operation.

NOTE:
Changes or modifications not expressly
approved by the party responsible for
compliance could void the user’s authority
to operate the equipment.
For Canada:
This device complies with Industry Canada
licence-exempt RSS standard(s). Operation
is subject to the following two conditions:
(1) this device may not cause interference,
and (2) this device must accept any inter-
ference, including interference that may
cause undesired operation of the device.

-------------------------------------------------------------------------------------------------------------------------------------------------------------

3 Pre-driving checks and adjustments

Keys........................................................................................ 3-2

Intelligent Key................................................................ 3-2
Valet hand-off............................................................... 3-3

Doors..................................................................................... 3-4

Locking with mechanical key.................................... 3-4
Opening and closing windows with the
mechanical key.............................................................. 3-5
Locking with inside lock knob................................... 3-5
Locking with power door lock switch.................... 3-5
Automatic door locks.................................................. 3-6
Child safety rear door lock ........................................ 3-6

Intelligent Key system........................................................ 3-7

Intelligent Key operating range ............................... 3-8
Door locks/unlocks precaution ............................... 3-9
Intelligent Key operation.......................................... 3-10
Battery saver system................................................. 3-11
Warning signals........................................................... 3-12
Troubleshooting guide.............................................. 3-13

Remote keyless entry system....................................... 3-14

How to use remote keyless entry system........... 3-14

Hood.................................................................................... 3-17

Trunk lid............................................................................. 3-18

Trunk lid release switch.......................................... 3-18
Trunk open request switch.................................... 3-19
Trunk button.............................................................. 3-19
Opening with key ..................................................... 3-19
Trunk release power cancel switch.................... 3-20
Auto closure.............................................................. 3-20
Interior trunk lid release ......................................... 3-21

Fuel-filler door ................................................................. 3-21

Opening the fuel-filler door................................... 3-21
Fuel-filler cap............................................................. 3-22

Tilt/telescopic steering.................................................. 3-24

Electric operation..................................................... 3-24

Sun visors .......................................................................... 3-24
Mirrors ............................................................................... 3-25

Inside mirror............................................................... 3-25
Outside mirrors......................................................... 3-26
Vanity mirror.............................................................. 3-27

Automatic drive positioner........................................... 3-28

Entry/exit function.................................................. 3-28
Memory storage....................................................... 3-28
Setting memory function ....................................... 3-29
System operation .................................................... 3-30

-------------------------------------------------------------------------------------------------------------------------------------------------------------

3-2

Pre-driving checks and adjustments

A key number plate is supplied with your
keys. Record the key number and keep it in a
safe place (such as your wallet), not in the
vehicle. If you lose your keys, it is recom-
mended you visit an INFINITI retailer for
duplicates by using the key number. INFINITI
does not record any key numbers so it is very
important to keep track of your key number
plate.
A key number is only necessary when you
have lost all keys and do not have one to
duplicate from. If you still have a key, it can
be duplicated without knowing the key
number.

SPA2222

1.

Intelligent Keys (2 sets)

2.

Mechanical keys (inside the Keys) (2
sets)

3.

Key number plate (1 set)

INTELLIGENT KEY

Your vehicle can only be driven with the
Intelligent Keys which are registered to your
vehicle’s Intelligent Key system components
and INFINITI Vehicle Immobilizer System
components. As many as 4 Intelligent Keys
can be registered and used with one vehicle.
The new keys must be registered by an
INFINITI retailer prior to use with the
Intelligent Key system and INFINITI Vehicle
Immobilizer System of your vehicle. Since the

registration process requires erasing all
memory in the Intelligent Key components
when registering new keys, be sure to take
all Intelligent Keys that you have to the
INFINITI retailer.
It is possible that the Intelligent Key func-
tions become canceled. Contact an INFINITI
retailer.

CAUTION

Be sure to carry the Intelligent Key

with you when driving. The Intelli-
gent Key is a precision device with a
built-in transmitter. To avoid dama-
ging it, please note the following.

— The Intelligent Key is water re-

sistant; however, wetting may
damage the Intelligent Key. If the
Intelligent Key gets wet, immedi-
ately wipe until it is completely
dry.

— Do not bend, drop or strike it

against another object.

— If the outside temperature is

below 14°F (−10°C) , the battery
of the Intelligent Key may not
function properly.

— Do not place the Intelligent Key

for an extended period in a place

KEYS

-------------------------------------------------------------------------------------------------------------------------------------------------------------

where temperatures exceed
140°F (60°C).

— Do not change or modify the

Intelligent Key.

— Do not use a magnet key holder.

— Do not place the Intelligent Key

near an electric appliance such as
a television set or personal com-
puter.

— Do not allow the Intelligent Key

to come into contact with water
or salt water, and do not wash it
in a washing machine. This could
affect the system function.

If an Intelligent Key is lost or stolen,

INFINITI recommends erasing the ID
code of that Intelligent Key. This will
prevent the Intelligent Key from un-
authorized use to unlock the vehicle.
For information regarding the eras-
ing procedure, it is recommended you
visit an INFINITI retailer.

SPA2033

Mechanical key

To remove the mechanical key, release the
lock knob at the back of the Intelligent Key.
To install the mechanical key, firmly insert it
into the Intelligent Key until the lock knob
returns to the lock position.
Use the mechanical key to lock or unlock the
doors and glove box if they are equipped
with a key cylinder.
See “Doors” (P.3-4),“Trunk lid” (P.3-18) and
“Storage” (P.2-49).

CAUTION

Always carry the mechanical key in-
stalled in the key.

VALET HAND-OFF

When you have to leave a key with a valet,
give them the Intelligent Key itself and keep
the mechanical key with you to protect your
belongings.
To prevent the glove box and the trunk from
being opened during valet hand-off, follow
the procedures below.
1. Push the trunk release power cancel

switch to the CANCEL side.

2. Remove the mechanical key from the

Intelligent Key.

3. Lock the glove box with the mechanical

key.

4. Hand the Intelligent Key to the valet,

keeping the mechanical key in your
pocket or bag for insertion into the
Intelligent Key when you retrieve your
vehicle.

See “Trunk lid” (P.3-18) and “Storage” (P.2-
49).

Pre-driving checks and adjustments

3-3

-------------------------------------------------------------------------------------------------------------------------------------------------------------

3-4

Pre-driving checks and adjustments

WARNING

Always have the doors locked while

driving. Along with the use of seat
belts, this provides greater safety in
the event of an accident by helping to
prevent persons from being thrown
from the vehicle. This also helps keep
children and others from unintention-
ally opening the doors, and will help
keep out intruders.

Before opening any door, always look

for and avoid oncoming traffic.

To help avoid risk of injury or death

through unintended operation of the
vehicle and or its systems, including
entrapment in windows or inadver-
tent door lock activation, do not
leave children, people who require
the assistance of others or pets
unattended in your vehicle. Addition-
ally, the temperature inside a closed
vehicle on a warm day can quickly
become high enough to cause a sig-
nificant risk of injury or death to
people and pets.

CAUTION

To prevent theft or accidents, be sure to
stop the engine and lock the doors
before stepping away from the vehicle.

JVP0231X

LOCKING WITH MECHANICAL
KEY

The power door lock system allows you to
lock or unlock all doors simultaneously using
the mechanical key.
. Turning the driver’s door key cylinder to

the front of the vehicle

will lock all

doors.

. Turning the driver’s door key cylinder

once to the rear of the vehicle

will

unlock the driver’s door. After returning
the key to the neutral position

, turning

it to the rear again within 60 seconds will
unlock all doors.

DOORS

-------------------------------------------------------------------------------------------------------------------------------------------------------------

. You can switch the lock system to the

mode that allows you to open all the
doors when the key is turned once. (See
the Infiniti InTouch Owner’s Manual.)

OPENING AND CLOSING WIN-
DOWS WITH THE MECHANICAL
KEY

The driver’s door key operation also allows
you to open and close the window that is
equipped with the automatic open/close
function. (See “Power windows” (P.2-54).)
To open the window, turn the driver’s door
key cylinder to the rear of the vehicle for
longer than 1 second. The door is unlocked
and the window keeps opening while turning
the key.
This function can also be performed by
pushing and holding the door UNLOCK
button of the Intelligent Key. (See “Remote
keyless entry system” (P.3-14).)
To close the window, turn the driver’s door
key cylinder to the front of the vehicle for
longer than 1 second. The door is locked and
the window keeps closing while turning the
key.

SPA2726

LOCKING WITH INSIDE LOCK
KNOB

To lock the door individually, move the inside
lock knob to the lock position

then close

the door.
To unlock, move the inside lock knob to the
unlock position

.

When locking the door without an Intelli-
gent Key, be sure not to leave the Intelligent
Key inside the vehicle.

JVP0319X

LOCKING WITH POWER DOOR
LOCK SWITCH

Operating the power door lock switch will
lock or unlock all the doors. The switches are
located on the driver’s and front passenger’s
door armrests.
To lock the doors, push the power door lock
switch to the lock position

with the

driver’s or front passenger’s door open, then
close the door.
When locking the door this way, be certain
not to leave the Intelligent Key inside the
vehicle.
To unlock the doors including the fuel-filler
door, push the power door lock switch to the

Pre-driving checks and adjustments

3-5

-------------------------------------------------------------------------------------------------------------------------------------------------------------

3-6

Pre-driving checks and adjustments

unlock position

.

Lockout protection

When the power door lock switch is moved
to the lock position any door open, all doors
will lock and unlock automatically. With the
Intelligent Key left in the vehicle and any
door open, all doors will unlock automati-
cally and a chime will sound after the door is
closed.
These functions help to prevent the Intelli-
gent Key from being accidentally locked
inside the vehicle.

AUTOMATIC DOOR LOCKS

. All doors lock automatically when the

vehicle speed reaches 15 MPH (24
km/h).

. All doors unlock automatically when the

ignition switch is placed in the OFF
position.

The automatic unlock function can be
deactivated or activated. 
To deactivate or
activate the automatic door unlock system,
perform the following procedure:
1. Close all doors.
2. Place the ignition switch in the ON

position.

3. Within 20 seconds of performing Step 2,

push and hold the power door lock
switch to the

position (UNLOCK)

for more than 5 seconds.

4. When activated, the hazard indicator will

flash twice. When deactivated, the ha-
zard indicator will flash once.

5. The ignition switch must be placed in the

OFF and ON position again between
each setting change.

When the automatic door unlock system is
deactivated, the doors do not unlock when
the ignition switch is placed in the OFF
position. To unlock the door manually, use
the inside lock knob or the power door lock
switch (driver’s or front passenger’s side).

SPA2745

CHILD SAFETY REAR DOOR
LOCK

The child safety rear door lock helps prevent
doors from being opened accidentally, espe-
cially when small children are in the vehicle.
When the levers are in the lock position

,

the rear doors can be opened only from the
outside.
To disengage, move the levers to the unlock
position

.

-------------------------------------------------------------------------------------------------------------------------------------------------------------

WARNING

Radio waves could adversely affect

electric medical equipment. Those
who use a pacemaker should contact
the electric medical equipment man-
ufacturer for the possible influences
before use.

The Intelligent Key transmits radio

waves when the buttons are pushed.
The FAA advises that the radio
waves may affect aircraft navigation
and communication systems. Do not
operate the Intelligent Key while on
an airplane. Make sure the buttons
are not operated unintentionally
when the unit is stored during a
flight.

The Intelligent Key system can operate all
the doors and the trunk lid using the remote
controller function or pushing the request
switch on the vehicle without taking the key
out from a pocket or purse. The operating
environment and/or conditions may affect
the Intelligent Key system operation.
Be sure to read the following before using
the Intelligent Key system.

CAUTION

Be sure to carry the Intelligent Key

with you when operating the vehicle.

Never leave the Intelligent Key in the

vehicle when you leave the vehicle.

The Intelligent Key is always communicating
with the vehicle as it receives radio waves.
The Intelligent Key system transmits weak
radio waves. Environmental conditions may
interfere with the operation of the Intelligent
Key system under the following operating
conditions.
. When operating near a location where

strong radio waves are transmitted, such
as a TV tower, power station and broad-
casting station.

. When in possession of wireless equip-

ment, such as a cellular telephone,
transceiver, and CB radio.

. When the Intelligent Key is in contact

with or covered by metallic materials.

. When any type of radio wave remote

control is used nearby.

. When the Intelligent Key is placed near

an electric appliance such as a personal
computer.

. When the vehicle is parked near a parking

meter.

In such cases, correct the operating condi-
tions before using the Intelligent Key func-
tion or use the mechanical key.
Although the life of the battery varies
depending on the operating conditions, the
battery’s life is approximately 2 years. If the
battery is discharged, replace it with a new
one.
When the Intelligent Key battery is almost
discharged, see “Intelligent Key battery dis-
charge” (P.5-12) to start the Direct Re-
sponse Hybrid

®

System.

Since the Intelligent Key is continuously
receiving radio waves, if the key is left near
equipment which transmits strong radio
waves, such as signals from a TV and
personal computer, the battery life may
become shorter.
For information regarding replacement of a
battery, see “Intelligent Key battery replace-
ment” (P.8-21).
For models with a steering wheel lock
mechanism: Because the steering wheel is
locked electrically, unlocking the steering
wheel with the ignition switch in the LOCK
position is impossible when the vehicle
battery is completely discharged. Pay special
attention that the vehicle battery is not
completely discharged.

Pre-driving checks and adjustments

3-7

INTELLIGENT KEY SYSTEM

-------------------------------------------------------------------------------------------------------------------------------------------------------------

3-8

Pre-driving checks and adjustments

As many as 4 Intelligent Keys can be
registered and used with one vehicle. For
information about the purchase and use of
additional Intelligent Keys, contact an
INFINITI retailer.

CAUTION

Do not allow the Intelligent Key,

which contains electrical compo-
nents, to come into contact with
water or salt water. This could affect
the system function.

Do not drop the Intelligent Key.
Do not strike the Intelligent Key

sharply against another object.

Do not change or modify the Intelli-

gent Key.

Wetting may damage the Intelligent

Key. If the Intelligent Key gets wet,
immediately wipe until it is comple-
tely dry.

If the outside temperature is below

14°F (−10°C) , the battery of the
Intelligent Key may not function
properly.

Do not place the Intelligent Key for

an extended period in an area where
temperatures exceed 140°F (60°C).

Do not attach the Intelligent Key

with a key holder that contains a
magnet.

Do not place the Intelligent Key near

equipment that produces a magnetic
field, such as a TV, audio equipment
and personal computers.

If an Intelligent Key is lost or stolen, INFINITI
recommends erasing the ID code of that
Intelligent Key from the vehicle. This may
prevent the unauthorized use of the Intelli-
gent Key to operate the vehicle. For infor-
mation regarding the erasing procedure,
contact an INFINITI retailer.

SPA2538

INTELLIGENT KEY OPERATING
RANGE

The Intelligent Key functions can only be
used when the Intelligent Key is within the
specified operating range from the request
switch

.

-------------------------------------------------------------------------------------------------------------------------------------------------------------


Content      ..     12      13      14      15     ..