Infiniti Q70 Hybrid (2018 year). Manual - part 12


  Index      Infiniti     Infiniti Q70 Hybrid (2018 year) - manual in english


Search            copyright infringement  


Content      ..     10      11      12      13     ..


Infiniti Q70 Hybrid (2018 year). Manual - part 12


SIC4325

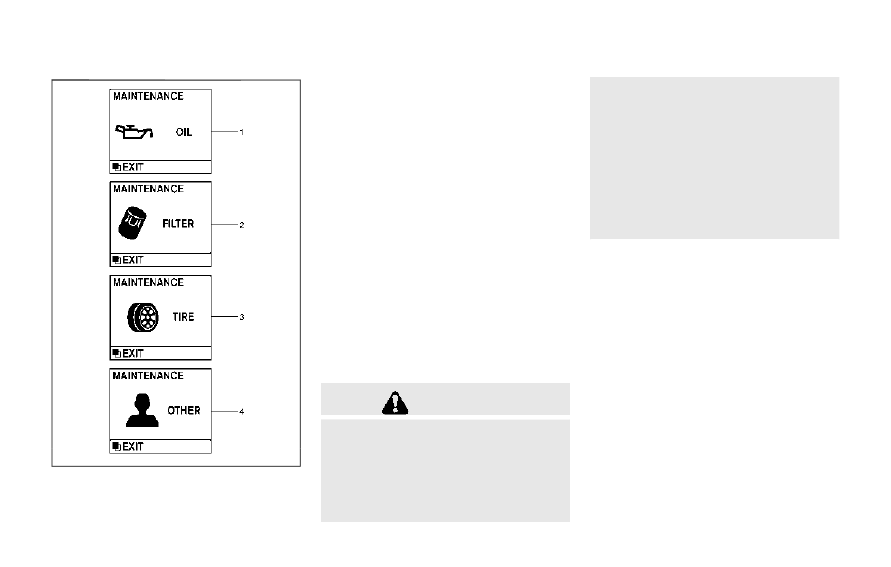
MAINTENANCE INDICATORS

1. Engine oil replacement indicator

This indicator appears when the customer
set time comes for changing the engine oil.
You can set or reset the distance for
changing the engine oil. (See “Trip computer”
(P.2-28).)

2. Oil filter replacement indicator

This indicator appears when the customer
set time comes for replacing the oil filter.
You can set or reset the distance for
replacing the oil filter. (See “Trip computer”
(P.2-28).)

3. Tire replacement indicator

This indicator appears when the customer
set distance comes for replacing tires. You
can set or reset the distance for replacing
tires. (See “Trip computer” (P.2-28).)

WARNING

The tire replacement indicator is not a
substitute for regular tire checks, includ-
ing tire pressure checks. See “Changing
wheels and tires” (P.8-33). Many factors
including tire inflation, alignment, driv-
ing habits and road conditions affect tire
wear and when tires should be replaced.

Setting the tire replacement indicator
for a certain driving distance does not
mean your tires will last that long. Use
the tire replacement indicator as a guide
only and always perform regular tire
checks. Failure to perform regular tire
checks, including tire pressure checks
could result in tire failure. Serious vehicle
damage could occur and may lead to a
collision, which could result in serious
personal injury or death.

4. “OTHER” indicator

This indicator appears when the customer
set time comes for replacing items other
than the engine oil, oil filter and tires. You
can set or reset the distance for replacing
the items. (See “Trip computer” (P.2-28).)
More maintenance reminders are also avail-
able on the center display. (See the Infiniti
InTouch Owner’s Manual.)

Instruments and controls

2-27

-------------------------------------------------------------------------------------------------------------------------------------------------------------

2-28

Instruments and controls

JVI0203X

SIC4327

TRIP COMPUTER

Switches for the trip computer are located
on the right side of the combination meter
panel. To operate the trip computer, push
the side or front of the switches as shown
above.

switch
switch

When the ignition switch is pushed to the
ON position, modes of the trip computer can
be selected by pushing the

switch

.

Each time the

switch

is pushed, the

display will change as follows:
Energy monitor

? Li-ion battery state of

charge and acceleration guide

? EV mode

-------------------------------------------------------------------------------------------------------------------------------------------------------------

odometer and twin trip odometer

? Current

fuel consumption

? Average fuel consump-

tion and speed

? Elapsed time and trip

odometer

? Distance to empty (dte) ?

Engine coolant temperature gauge

? Out-

side air temperature (ICY)

? Setting ?

Warning check

1. Energy monitor

The energy flow related to the hybrid system
is shown by the arrow symbols.

: Li-ion battery
: Engine

shows the charge level of the Li-ion

battery.
+ : Charge level is high
- : Charge level is low
The charge level display will continuously
change as the Li-ion battery charge level
increase or decreases during normal vehicle
operation. Movement of the display from
the far right to the far left of the bar is
normal.
The energy monitor is also displayed on the
center display. (See “Energy monitors” (P.
Hybrid System-5).)

2. Li-ion battery state of charge and
acceleration guide

Li-ion battery state of charge:

This displays the remaining charge in the Li-
ion battery.
The charge level display will continuously
change as the Li-ion battery charge level
increase or decrease during normal vehicle
operation. Movement of the display from
the far right to the far left of the bar is
normal.
This works in conjunction with the remaining
battery display on the center display.

Acceleration guide:

This display provides the driver a visual
display of how efficiently the vehicle is being
driven based on accelerator pedal position.
When the drive mode is set to ECO using the
INFINITI Drive Mode Selector, the accelera-
tion guide operates with the ECO drive
indicator and ECO pedal (if so equipped) to
help you improve fuel economy. (See “ECO
drive indicator light” (P.2-18), “INFINITI
Drive Mode Selector” (P.5-19) and “ECO
pedal system” (P.5-20).)

JVI0258X

: Economy range
: Power range
: Accelerator pedal position indicator

Instruments and controls

2-29

-------------------------------------------------------------------------------------------------------------------------------------------------------------

2-30

Instruments and controls

JVI0259X

The above examples of the acceleration
guide means the following conditions.
1. The vehicle is being driven economically

when the vehicle is driven with the
accelerator pedal position in the econo-
my range.

2. The vehicle is being driven less econom-

ically when the vehicle is driven with the
accelerator pedal position in the power
range.

This will not be displayed when Intelligent
Cruise Control (ICC) system is operating.

3. EV mode odometer and twin trip
odometer

EV mode odometer:
This indicates the total distance traveled
using the electric motor only.

EV mode twin trip odometer:
This indicates the distance traveled in an
individual trip using the electric motor only.
2 types of individual trip can be recorded,
TRIP A and TRIP B.
Pushing the TRIP RESET switch will toggle
between TRIP A and TRIP B.
To reset the display to 0, hold down the
TRIP RESET switch for more than approxi-
mately 1 second.

4. Current fuel consumption

The current fuel consumption mode shows
the current fuel consumption.

5. Average fuel consumption (MPG
or l (liter)/100 km) and speed (MPH
or km/h)

Fuel consumption:
The average fuel consumption mode shows
the average fuel consumption since the last
reset. Resetting is done by pushing the
switch

for longer than 1 second. (The

average speed is also reset at the same
time.)
The display is updated every 30 seconds. At
about the first 1/3 mile (500 m) after a
reset, the display shows “——”.

Speed:
The average speed mode shows the average
vehicle speed since the last reset. Resetting
is done by pushing the

switch

for

longer than 1 second. (The average fuel
consumption is also reset at the same time.)
The display is updated every 30 seconds.
The first 30 seconds after a reset, the
display shows “——”.

6. Elapsed time and trip odometer
(mls or km)

Elapsed time:
The elapsed time mode shows the time since
the last reset. The displayed time can be
reset by pushing the

switch

for longer

than 1 second. (The trip odometer is also
reset at the same time.)

Trip odometer:
The trip odometer mode shows the total
distance the vehicle has been driven since
the last reset. Resetting is done by pushing
the

switch

for longer than 1 second.

(The elapsed time is also reset at the same

-------------------------------------------------------------------------------------------------------------------------------------------------------------

time.)

7. Distance to empty (dte — mls or
km)

The distance to empty (dte) mode provides
you with an estimation of the distance that
can be driven before refueling. The dte is
constantly being calculated, based on the
amount of fuel in the fuel tank and the actual
fuel consumption.
The display is updated every 30 seconds.
The dte mode includes a low range warning
feature. If the fuel level is low, the warning is
displayed on the screen.
When the fuel level drops even lower, the
dte display will change to “——”.
. If the amount of fuel added is small, the

display just before the ignition switch is
pushed to the OFF position may con-
tinue to be displayed.

. When driving uphill or rounding curves,

the fuel in the tank shifts, which may
momentarily change the display.

8. Engine coolant temperature
gauge

The gauge indicates the engine coolant
temperature.
This displays the temperature of the engine
coolant. The range of coolant overheat is

indicated by the horizontal line of the upper
part of the H mark.
The engine coolant temperature varies with
the outside air temperature and driving
conditions.

CAUTION

If the engine is overheated, continued
operation of the vehicle may seriously
damage the engine. See “If your vehicle
overheats” (P.6-12) for immediate ac-
tion required.

9. Outside air temperature (ICY — °F
or °C)

The outside air temperature is displayed in °F
or °C in the range of −22 to 140°F (−30 to
60°C).
The outside air temperature mode includes a
low temperature warning feature. If the
outside air temperature is below 37°F
(3°C), the warning is displayed on the screen.
The outside temperature sensor is located in
front of the radiator. The sensor may be
affected by road or engine heat, wind
directions and other driving conditions. The
display may differ from the actual outside
temperature or the temperature displayed

on various signs or billboards.

10. Setting

Setting is available while the hybrid system
is running.
Setting cannot be made while driving. A
message “Setting can only be operated
when stopped” is also displayed on the
vehicle information display.
The

switch

and

switch

are used

in the setting mode to select and decide a
menu.

SKIP:
Push the

switch

to move to the

warning check mode.
Push the

switch

to select other

menus.

ALERT:
There are the following submenus under the
alert menu.
. BACK

Select this submenu to return to the top
page of the setting mode.

. TIMER

Select this submenu to specify when the
“TIMER” indicator activates.

. ICY

Select this submenu to display the low
outside temperature warning.

Instruments and controls

2-31

-------------------------------------------------------------------------------------------------------------------------------------------------------------

2-32

Instruments and controls

MAINTENANCE:
There are the following submenus under the
maintenance menu.
. BACK

Select this submenu to return to the top
page of the setting mode.

. OIL

Select this submenu to set or reset the
distance for changing the engine oil.

. FILTER

Select this submenu to set or reset the
distance for replacing the oil filter.

. TIRE

Select this submenu to set or reset the
distance for replacing tires.

. OTHER

Select this submenu and set or reset the
distance for replacing items other than
the engine oil, oil filter and tires.

OPTIONS:
There are the following submenus under the
display menu.
. BACK

Select this submenu to return to the top
page of the setting mode.

. LANGUAGE

Select this submenu to choose English or
French for display.

. UNIT

Select this submenu to choose the unit
from miles, MPG, °F or km, l/100km, °C.

. EFFECTS

Select this menu to set the dial effects
described below to on or off.
— The indicator needles sweep in the

meters when the hybrid system is
started.

11. Warning check

SKIP:
Push the

switch

to move to the

warning check mode.
Push the

switch

to select other

menus.

DETAIL:
This item is available only when a warning is
displayed.
Select this menu to see the details of
warnings.

SIC2132

Your vehicle has two types of security
systems, as follows:
. Vehicle security system

. INFINITI Vehicle Immobilizer System
The security condition will be shown by the
security indicator light.

VEHICLE SECURITY SYSTEM

The vehicle security system provides visual
and audio alarm signals if someone opens
the doors, hood, or trunk lid when the
system is armed. It is not, however, a motion
detection type system that activates when a
vehicle is moved or when a vibration occurs.
The system helps deter vehicle theft but
cannot prevent it, nor can it prevent the

SECURITY SYSTEMS

-------------------------------------------------------------------------------------------------------------------------------------------------------------

theft of interior or exterior vehicle compo-
nents in all situations. Always secure your
vehicle even if parking for a brief period.
Never leave your Intelligent Key(s) in the
vehicle, and always lock it when unattended.
Be aware of your surroundings, and park in
secure, well-lit areas whenever possible.
Many devices offering additional protection,
such as component locks, identification
markers, and tracking systems, are available
at auto supply stores and specialty shops.
Your INFINITI retailer may also offer such
equipment. Check with your insurance com-
pany to see if you may be eligible for
discounts for various theft protection fea-
tures.

SIC2045

How to arm the vehicle security
system

1. Close all windows.

The system can be armed even if the
windows are open.

2. Push the ignition switch to the OFF

position.

3. Remove the Intelligent Key from the

vehicle.

4. Close all doors, hood and trunk. Lock all

doors. The doors can be locked with the
Intelligent Key, door handle request
switch, power door lock switch or me-
chanical key.

5. Confirm that the security indicator light

comes on. The security indicator light
stays on for about 30 seconds. The
vehicle security system is now pre-
armed. After about 30 seconds the
vehicle security system automatically
shifts into the armed phase. The security
light begins to flash once every approxi-
mately 3 seconds. If, during this 30-
second pre-arm time period, the door is
unlocked, or the ignition switch is pushed
to ACC or ON, the system will not arm.

Even when the driver and/or passengers
are in the vehicle, the system will activate
with all doors, hood, and trunk lid locked
with the ignition switch in the LOCK
position. When pushing the ignition switch
to the ACC or ON position, the system will
be released.

Vehicle security system activation

The vehicle security system will give the
following alarm:
. The headlights blink and the horn sounds

intermittently.

. The alarm automatically turns off after

approximately 1 minute. However, the
alarm reactivates if the vehicle is tam-
pered with again.

Instruments and controls

2-33

-------------------------------------------------------------------------------------------------------------------------------------------------------------

2-34

Instruments and controls

The alarm is activated by:
. Unlocking the door or opening the trunk

lid without using the button on the
Intelligent Key, the door handle request
switch or the mechanical key. (Even if the
door is opened by releasing the door
inside lock knob, the alarm will activate.)

. Opening the hood.

How to stop an activated alarm

The alarm will stop by unlocking a door by
pushing the unlock button on the Intelligent
Key, the door handle request switch or using
the mechanical key. The alarm will not stop if
the ignition switch is pushed to the ACC or
ON position.
If the system does not operate as described
above, it is recommended you have it
checked by an INFINITI retailer.

INFINITI VEHICLE IMMOBILIZER
SYSTEM

The INFINITI Vehicle Immobilizer System
will not allow the INFINITI Direct Response
Hybrid

®

System to start without the use of

the registered Intelligent Key. Never leave
these keys in the vehicle.

FCC Notice:
For USA:
This device complies with Part 15 of the
FCC Rules. Operation is subject to the
following two conditions: (1) This device
may not cause harmful interference, and (2)
this device must accept any interference
received, including interference that may
cause undesired operation.

NOTE:
Changes or modifications not expressly
approved by the party responsible for
compliance could void the user’s authority
to operate the equipment.
For Canada:
This device complies with Industry Canada
licence-exempt RSS standard(s). Operation
is subject to the following two conditions:
(1) this device may not cause interference,
and (2) this device must accept any inter-
ference, including interference that may
cause undesired operation of the device.

SIC2045

Security indicator light

The security indicator light is located on the
meter panel. It indicates the status of the
INFINITI Vehicle Immobilizer System.
The light blinks after the ignition switch was
in the LOCK, ACC or OFF position. This
function indicates the security systems
equipped on the vehicle are operational.
If the INFINITI Vehicle Immobilizer System is
malfunctioning, this light will remain on
while the ignition switch is in the ON
position.

-------------------------------------------------------------------------------------------------------------------------------------------------------------

If the light still remains on and/or the
hybrid system will not start, seek service
for the INFINITI Vehicle Immobilizer System
as soon as possible. Please bring all regis-
tered keys that you have. It is recommended
you visit an INFINITI retailer for this
service.

WARNING

In freezing temperatures the washer
solution may freeze on the windshield
and obscure your vision which may lead
to an accident. Warm windshield with
the defroster before you wash the wind-
shield.

CAUTION

Do not operate the washer continu-

ously for more than 30 seconds.

Do not operate the washer if the

reservoir tank is empty.

Do not fill the window washer re-

servoir tank with washer fluid con-
centrates at full strength. Some
methyl alcohol based washer fluid
concentrates may permanently stain
the grille if spilled while filling the
window washer reservoir tank.

Pre-mix washer fluid concentrates

with water to the manufacturer’s
recommended levels before pouring
the fluid into the window washer
reservoir tank. Do not use the win-
dow washer reservoir tank to mix the

washer fluid concentrate and water.

Instruments and controls

2-35

WIPER AND WASHER SWITCH

-------------------------------------------------------------------------------------------------------------------------------------------------------------

2-36

Instruments and controls

JVI0738X

The windshield wiper and washer operates
when the ignition switch is in the ON
position.
Push the lever down to operate the wiper at
the following speed:

AUTO — operates the rain-sensing
auto wiper system. (See “Rain-sensing
auto wiper system” (P.2-36).)
LO — continuous low speed operation
HI — continuous high speed operation
MIST — one sweep operation of the
wiper

Pull the lever toward you

to operate the

washer. Then the wiper will also operate
several times.

Pulling up the wiper arm:
The wiper arm should be in the up position
when replacing the wiper.
To pull up the wiper arm, push up

twice,

the wiper operation stops in mid-operation.
The wiper arm can be pulled up.
The shift lever should be in the P (Park)
position.
To replace the wiper arm, place the wiper
arm in the down position and then push the
lever

up once.

CAUTION

Do not operate the windshield wiper
while the wiper arm is pulled up. The
wiper arm may be damaged.

Wiper drip wipe system:
The wiper will also operate once about 3
seconds after the washer and wiper are
operated. This operation is to wipe washer
fluid that has dripped on the windshield.

JVI0739X

RAIN-SENSING AUTO WIPER
SYSTEM

The rain-sensing auto wiper system can
automatically turn on the wipers and adjust
the wiper speed depending on the rainfall
and the vehicle speed by using the rain
sensor located on the upper part of the
windshield.
To set the rain-sensing auto wiper system,
push the lever down to the AUTO position

. The wiper will sweep once while the

ignition switch is in the ON position.
The rain sensor sensitivity level can be
adjusted by turning the knob toward
(High) or toward

(Low).

-------------------------------------------------------------------------------------------------------------------------------------------------------------

. High — High sensitive operation

. Low — Low sensitive operation
To turn the rain-sensing auto wiper system
off, push up the lever to the OFF position, or
pull down the lever to the LO or HI position.

CAUTION

Do not touch the rain sensor and around
it when the wiper switch is in the AUTO
position and the ignition switch is in the
ON position. The wipers may operate
unexpectedly and cause an injury or may
damage a wiper.

The rain-sensing auto wipers are in-

tended for use during rain. If the switch
is left in the AUTO position, the wipers
may operate unexpectedly when dirt,
fingerprints, oil film or insects are stuck
on or around the sensor. The wipers may
also operate when exhaust gas or
moisture affect the rain sensor.

The rain-sensing auto wipers may not

operate if rain does not hit the rain
sensor even if it is raining.

When the windshield glass is coated

with water repellent, the speed of the
rain-sensing auto wipers may be higher
even though the amount of the rainfall is
small.

Be sure to turn off the rain-sensing auto

wiper system when you use a car wash.

Using genuine wiper blades is recom-

mended for proper operation of the
rain-sensing auto wiper system. (See
“Windshield wiper blades” (P.8-17) for
wiper blade replacement.)

SIC4330

To defog/defrost the rear window glass and
outside mirrors, start the INFINITI Direct
Response Hybrid

®

System and push the

switch

on. The indicator light

will come

on. Push the switch again to turn the
defroster off.
It will automatically turn off in approxi-
mately 15 minutes.

CAUTION

When cleaning the inner side of the rear
window, be careful not to scratch or
damage the rear window defroster.

Instruments and controls

2-37

REAR WINDOW AND OUTSIDE
MIRROR DEFROSTER SWITCH

-------------------------------------------------------------------------------------------------------------------------------------------------------------

2-38

Instruments and controls

SIC3267

HEADLIGHT SWITCH

Lighting

Turn the switch to the

position:

The front parking, side marker, tail and
license plate lights will come on.
Turn the switch to the

position:

Headlights will come on and all the
other lights remain on.

SIC3268

Autolight system

The autolight system allows the headlights
to be set so they turn on and off auto-
matically.
To set the autolight system:
1. Make sure the headlight switch is in the

AUTO position

.

2. Push the ignition switch to the ON

position.

3. The autolight system automatically turns

the headlights on and off.

To turn the autolight system off, turn the
switch to the OFF,

or

position.

The autolight system can turn on the head-

lights automatically when it is dark and turn
off the headlights when it is light.
For US models: The headlights will also be
turned on automatically at twilight or in
rainy weather (when the windshield wiper is
operated continuously).
If the ignition switch is pushed to the OFF
position and one of the doors is opened and
this condition is continued, the headlights
remain on for 5 minutes.

Automatic headlights off delay:
You can keep the headlights on for up to 180
seconds after you push the ignition switch to
OFF and open any door then close all the
doors.
You can adjust the period of the automatic
headlights off delay from 0 seconds (OFF)
to 180 seconds. The factory default setting
is 45 seconds.
For automatic headlights off delay setting,
see the Infiniti InTouch Owner’s Manual.

HEADLIGHT AND TURN SIGNAL SWITCH

-------------------------------------------------------------------------------------------------------------------------------------------------------------

SIC3784A

Be sure not to put anything on top of the
photo sensor

located on the top of the

instrument panel. The photo sensor controls
the autolight; if it is covered, the photo
sensor reacts as if it is dark and the head-
lights will illuminate.

SIC3269

To select the low beam, put the lever in
the neutral position as shown.
To select the high beam, push the lever
forward while the switch is in the
position. Pull it back to select the low
beam.
Pulling the lever toward you will flash
the headlight high beam even when the
headlight switch is in the OFF position.

Headlight beam select

Battery saver system

A chime will sound when the driver side door
is opened with the light switch in the

or

position and the ignition switch in the

ACC, OFF or LOCK position.
When the headlight switch is in the

or

position while the ignition switch is in

the ON position, the lights will automatically
turn off after a period of time when the
ignition switch has been pushed to the OFF
position.
When the headlight switch remains in the

or

position after the lights auto-

matically turn off, the lights will turn on
when the ignition switch is pushed to the ON
position.

CAUTION

When you turn on the headlight

switch again after the lights auto-
matically turn off, the lights will not
turn off automatically. Be sure to
turn the light switch to the OFF
position when you leave the vehicle
for extended periods of time, other-
wise the 12-volt battery will be
discharged.

Never leave the light switch on when

the INFINITI Direct Response Hy-
brid

®

System is not running for a

periods of time even if the headlights
turn off automatically.

Instruments and controls

2-39

-------------------------------------------------------------------------------------------------------------------------------------------------------------

2-40

Instruments and controls

Daytime running light system

The daytime running lights automatically
illuminate when the hybrid system is started
with the parking brake released. The day-
time running lights operate with the head-
light switch in the OFF position or in the
position. Turn the headlight switch to the

position for full illumination when driv-

ing at night.
If the parking brake is applied before the
hybrid system is started, the daytime run-
ning lights do not illuminate. The daytime
running lights illuminate once the parking
brake is released. The daytime running lights
will remain on until the ignition switch is
pushed to the OFF position.

Adaptive Front lighting System
(AFS) (if so equipped)

The Adaptive Front lighting System (AFS)
will automatically adjust the headlights (low
beam) toward the turning direction to
improve the driver’s view. When the head-
light switch is ON and the driver operates
the steering wheel in a turn, the AFS system
will be activated.
The AFS will operate:
. Right-side headlight

— When the headlight switch is ON

— When the shift lever is in any position

other than P (Park) or R (Reverse)

— When the steering wheel is turned

clockwise

. Left-side headlight

— When the headlight switch is ON
— When the shift lever is in any position

other than P (Park) or R (Reverse)

— When the vehicle is driven at a speed

above 3 MPH (5 km/h).

— When the steering wheel is turned

counterclockwise

SIC4333

To turn the AFS off, push the AFS switch.
(The AFS OFF indicator light will illuminate.)
Push the switch again to turn the system on
again.
AFS will also adjust the headlight to a proper
axis automatically, depending on the number
of occupants in the vehicle, the load the
vehicle is carrying and the road conditions.
If the AFS OFF indicator light blinks after
the ignition switch has been pushed to the
ON position, this may indicate that the AFS
is not functioning properly. Have the system
checked. It is recommended you visit an
INFINITI retailer for this service. When the
hybrid system is started, the headlights will
vibrate to check the system condition. This is

-------------------------------------------------------------------------------------------------------------------------------------------------------------

not a malfunction.

SIC4331

SIC3270

Instruments and controls

2-41

-------------------------------------------------------------------------------------------------------------------------------------------------------------

2-42

Instruments and controls

Instrument brightness control

The instrument brightness control switch
can be operated when the ignition switch is
in the ON position. When the switch is
operated, the vehicle information display
switches to the brightness adjustment
mode.
Push the upper switch

to brighten the

instrument panel lights. The bar

moves to

the + side. When reaching the maximum
brightness, “MAX” appears on the display

.

Push the lower switch

to dim the instru-

ment panel lights. The bar

moves to the −

side. When reaching the minimum bright-
ness, “MIN” appears on the display

.

However, “MIN” does not appear during
the nighttime.
The vehicle information display returns to
the normal display under the following
conditions:
. when the instrument brightness control

switch is not operated for more than 5
seconds.

. when the side or front of the

switch

or

switch on the right side of the

combination meter panel is pushed.

SIC3271

TURN SIGNAL SWITCH

Turn signal

Move the lever up or down to signal the
turning direction. When the turn is com-
pleted, the turn signals cancel automatically.

Lane change signal

Move the lever up or down until the turn
signal begins to flash, but the lever does not
latch, to signal a lane change. Hold the lever
until the lane change is completed.
Move the lever up or down until the turn
signal begins to flash, but the lever does not
latch, and release the lever. The turn signal
will automatically flash three times.

Choose the appropriate method to signal a
lane change based on road and traffic
conditions.

-------------------------------------------------------------------------------------------------------------------------------------------------------------


Content      ..     10      11      12      13     ..