Infiniti Jx35 (2013 year). Manual - part 31


  Index      Infiniti     Infiniti Jx35 (2013 year) - manual in english


Search            copyright infringement  


Content      ..     29      30      31      32     ..


Infiniti Jx35 (2013 year). Manual - part 31


NOTE:

The air cleaner filter should not be cleaned
and reused.

Replace the air cleaner filter according to the
maintenance log shown in the “Warranty Informa-
tion and Maintenance Booklet.”

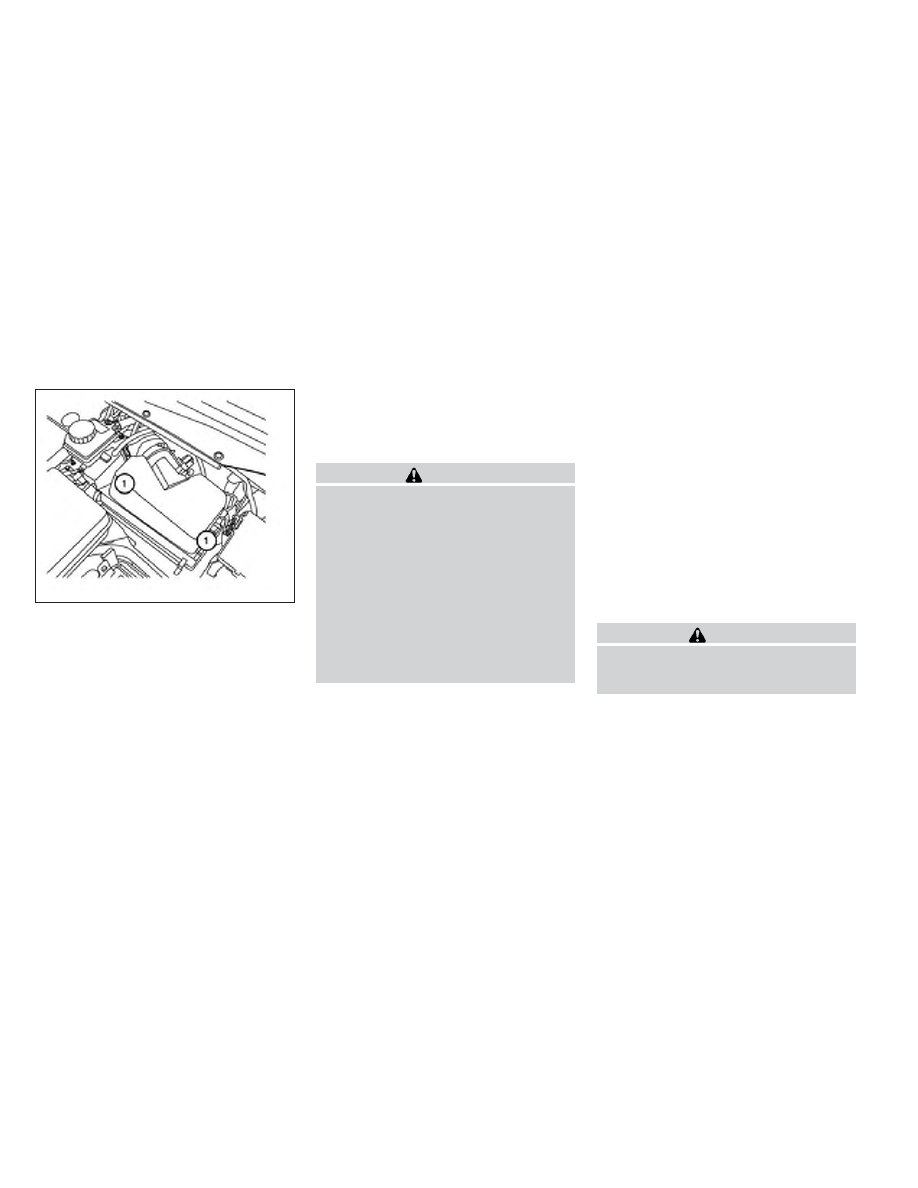
To remove the air cleaner filter:

1

Unlatch the clips and move the air cleaner
cover upward.

Remove the air cleaner filter and wipe the inside
of the air cleaner filter housing and the cover with
a damp cloth.

NOTE:

After installing a new air cleaner, make
sure the air cleaner cover is seated in the
housing and latch the clips.

WARNING

● Operating the engine with the air cleaner

removed can cause you or others to be
burned. The air cleaner not only cleans
the air, it stops the flame if the engine
backfires. If it isn’t there, and the engine
backfires, you could be burned. Do not
drive with the air cleaner removed, and
be careful when working on the engine
with the air cleaner removed.

● Never pour fuel into the throttle body or

attempt to start the engine with the air
cleaner removed. Doing so could result
in serious injury.

IN-CABIN MICROFILTER

The in-cabin microfilter restricts the entry of air-
borne dust and pollen particles and reduces
some objectionable outside odors. The filter is
located behind the glove box. Refer to the
“INFINITI Service and Maintenance Guide” for
change intervals.

If replacement is required, see your INFINITI re-
tailer.

CLEANING

If your windshield is not clear after using the
windshield washer or if a wiper blade chatters
when running, wax or other material may be on
the blade or windshield.

Clean the outside of the windshield with a washer
solution or a mild detergent. Your windshield is
clean if beads do not form when rinsing with clear
water.

Clean each blade by wiping it with a cloth soaked
in a washer solution or a mild detergent. Then
rinse the blades with clear water. If your wind-
shield is still not clear after cleaning the blades
and using the wiper, replace the blades.

CAUTION

Worn windshield wiper blades can dam-
age the windshield and impair driver
vision.

LDI2090

AIR CLEANER

WINDSHIELD WIPER BLADES

8-18

Maintenance and do-it-yourself

-------------------------------------------------------------------------------------------------------------------------------------------------------------

REPLACING

Replace the wiper blades if they are worn.

1. Lift the wiper arm away from the windshield.

2

Push the release tab, then move the wiper
blade down the wiper arm to remove.

3

Remove the wiper blade.

4. Insert the new wiper blade onto the wiper

arm until it clicks into place.

5. Rotate the wiper blade so the dimple is in the

groove.

6. Return the wiper to its original position and

release it until it has made contact with the
windshield.

CAUTION

● After wiper blade replacement, return

the wiper arm to its original position;
otherwise it may be damaged when the
hood is opened.

● Make sure the wiper blades contact the

glass; otherwise the arms may be dam-
aged from wind pressure.

If you wax the surface of the hood, be careful not
to let wax get into the windshield washer nozzle

A

. This may cause clogging or improper wind-

shield washer operation. If wax gets into the
nozzle, remove it with a needle or small pin

B

.

WDI0594

WDI0570

Maintenance and do-it-yourself

8-19

-------------------------------------------------------------------------------------------------------------------------------------------------------------

Rear window wiper blade

Contact an INFINITI retailer if checking or re-
placement is required.

If the brakes do not operate properly, have the
brakes checked by an INFINITI retailer.

Self-adjusting brakes

Your vehicle is equipped with self-adjusting
brakes.

The front and rear disc-type brakes self-adjust
every time the brake pedal is applied.

WARNING

See an INFINITI retailer for a brake system
check if the brake pedal height does not
return to normal.

Brake pad wear indicators

The disc brake pads on your vehicle have audible
wear indicators. When a brake pad requires re-
placement, a high pitched scraping or screech-
ing sound will be heard when the vehicle is in
motion. The noise will be heard whether or not the
brake pedal is depressed. Have the brakes
checked as soon as possible if the wear indicator
sound is heard.

Under some driving or climate conditions, occa-
sional brake squeak, squeal or other noise may
be heard. Occasional brake noise during light to
moderate stops is normal and does not affect the
function or performance of the brake system.

Proper brake inspection intervals should
be followed. 
For more information regarding
brake inspections, see the appropriate mainte-
nance schedule information in the “INFINITI Ser-
vice and Maintenance Guide”.

BRAKES

8-20

Maintenance and do-it-yourself

-------------------------------------------------------------------------------------------------------------------------------------------------------------

Two types of fuses are used. Type

A

is used in

the fuse boxes in the engine compartment. Type

B

is used in the passenger compartment fuse

box.

Type A fuses are provided as spare fuses. They
are stored in the passenger compartment fuse
box.

Type A fuses can be installed in the engine com-
partment and passenger compartment fuse
boxes.

If a type A fuse is used to replace a type B fuse,
the type A fuse will not be level with the fuse
pocket as shown in the illustration. This will not
affect the performance of the fuse. Make sure the
fuse is installed in the fuse box securely.

Type B fuses cannot be installed in the under-
hood fuse boxes. Only use type A fuses in the
underhood fuse boxes.

LDI0455

LDI0457

FUSES

Maintenance and do-it-yourself

8-21

-------------------------------------------------------------------------------------------------------------------------------------------------------------

ENGINE COMPARTMENT

CAUTION

Never use a fuse of a higher or lower
amperage rating than specified on the
fuse box cover. This could damage the
electrical system or cause a fire.

If any electrical equipment does not come on,
check for an open fuse.

1. Be sure the ignition switch and the headlight

switch are OFF.

2. Open the engine hood.

3. Remove the fuse box cover by pushing the

tab and lifting the cover up.

4. Remove the fuse with the fuse puller. The

fuse puller is located in the center of the fuse
block in the passenger compartment.

5. If the fuse is open

A

, replace it with a new

fuse

B

.

6. If a new fuse also opens, have the electrical

system checked and repaired by an INFINITI
retailer.

Fusible links

If the electrical equipment does not operate and
fuses are in good condition, check the fusible
links. If any of these fusible links are melted,
replace with only Genuine NISSAN parts.

LDI2149

WDI0452

8-22

Maintenance and do-it-yourself

-------------------------------------------------------------------------------------------------------------------------------------------------------------

PASSENGER COMPARTMENT

CAUTION

Never use a fuse of a higher or lower
amperage rating than specified on the
fuse box cover. This could damage the
electrical system or cause a fire.

If any electrical equipment does not operate,
check for an open fuse.

1. Be sure the ignition switch and the headlight

switch are OFF.

2. Open the glove box to access the fuse box

cover.

3. Pull the fuse box cover to remove.

4. Remove the fuse with the fuse puller.

5. If the fuse is open

A

, replace it with an

equivalent good fuse

B

.

6. Push the fuse box cover to install.

7. If a new fuse also opens, have the electrical

system checked and repaired by an INFINITI
retailer.

LDI2092

Type A

WDI0452

Maintenance and do-it-yourself

8-23

-------------------------------------------------------------------------------------------------------------------------------------------------------------

Extended storage switch

If any electrical equipment does not operate,
remove the extended storage switch and check
for an open fuse.

NOTE:

The extended storage switch is used for
long term vehicle storage. Even if the ex-
tended storage switch is broken it is not
necessary to replace it. Replace only the
open fuse in the switch with a new fuse.

How to replace the extended storage switch:

1. To remove the extended storage switch, be

sure the ignition switch is in the OFF or
LOCK position.

2. Be sure the headlight switch is in the OFF

position.

3. Remove the fuse box cover.

4. Pinch the locking tabs

1

found on each

side of the storage switch.

5. Pull the storage switch straight out from the

fuse box

2

.

Type B

LDI0456

LDI2035

8-24

Maintenance and do-it-yourself

-------------------------------------------------------------------------------------------------------------------------------------------------------------

CAUTION

Be careful not to allow children to swallow
the battery or removed parts.

INFINITI INTELLIGENT KEY

Replace the battery in the Intelligent Key as fol-
lows:

1. Remove the mechanical key from the Intelli-

gent Key.

2. Insert a small screwdriver

A

into the slit

B

of the corner and twist it to separate the
upper part from the lower part. Use a cloth to
protect the casing.

3. Replace the battery with a new one.

Recommended battery: CR2025 or equiva-
lent.

● Do not touch the internal circuit and elec-

tric terminals as doing so could cause a
malfunction.

● Hold the battery by the edges. Holding

the battery across the contact points will
seriously deplete the storage capacity.

● Make sure that the + side faces the bot-

tom of the case.

SDI1867

BATTERY REPLACEMENT

Maintenance and do-it-yourself

8-25

-------------------------------------------------------------------------------------------------------------------------------------------------------------

4. Close the lid securely as illustrated

C

D

.

5. Operate the buttons to check the operation.

See an INFINITI retailer if you need assistance for
replacement.

FCC Notice:

For USA:
This device complies with Part 15 of the
FCC Rules. Operation is subject to the fol-
lowing two conditions: (1) This device may
not cause harmful interference, and (2) this
device must accept any interference re-
ceived, including interference that may
cause undesired operation. Note: Changes

or modifications not expressly approved by
the party responsible for compliance could
void the user’s authority to operate the
equipment.

For Canada:
This device complies with RSS-210 of In-
dustry Canada. Operation is subject to the
following two conditions: (1) this device
may not cause interference, and (2) this
device must accept any interference, in-
cluding interference that may cause unde-
sired operation of the device.

HEADLIGHTS
Replacing the xenon headlight bulb

If replacement is required, see your INFINITI re-
tailer.

WARNING

c

HIGH VOLTAGE

When xenon headlights are on, they pro-
duce a high voltage. To prevent an electric
shock, never attempt to modify or disas-
semble. Always have your xenon head-
lights replaced at an INFINITI retailer. For
additional information, see “Headlight
and turn signal switch” in the “Instru-
ments and controls” section.

WDI0535

LIGHTS

8-26

Maintenance and do-it-yourself

-------------------------------------------------------------------------------------------------------------------------------------------------------------

FOG LIGHTS
Replacing the fog light bulb

If replacement is required, see your INFINITI re-
tailer.

CAUTION

● High pressure halogen gas is sealed

inside the halogen bulb. The bulb may
break if the glass envelope is scratched
or the bulb is dropped.

● When handling the bulb, do not touch

the glass envelope.

● Use the same number and wattage as

originally installed as shown in the
chart.

● Do not leave the bulb out of the fog light

for a long period of time as dust, mois-
ture and smoke may enter the fog light
body and affect the performance of the
fog light.

EXTERIOR AND INTERIOR LIGHTS

Item

Wattage (W)

Bulb No.

Headlight assembly*

High/ Low

35

D2S

Park

5

W5W

Turn

21

PY21W

Sidemarker

5

W5W

Front fog lights

55

H11

Daytime running lights (Canada only)

19

PS19W

Room/map lights

8

Footwell light

3.4

158

Personal lights

6

WXW52

Glove box light*

8

258

Step light

3.4

194

Courtesy light*

(LED)

Puddle lights*

(LED)

Vanity mirror light

2

Cargo light

8

AL67

High-mounted stop light*

(LED)

Rear combination light

Tail/Stop*

(LED)

Turn

21

WY21W

Rear sidemarker

(LED)

Backup (reversing)*

18

921

License plate light*

5

W5W

* See an INFINITI retailer for replacement.

Always check with the Parts Department at an INFINITI retailer for the latest parts information.

Maintenance and do-it-yourself

8-27

-------------------------------------------------------------------------------------------------------------------------------------------------------------

1.

Headlight assembly

2

Map light

3

Personal light

4.

Fog light/ Daytime running light
(Canada only)

5.

Cargo light

6.

Courtesy light

7.

Rear combination light

8.

License plate light

Replacement procedures

All other lights are either type A, B, C or D. When
replacing a bulb, first remove the lens, lamp
and/or cover.

LDI2093

WDI0263

8-28

Maintenance and do-it-yourself

-------------------------------------------------------------------------------------------------------------------------------------------------------------

Indicates bulb removal

Indicates bulb installation

Use a cloth

1

to protect the housing.

Use a cloth

1

to protect the housing.

Map lights

LDI2094

Personal lights

WDI0670

Maintenance and do-it-yourself

8-29

-------------------------------------------------------------------------------------------------------------------------------------------------------------

Use a cloth

1

to protect the housing.

Use a cloth

1

to protect the housing.

1

Remove the trim surrounding the housing.

2

Remove the two screws holding the assem-
bly to the vehicle.

3

Remove the assembly.

4

Replace the necessary bulbs.

Vanity mirror

LDI2096

Cargo light

WDI0206

8-30

Maintenance and do-it-yourself

-------------------------------------------------------------------------------------------------------------------------------------------------------------

If you have a flat tire, see “Flat tire” in the
“In case of emergency” section of this
manual.

TIRE PRESSURE

Tire Pressure Monitoring System
(TPMS)

This vehicle is equipped with the Tire
Pressure Monitoring System (TPMS). It
monitors tire pressure of all tires except
the spare. When the low tire pressure
warning light is lit and the “Tire Pressure
Low – Add Air” warning appears in the
vehicle information display, one or more of
your tires is significantly under-inflated. If
equipped, the system also displays pres-
sure of all tires (except the spare tire) on
the display screen by sending a signal
from a sensor that is installed in each
wheel.

The TPMS will activate only when the
vehicle is driven at speeds above 16 MPH
(25 km/h). Also, this system may not de-
tect a sudden drop in tire pressure (for
example a flat tire while driving).

For more details, refer to “Low tire pres-
sure warning light” in the “Instruments and
controls” section and “Flat tire” in the “In
case of emergency” section.

Tire inflation pressure

Check the tire pressures (including the
spare) often and always prior to long dis-
tance trips. The recommended tire pres-
sure specifications are shown on the
F.M.V.S.S./C.M.V.S.S. certification label
or the Tire and Loading Information label
under the “Cold Tire Pressure” heading.
The Tire and Loading Information label is
affixed to the driver side center pillar. Tire
pressures should be checked regularly
because:

● Most tires naturally lose air over time.
● Tires can lose air suddenly when

driven over potholes or other objects
or if the vehicle strikes a curb while
parking.

Rear combination light

LDI2085

WHEELS AND TIRES

Maintenance and do-it-yourself

8-31

-------------------------------------------------------------------------------------------------------------------------------------------------------------

The tire pressures should be checked
when the tires are cold. The tires are
considered COLD after the vehicle has
been parked for 3 or more hours, or driven
less than 1 mile (1.6 km) at moderate
speeds.

The TPMS with Tire Inflation Indicator
provides visual and audible signals out-
side the vehicle for inflating the tires to the
recommended COLD tire pressure. For
more information, see “TPMS with Tire
Inflation Indicator” in the “Starting and
driving” section.

Incorrect tire pressure, including un-
der inflation, may adversely affect
tire life and vehicle handling.

WARNING

● Improperly inflated tires can fail

suddenly and cause an accident.

● The Gross Vehicle Weight Rating

(GVWR)

is

located

on

the

F.M.V.S.S./C.M.V.S.S.

certifica-

tion label. The vehicle weight ca-
pacity is indicated on the Tire and
Loading Information label. Do
not load your vehicle beyond this
capacity. Overloading your ve-
hicle may result in reduced tire
life, unsafe operating conditions
due to premature tire failure, or
unfavorable handling character-
istics and could also lead to a
serious accident. Loading be-
yond the specified capacity may
also result in failure of other ve-
hicle components.

● Before taking a long trip, or

whenever you heavily load your
vehicle, use a tire pressure gauge
to ensure that the tire pressures
are at the specified level.

● For additional information re-

garding tires, refer to “Important
Tire Safety Information” (US) or
“Tire

Safety

Information”

(Canada) in the Warranty Infor-
mation Booklet.

8-32

Maintenance and do-it-yourself

-------------------------------------------------------------------------------------------------------------------------------------------------------------

Tire and loading information label

1

Seating capacity: The maximum num-
ber of occupants that can be seated
in the vehicle.

2

Original tire size: The size of the tires
originally installed on the vehicle at
the factory.

3

Cold tire pressure: Inflate the tires to
this pressure when the tires are cold.
Tires are considered COLD after the
vehicle has been parked for 3 or more
hours, or driven less than 1 mile
(1.6 km) at moderate speeds. The
recommended cold tire inflation is set
by the manufacturer to provide the
best balance of tire wear, vehicle
handling, driveability, tire noise, etc.,
up to the vehicle’s GVWR.

4

Tire size - refer to “Tire labeling” later
in this section.

5

Spare tire size.

6

Vehicle load limit: See loading infor-
mation in the “Technical and con-
sumer information” section.

LDI2083

Maintenance and do-it-yourself

8-33

-------------------------------------------------------------------------------------------------------------------------------------------------------------


Content      ..     29      30      31      32     ..