Infiniti QX56 (JA60). Manual - part 305
TRANSFER ASSEMBLY
DLN-143
< DISASSEMBLY AND ASSEMBLY >
[ATX14B]
C
E
F
G
H
I
J
K
L
M
A
B
DLN
N
O
P
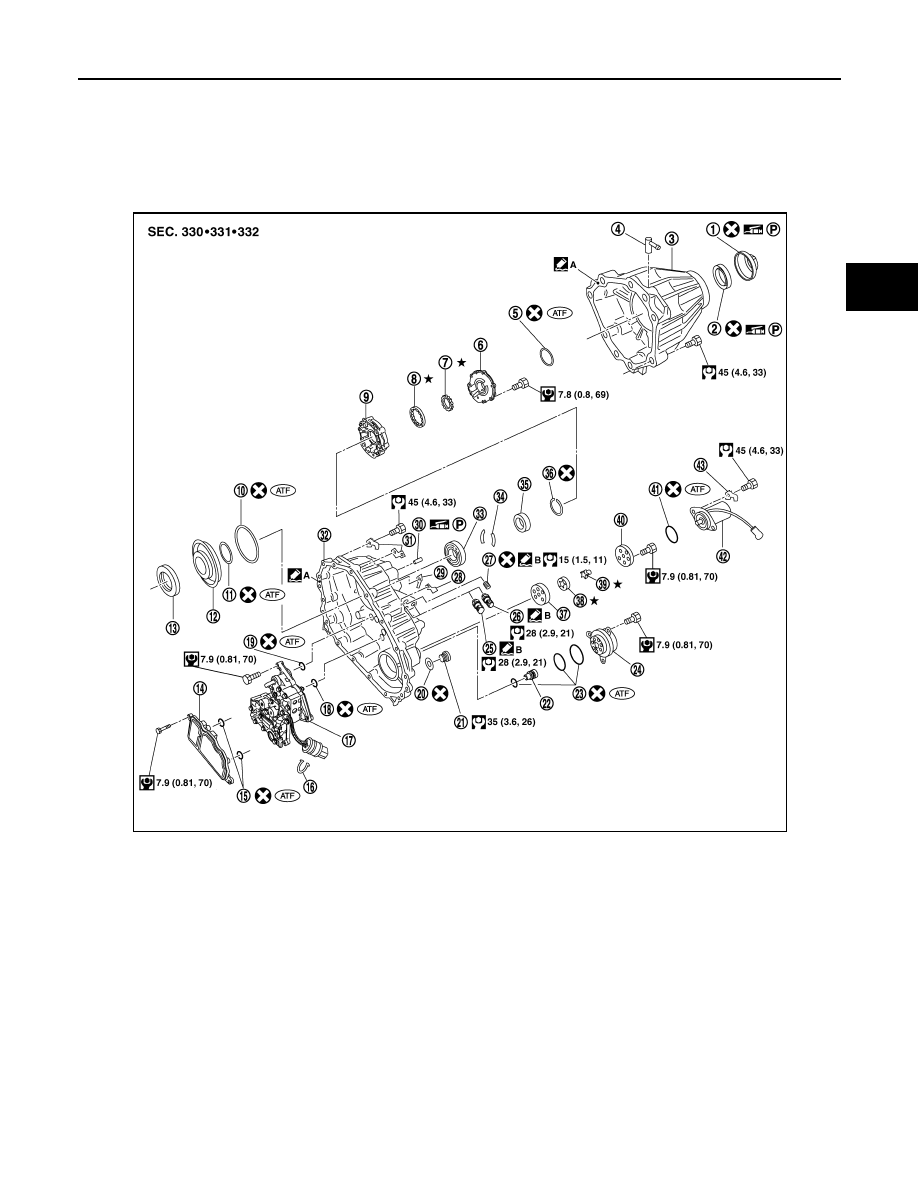
40.
Retaining plate
41.
Driven plate (10 sheet)
42.
Drive plate (10 sheet)
43.
Return spring assembly
44.
Press flange
45.
Thrust needle bearing
46.
Snap ring
47.
Retaining pin
48.
L-H fork
49.
2-4 fork
50.
Shift fork spring
51.
Fork guide
52.
Retainer pin
53.
Shift rod
1.
Dust cover
2.
Rear oil seal
3.
Rear case
4.
Breather tube
5.
Seal ring
6.
Main oil pump cover
7.
Inner gear
8.
Outer gear
9.
Main oil pump housing
10.
D-ring
11. D-ring
12.
Clutch piston
13.
Thrust needle bearing race
14. Oil strainer
15.
O-ring
16.
Snap ring
17. Control valve assembly
18.
Lip seal (large 5 pieces)
19.
Lip seal (small 2 pieces)
20. Gasket
21.
Filler plug
22.
Oil filter stud
23. O-ring
24.
Oil filter
25
ATP switch
26. Neutral-4LO switch
27.
Oil pressure check plug
28.
Harness bracket
29. Air breather hose clamp
30.
Stem bleeder
31.
Harness bracket
32. Center case
33.
Mainshaft rear bearing
34.
C-ring
35. Washer holder
36.
Snap ring
37.
Sub oil pump housing
38. Outer gear
39.
Inner gear
WDIA0302E