Infiniti QX56 (Z62). Manual - part 853
 

  Index      Infiniti     Infiniti QX56 (Z62) - service repair manual 2011 year


Search            


Content   ..  851  852  853  854   ..


Infiniti QX56 (Z62). Manual - part 853


INSTRUMENT PANEL ASSEMBLY

IP-19

< REMOVAL AND INSTALLATION >

C

D

E

F

G

H

I

K

L

M

A

B

IP

N

O

P

3.

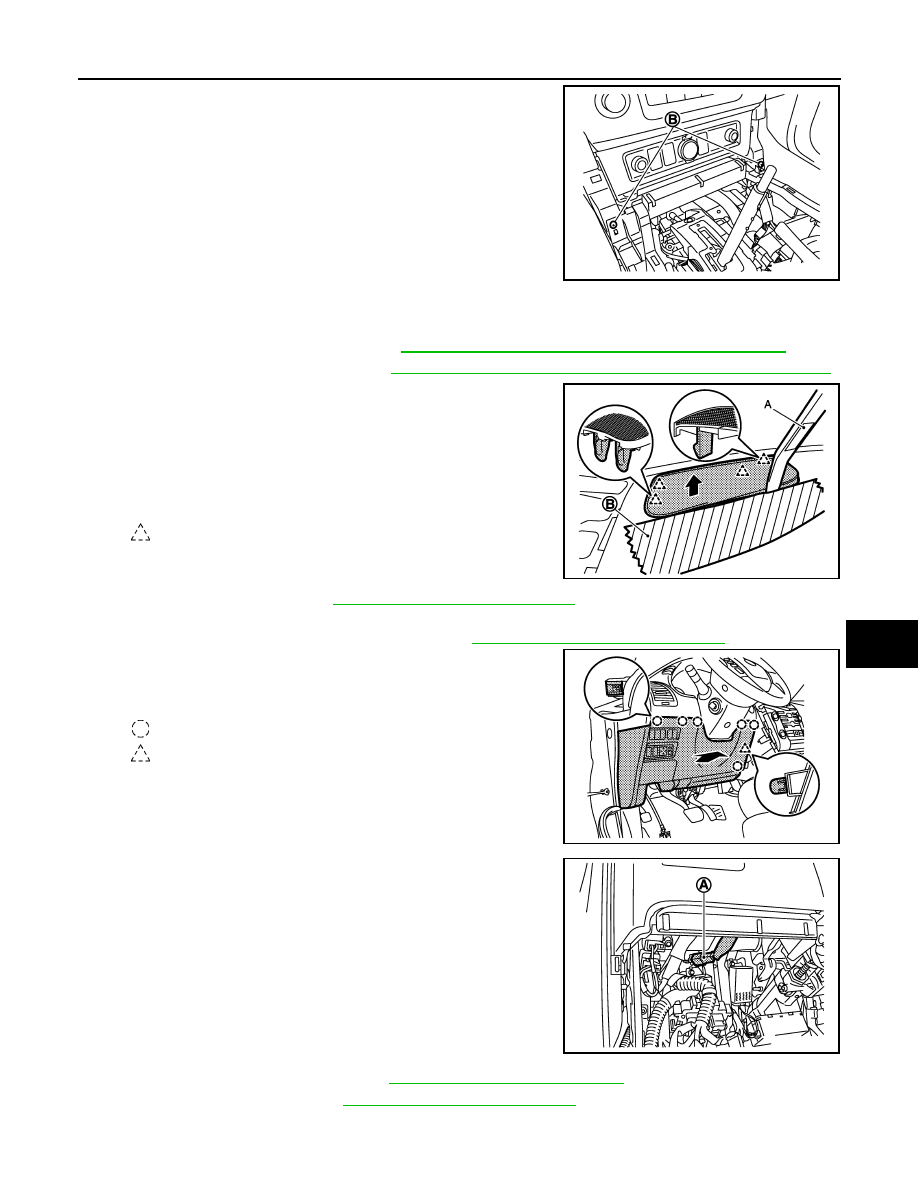
Remove center console assembly front fixing screws (B).

4.

Lift up center console assembly back side, and then remove center console assembly.

17. Remove front body side welt LH. Refer to 

INT-20, "BODY SIDE WELT : Removal and Installation"

.

18. Remove front pillar garnish LH. Refer to 

INT-19, "FRONT PILLAR GARNISH : Removal and Installation"

.

19. Remove speaker grille LH.

1.

Disengage speaker grille LH fixing pawls with remover tool
(A).

2.

Pull up speaker grille LH.

CAUTION:

 Apply protective tape (B) on the part to protect it from dam-
age.

20. Remove squawker LH. Refer to 

AV-218, "Removal and Installation"

.

21. Remove instrument lower panel LH.

1.

Remove food opener lever fixing bolts. Refer to 

DLK-238, "Removal and Installation"

2.

Pull back instrument lower panel LH, and then disengage
the clips and pawl.

3.

Disconnect harness connectors and aspirator duct.

22. Disconnect meter control switch harness connector (A). 

23. Remove driver air bag module. Refer to 

SR-11, "Removal and Installation"

.

24. Remove steering wheel. Refer to 

ST-33, "Removal and Installation"

.

JMJIA3898ZZ

: Pawl

JMJIA3839ZZ

: Clip

: Pawl

JMJIA3840ZZ

JMJIA3841ZZ

IP-20

< REMOVAL AND INSTALLATION >

INSTRUMENT PANEL ASSEMBLY

25. Remove steering column covers.

1.

Remove steering column cover fixing screws (A).

2.

Pull up steering column upper cover (1), and then disen-
gage steering column upper cove fixing pawls.

3.

Remove steering column upper cover.

4.

Pull down steering column lower cover (2), and then discon-
nect ADP steering switch connector (with ADP).

5.

Remove steering column lower cover.

26. Remove combination switch. Refer to 

BCS-82, "Removal and Installation"

.

27. Remove spiral cable. Refer to 

SR-14, "Removal and Installation"

.

28. Remove cluster lid A.

1.

Pull back cluster lid A, and then disengage the clips and
pawls.

2.

Disconnect harness connectors.

29. Remove combination meter. Refer to 

MWI-85, "Removal and Installation"

.

30. Remove upper ventilator grille.

1.

Disengage upper ventilator grille fixing clips and pawls with
remover tool (A)

2.

Pull toward the arrow direction.

CAUTION:

 Apply protective tape (B) on the part to protect it from dam-
age.

31. Remove center speaker. Refer to 

AV-221, "Removal and Installation"

.

32. Remove cluster lid C.

1.

Remove cluster lid C fixing screws (A).

2.

Pull back cluster lid C, and then disengage the pawls and
metal clips.

3.

Disconnect harness connectors.

: Pawl

JMJIA3842ZZ

: Clip

: Pawl

JMJIA3843ZZ

: Clip

: Pawl

JMJIA3844ZZ

: Pawl

: Metal Clip

JMJIA4228ZZ

INSTRUMENT PANEL ASSEMBLY

IP-21

< REMOVAL AND INSTALLATION >

C

D

E

F

G

H

I

K

L

M

A

B

IP

N

O

P

33. Remove cluster lid C lower.

1.

Disengage cluster lid C lower fixing metal clips with remover
tool (A).

2.

Pull back cluster lid C lower, and then disconnect harness
connectors.

CAUTION:

 Apply protective tape (B) on the part to protect it from dam-
age.

NOTE:
When removing cluster lid C lower without removing center console.
1.

Disengage metal clips of lower side of cluster lid C lower
using a remover tool (A).

2.

Disengage metal clips of upper side of cluster lid C lower
using a remover tool.

3.

Pull back cluster lid C lower, and then disconnect harness
connectors.

34. Remove AV control unit. Refer to 

AV-212, "Removal and Installation"

.

35. Remove cluster lid D.

1.

Remove cluster lid D fixing screw (A).

2.

Pull back cluster lid D, and then disengage the pawls and
metal clips.

36. Remove front display unit. Refer to 

AV-213, "Removal and Installation"

.

37. Remove instrument panel assembly mounting screws (A) and bolts (B).

: Metal Clip

JMJIA3896ZZ

Metal clip

JMJIA3846ZZ

: Pawl

: Metal Clip

JMJIA3847ZZ

JMJIA3850ZZ

IP-22

< REMOVAL AND INSTALLATION >

INSTRUMENT PANEL ASSEMBLY

38. Pull back instrument panel assembly, and then remove front squawker LH harness (1) fixing clip (A) from

front ventilator duct (2).

39. Remove instrument panel from passenger door opening portion.

CAUTION:

• Cover tool with a shop cloth to prevent windshield glass from being damaged.
• When removing instrument panel assembly, 2 workers are required so as to prevent it from drop-

ping.

40. Remove the following parts after removing instrument panel assembly.

• Front passenger air bag module. Refer to 

SR-17, "Removal and Installation"

.

• Side ventilator grille LH/RH. Refer to 

VTL-10, "SIDE VENTILATOR GRILLE : Removal and Installation"

.

• Side ventilator duct: Refer to 

VTL-10, "SIDE VENTILATOR DUCT : Removal and Installation"

.

• Upper ventilator duct: Refer to 

VTL-10, "UPPER VENTILATOR DUCT : Removal and Installation"

.

• Front defroster nozzle: Refer to 

VTL-11, "FRONT DEFROSTER NOZZLE : Removal and Installation"

.

• Side defroster nozzle: Refer to 

VTL-11, "SIDE DEFROSTER NOZZLE : Removal and Installation"

.

• GPS antenna: Refer to 

AV-232, "Removal and Installation"

.

• Instrument finisher A
• Instrument finisher B

INSTALLATION

Install in the reverse order of removal.

JMJIA3851ZZ


Content   ..  851  852  853  854   ..