Infiniti QX56 (Z62). Manual - part 554
 

  Index      Infiniti     Infiniti QX56 (Z62) - service repair manual 2011 year


Search            


Content   ..  552  553  554  555   ..


Infiniti QX56 (Z62). Manual - part 554


EC-194

< DTC/CIRCUIT DIAGNOSIS >

[VK56VD]

P0075, P0081 IVT CONTROL SOLENOID VALVE

2.

Disconnect ECM harness connector.

3.

Check the continuity between IVT control solenoid valve harness connector and ECM harness connector.

4.

Also check harness for short to ground and short to power. 

Is the inspection result normal?

YES

>> GO TO 4.

NO

>> Repair open circuit, short to ground or short to power in harness or connectors.

4.

CHECK IVT CONTROL SOLENOID VALVE

Refer to 

EC-194, "Component Inspection (Intake Valve Timing Control Solenoid Valve)"

.

Is the inspection result normal?

YES

>> GO TO 5.

NO

>> Replace malfunctioning IVT control solenoid valve. Refer to 

EM-61, "Exploded View"

.

5.

CHECK INTERMITTENT INCIDENT

Refer to 

GI-40, "Intermittent Incident"

.

>> INSPECTION END

Component Inspection (Intake Valve Timing Control Solenoid Valve)

INFOID:0000000006288359

1.

CHECK INTAKE VALVE TIMING CONTROL SOLENOID VALVE-I

1.

Turn ignition switch OFF.

2.

Disconnect intake valve timing control solenoid valve harness connector.

3.

Check resistance between intake valve timing control solenoid valve terminals as per the following.

Is the inspection result normal?

YES

>> GO TO 2.

NO

>> Replace malfunctioning intake valve timing control solenoid valve. Refer to 

EM-61, "Exploded

View"

.

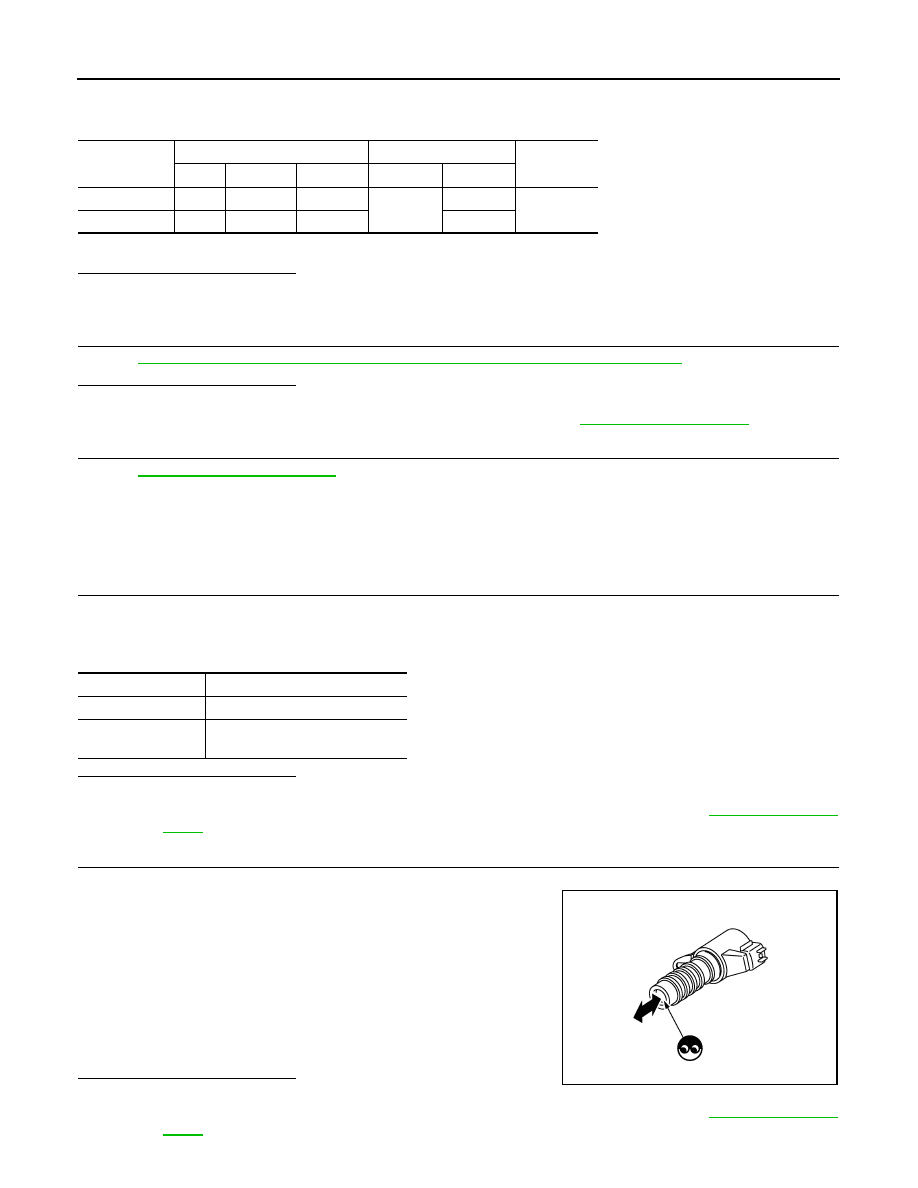
2.

CHECK INTAKE VALVE TIMING CONTROL SOLENOID VALVE-II

1.

Remove intake valve timing control solenoid valve.

2.

Provide 12 V DC between intake valve timing control solenoid
valve terminals 1 and 2, and then interrupt it. Check that the
plunger moves as shown in the figure.

CAUTION:

Never apply 12 V DC continuously for 5 seconds or more.
Doing so may result in damage to the coil in intake valve
timing control solenoid valve.
NOTE:
Always replace O-ring when intake valve timing control
solenoid valve is removed.

Is the inspection result normal?

YES

>> INSPECTION END

NO

>> Replace malfunctioning intake valve timing control solenoid valve. Refer to 

EM-61, "Exploded

View"

.

DTC

IVT control solenoid valve

ECM

Continuity

Bank

Connector

Terminal

Connector

Terminal

P0075

1

F47

1

F111

49

Existed

P0081

2

F61

1

54

Terminals

Resistance

1 and 2

7.0 - 7.7 

 [at 20

°

C (68

°

F)]

1 or 2 and ground


(Continuity should not exist)

JMBIA0079ZZ

P0087, P0088, P0090 FRP CONTROL SYSTEM

EC-195

< DTC/CIRCUIT DIAGNOSIS >

[VK56VD]

C

D

E

F

G

H

I

J

K

L

M

A

EC

N

P

O

P0087, P0088, P0090 FRP CONTROL SYSTEM

DTC Logic

INFOID:0000000006217784

DTC DETECTION LOGIC

NOTE:
• If DTC P0087 or P0090 is displayed with DTC P1197, first perform the trouble diagnosis for DTC

P1197.

• DTC P0087 or P0090 may be displayed when running out of gas.

DTC CONFIRMATION PROCEDURE

1.

PRECONDITIONING

1.

Turn ignition switch OFF and wait at least 10 seconds.

2.

Turn ignition switch ON.

3.

Turn ignition switch OFF and wait at least 10 seconds.

TESTING CONDITION:
Before performing the following procedure, confirm that battery voltage is 11 V or more at idle.

>> GO TO 2.

2.

PERFORM DTC CONFIRMATION PROCEDURE-I

1.

Check that the fuel tank is 1/8 full of fuel.

2.

Warm up the engine to the normal operating temperature and keep the engine speed at idle for 60 sec-
onds.
NOTE:
Warm up the engine until “COOLAN TEMP/S” on “DATA MONITOR” of CONSULT-III reaches at least
70

°

C (158

°

F).

3.

Check 1st trip DTC.

Is 1st trip DTC detected?

YES

>> Proceed to  

EC-196, "Diagnosis Procedure"

.

NO

>> GO TO 3.

3.

PERFORM DTC CONFIRMATION PROCEDURE-II

1.

Cool the engine until the engine coolant temperature reaches 60

°

C (140

°

F) or less.

2.

Start the engine and wait at least 60 seconds.

3.

Check 1st trip DTC.

Is 1st trip DTC detected?

YES

>> Proceed to  

EC-196, "Diagnosis Procedure"

.

NO

>> INSPECTION END

DTC No.

Trouble diagnosis name

DTC detecting condition

Possible cause

P0087

High fuel pressure too low

The following condition continues for 5 
seconds or more after engine start (re-
gardless of water temperature): Target 
fuel pressure 

 Actual fuel pressure 


2.7 MPa (27 bar, 27.5 kg/cm

2

, 392 psi)

• Harness or connectors

(The fuel pump circuit is open or shorted.)

• Fuel system

P0088

high fuel pressure too high

The following condition continues for 5 
seconds or more after engine start (re-
gardless of water temperature):Actual 
fuel pressure 

 Target fuel pressure 


2.7 MPa (27 bar, 27.5 kg/cm

2

, 392 psi)

P0090

High pressure fuel pump per-
formance

 Fuel rail pressure remains at 1.5 MPa 

(15 bar, 15.3 kg/ cm

2

, 217.5 psi) or less 

for 3 seconds or more during engine rev.

EC-196

< DTC/CIRCUIT DIAGNOSIS >

[VK56VD]

P0087, P0088, P0090 FRP CONTROL SYSTEM

Diagnosis Procedure

INFOID:0000000006217785

1.

CHECK LOW FUEL PRESSURE

WITH CONSULT-III

1.

Start the engine.

2.

Check “L/FUEL PRES SEN V” in “DATA MONITOR” of “ECM” with CONSULT-III.

WITHOUT CONSULT-III

1.

Start the engine.

2.

Check low fuel pressure sensor signal voltage.

Is inspection result normal?

YES

>> GO TO 2.

NO

>> Check low fuel pressure system. Refer to 

EC-512, "Diagnosis Procedure"

.

2.

PERFORM THE HIGH PRESSURE FUEL PUMP COMPONENT INSPECTION

Perform the high pressure fuel pump component inspection. Refer to 

EC-196, "Component Inspection"

.

Is inspection result normal?

YES

>> GO TO 3.

NO

>> Replace the fuel pump.

3.

CHECK FUEL LEAKAGE

1.

Start the engine.

2.

Visually check that the fuel pump, fuel rail, and fuel piping have no fuel leakage.

Is inspection result normal?

YES

>> Check that the fuel system has no breakage, bend, and crush.

NO

>> Repair or Replace the error-detected parts.

Component Inspection

INFOID:0000000006217786

1.

CHECK HIGH PRESSURE FUEL PUMP-I

1.

Turn ignition switch OFF.

2.

Disconnect high pressure fuel pump harness connector.

3.

Check the resistance between high pressure fuel pump terminals as follows.

Is the inspection result normal?

YES

>> GO TO 2.

NO

>> Replace high pressure fuel pump.  Refer to 

EM-49, "Removal and Installation"

.

Data monitor item

Condition

Value

(Approx.)

L/FUEL PRES SEN V

Engine speed: idle

3,000 –3,300 mV

Engine speed: 3,000 rpm (no load)

+

Condition

Value

(Approx.)

Low fuel pressure sensor

Connector

Terminal

F25

2

Ground

Engine speed: idle

3.0 –3.3 V

Engine speed: 3,000 rpm (no load)

+

Condition

Resistance

High pressure fuel pump

Terminal

1

2

Temperature 

°

C (

°

F)

20 – 30 (68 - 86)

9 - 11 

P0087, P0088, P0090 FRP CONTROL SYSTEM

EC-197

< DTC/CIRCUIT DIAGNOSIS >

[VK56VD]

C

D

E

F

G

H

I

J

K

L

M

A

EC

N

P

O

2.

CHECK HIGH PRESSURE FUEL PUMP-II

WITH CONSULT-III

1.

Reconnect high pressure fuel pump harness connector.

2.

Start the engine.

3.

Check “FUEL PRES SEN” in “DATA MONITOR” of “ECM” with CONSULT-III.

WITHOUT CONSULT-III

1.

Start the engine.

2.

Check fuel rail pressure sensor signal voltage.

YES

>> INSPECTION END

NO

>> Replace high pressure fuel pump.  Refer to 

EM-43, "Removal and Installation"

.

Data monitor item

Condition

Voltage

(Approx.)

FUEL PRES SEN V

Engine speed: idle

980 – 1,200 mV

Engine speed: Revving engine from idle to 4,000 rpm quickly

 1,100 – 2,900 mV

+

Condition

Value

(Approx.)

Fuel rail pressure sensor

Connector

Terminal

F26

2

Ground

Engine speed: idle

0.98 – 1.2 V

Engine speed: Revving engine from idle to 4,000 rpm quickly

 1.1 – 2.9 V


Content   ..  552  553  554  555   ..