Infiniti QX56 (Z62). Manual - part 1335


  Index      Infiniti     Infiniti QX56 (Z62) - service repair manual 2011 year


Search            


Content   ..  1333  1334  1335  1336   ..


Infiniti QX56 (Z62). Manual - part 1335


TRANSMISSION ASSEMBLY

TM-249

< UNIT DISASSEMBLY AND ASSEMBLY >

[7AT: RE7R01B]

C

E

F

G

H

I

J

K

L

M

A

B

TM

N

O

P

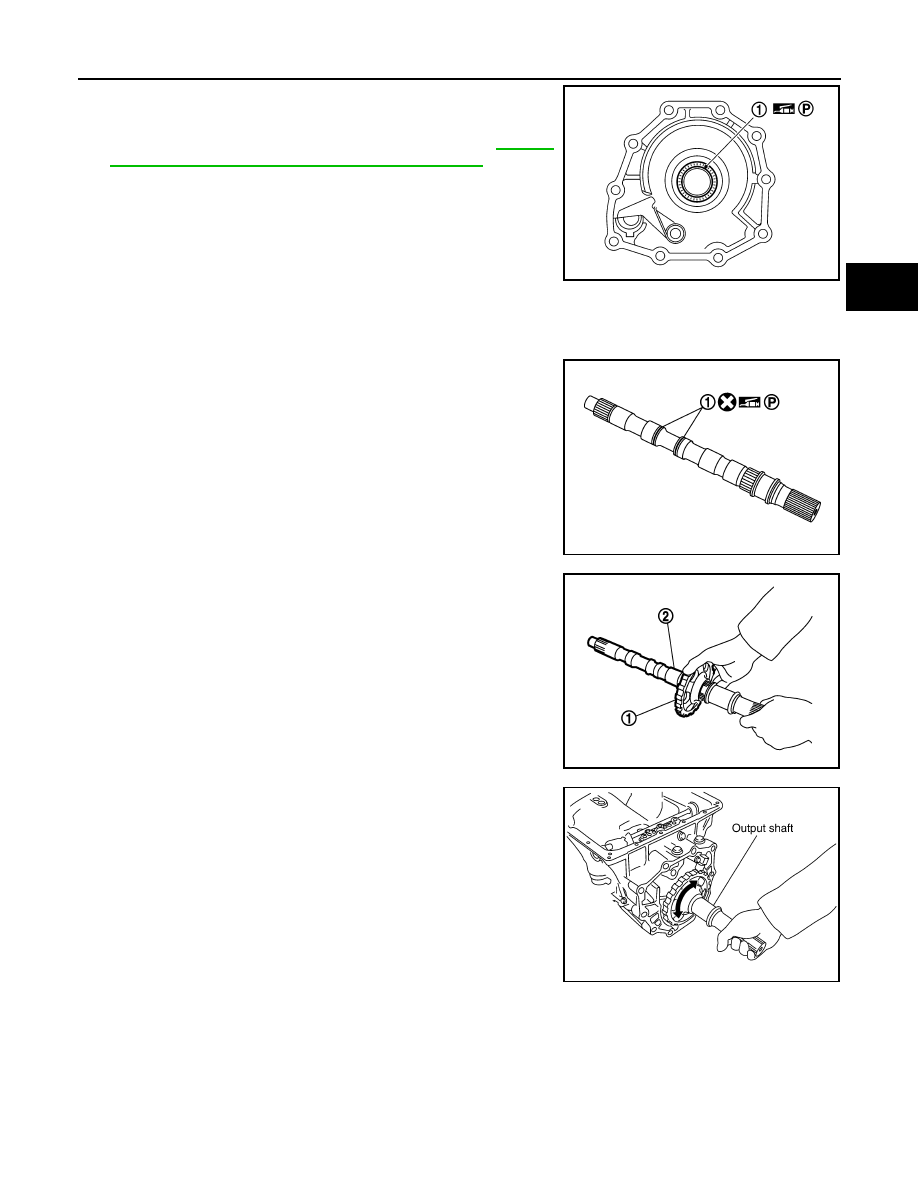
25. Install needle bearing (1) to rear extension (2WD) or adapter

case (4WD).

CAUTION:

Check the direction of needle bearing. Refer to 

TM-222,

"Location of Needle Bearings and Bearing Races"

.

26. Install rear extension assembly (2WD) or adapter case assembly (4WD) according to the following proce-

dures.

a.

2WD

i.

Install seal rings (1) to output shaft.

ii.

Install parking gear (1) to output shaft (2).

iii.

Install output shaft in transmission case.

CAUTION:

Be careful not to mistake front for rear because both sides
looks similar. (Thinner end is front side.)

SCIA6179J

JPDIA0030ZZ

JPDIA0029ZZ

SCIA5030E

TM-250

< UNIT DISASSEMBLY AND ASSEMBLY >

[7AT: RE7R01B]

TRANSMISSION ASSEMBLY

iv.

Install bearing race to output shaft.

v.

Apply recommended sealant (Genuine Anaerobic Liquid Gasket
or equivalent. Refer to 

GI-22, "Recommended Chemical Prod-

ucts and Sealants"

.) to rear extension assembly as shown in the

figure.

CAUTION:

Completely remove all moisture, oil and old sealant, etc.
from the transmission case and rear extension assembly
mounting surfaces.

vi. Install rear extension assembly to transmission case.

CAUTION:

Insert the tip of parking rod between the parking pawl and
the parking actuator support when assembling the rear
extension assembly.

vii. Tighten rear extension assembly bolts to the specified torque.

SCIA5245E

Sealant starting 
point and end-
point (A)

: Start and finish point shall be in 
the center of two bolts.

Overlap width of 
sealant starting 
point and end-
point (B)

: 3 – 5 mm (0.12 – 0.20 in)

Sealant width (C)

: 1.0 – 2.0 mm (0.04 – 0.08 in)

Sealant height (C)

: 0.4 – 1.0 mm (0.016 – 0.04 in)

JSDIA1855ZZ

SCIA5029E

1

:  Bracket

A

:  Bolt

B

: Self-sealing bolt

JSDIA1845ZZ

TRANSMISSION ASSEMBLY

TM-251

< UNIT DISASSEMBLY AND ASSEMBLY >

[7AT: RE7R01B]

C

E

F

G

H

I

J

K

L

M

A

B

TM

N

O

P

b.

4WD

i.

Install seal rings (1) to output shaft.

ii.

Install parking gear (1) to output shaft (2).

iii.

Install output shaft in transmission case.

CAUTION:

Be careful not to mistake front for rear because both sides
looks similar. (Thinner end is front side.)

iv.

Install bearing race to output shaft.

JPDIA0030ZZ

JPDIA0029ZZ

SCIA5030E

SCIA5245E

TM-252

< UNIT DISASSEMBLY AND ASSEMBLY >

[7AT: RE7R01B]

TRANSMISSION ASSEMBLY

v.

Install gasket onto transmission case.

CAUTION:

• Completely remove all moisture, oil and old gasket, etc.

from the transmission case and adapter case assembly
mounting surfaces.

• Never reuse gasket.

vi. Install adapter case assembly to transmission case.

CAUTION:

Insert the tip of parking rod between the parking pawl and
the parking actuator support when assembling the adapter
case assembly.

vii. Tighten adapter case assembly bolts to the specified torque.

27. Install needle bearing in drum support.

CAUTION:

Check the direction of needle bearing. Refer to 

TM-222,

"Location of Needle Bearings and Bearing Races"

.

SCIA5231E

SCIA5186E

1

:  Bracket

A

:  Bolt

B

: Self-sealing bolt

JPDIA1155ZZ

SCIA5198E


Content   ..  1333  1334  1335  1336   ..