Infiniti QX56 (Z62). Manual - part 1150


  Index      Infiniti     Infiniti QX56 (Z62) - service repair manual 2011 year


Search            


Content   ..  1148  1149  1150  1151   ..


Infiniti QX56 (Z62). Manual - part 1150


SE-138

< REMOVAL AND INSTALLATION >

THIRD SEAT

Removal and Installation

INFOID:0000000006217436

REMOVAL

CAUTION:

When removing and installing, use shop cloths to protect parts from damage.

1.

Remove the headrest.

2.

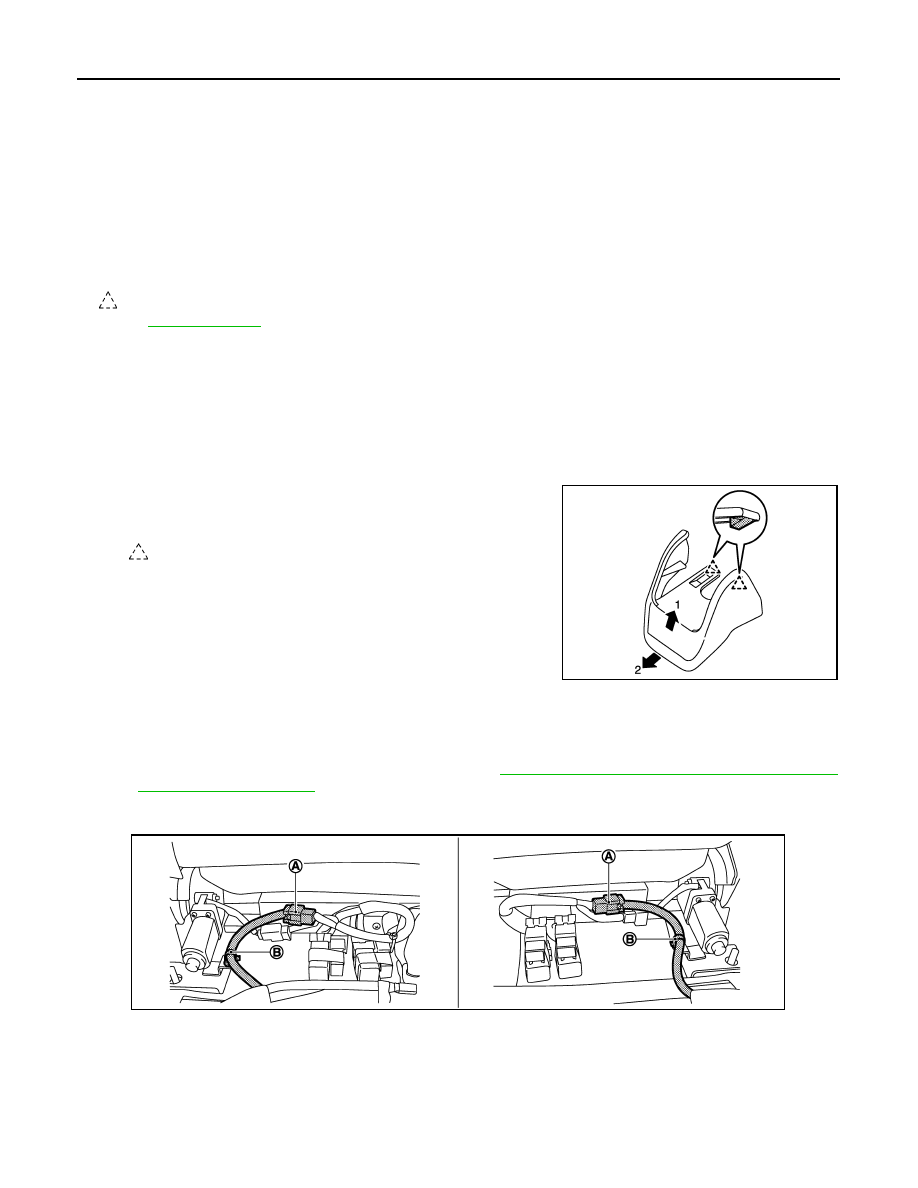
Remove the leg cover.
1.

Pull up the front edge of the leg cover to release the pawls.

2.

Slide the leg cover forward to release the pawls.

3.

Remove the mounting bolts on the front side of the third seat.

4.

Operate fold down switch or reclining switch, and fold down seatback LH and RH.

5.

Remove the luggage floor bracket.
1.

Remove the luggage floor rear board. Refer to 

INT-34, "LUGGAGE FLOOR REAR BOARD :

Removal and Installation"

.

2.

Remove the mounting nuts and screws of the luggage floor bracket.

6.

Disconnect harness connector (A) and remove harness clip (B) of seat harness assembly.

7.

Remove the seat belt anchor plate.

8.

Remove the mounting nuts on the rear side of the third seat.

9.

Remove the third seat assembly from vehicle.

CAUTION:

When removing and installing, use shop cloths to protect parts from damage.

INSTALLATION

10. Seat cushion pad

11.

Leg cover RH

12. Seat hinge assembly RH

13. Seat hinge assembly LH

14. Leg cover LH

15. Seat harness LH

16. Seat bracket assembly LH

17. Seatback silencer LH

18. Headrest LH

19. Seatback board LH

20. Seatback board RH

21. Seatback board clip

22. Luggage floor bracket

23. Seat belt anchor nut

24. Seat belt anchor bolt

25. Seat belt buckle RH

26. Seat belt buckle (center)

27. Seat belt anchor plate

28. Seat belt connector buckle

29. Seat belt buckle LH

30. Hinge cover RH

31. Seatback inner arm cover RH

32. Seatback inner arm cover LH

33. Hinge cover LH

34. Seatback support

35. Seatback frame RH

36. Bush

37. Seat cushion frame RH

38. Seat cushion frame LH

39. Seatback frame LH

  : Pawl

Refer to 

GI-4, "Components"

 for symbols in the figure.

: Pawl

JMJIA3899ZZ

JMJIA4264ZZ

THIRD SEAT

SE-139

< REMOVAL AND INSTALLATION >

C

D

E

F

G

H

I

K

L

M

A

B

SE

N

O

P

Install in the reverse order of removal.

Disassembly and Assembly

INFOID:0000000006217437

SEATBACK

Disassembly

1.

Remove the hinge cover.
1.

Remove the seat cushion trim and seat cushion pad from seat cushion frame.

2.

Remove the fixing screws, and then remove the hinge cover.

2.

Remove the mounting bolts, and then remove the seatback assembly.

3.

Open fastener (A) of seatback trim.
• LH  side

• RH side

4.

Remove clips that retain seatback board and seatback trim.

5.

Remove the seatback board and the clips.
1.

Slide and align the clips (B) to the holes on the seatback
board (A) as shown in the figure, and then remove the seat-
back board (A).

2.

Remove the clips after removing the seatback board.

6.

Remove the seatback trim and seatback pad.

JMJIA4328ZZ

JMJIA4329ZZ

JMJIA4076ZZ

SE-140

< REMOVAL AND INSTALLATION >

THIRD SEAT

1.

Remove the headrest holder.

CAUTION:

Before installing headrest holder check its orientation. 
(front/rear and right/left)

2.

Remove the seatback trim and pad from seatback frame.

3.

Remove the hog rings to separate the seatback trim and seatback pad.

7.

Remove the seatback silencer.

8.

Remove the seatback inner arm cover (RH and LH).

Assembly

Assemble in the reverse order of disassembly.

CAUTION:

• Install the hog rings of seatback trim in position, and then securely connect the trim or trim cord with

the seatback frame.

• When installing wire, be careful that it is not slackened.

SEAT CUSHION

Disassembly

1.

Remove the seat cushion trim and seat cushion pad.
1.

Remove the seat cushion retainer.

2.

Remove the seat cushion trim and seat cushion pat from seat cushion frame.

3.

Remove the hog rings to separate the seatback trim and seatback pad.

2.

Remove the hinge cover.
Remove the fixing screws, and then remove the hinge cover.

3.

Remove the mounting bolts, and then remove the seat cushion assembly.

4.

Remove the mounting nuts, and then remove the seat hinge assembly.

Assembly

Assemble in the reverse order of disassembly.

CAUTION:

Install the hog rings of seat cushion trim in position, and then securely connect the trim or trim cord
with the seat cushion pad wire.

PIIB4084J

POWER SEAT SWITCH

SE-141

< REMOVAL AND INSTALLATION >

C

D

E

F

G

H

I

K

L

M

A

B

SE

N

O

P

POWER SEAT SWITCH

Removal and Installation

INFOID:0000000006217438

REMOVAL

CAUTION:

When removing and installing, use shop cloths to protect parts from damage.

1.

Remove the seat. Refer to 

SE-112, "Removal and Installation"

.

2.

Remove the seat cushion outer finisher.

3.

Disconnect power seat switch connector.

4.

Remove the screws.

5.

Remove the power seat switch from the seat.

INSTALLATION

Install in the reverse order of removal.


Content   ..  1148  1149  1150  1151   ..