Infiniti Q45. Manual - part 858


  Index      Infiniti     Infiniti Q45 - service repair manual 2006 year


Search            copyright infringement  


Content   ..  856  857  858  859   ..


Infiniti Q45. Manual - part 858


FRONT SEAT

SE-187

C

D

E

F

G

H

J

K

L

M

A

B

SE

REMOVAL

When removing or installing the seat trim, carefully handle it to keep dirt out and avoid damage.

CAUTION:

Before removing the front seat, turn the ignition switch off, disconnect both battery cables and
wait and least 3 minutes.

When checking the power seat circuit for continuity using a circuit tester, do not confuse its con-
nector with the side air bag module connector. Such an error may cause the air bag to deploy.

Do not drop, tilt, or bump the side air bag module installing in the seat. Always handle it with care.
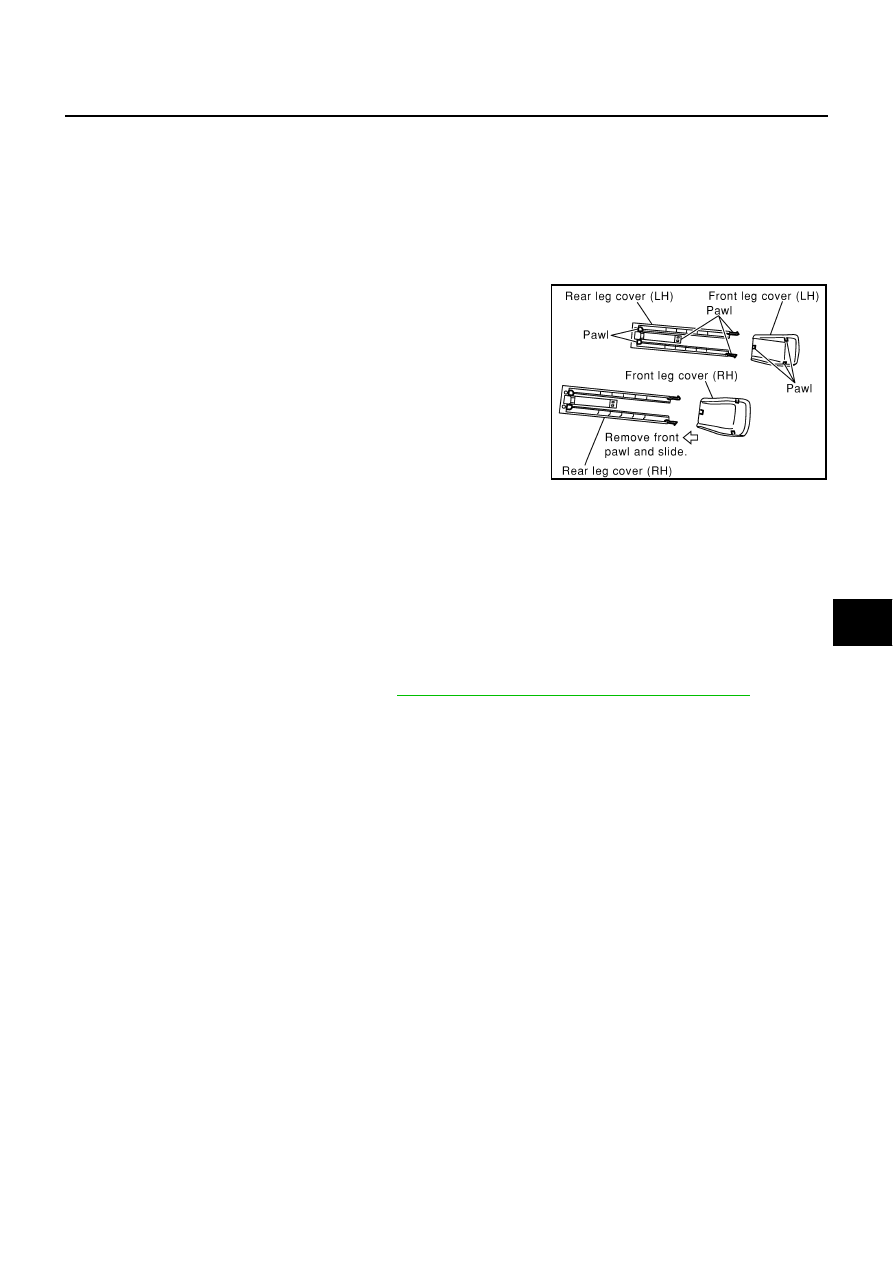
1.

Remove the front leg cover and rear leg cover. (LH/RH)

NOTE:

Slide the seat backward, and disconnect the front tabs on the front leg cover. Then move the cover
toward the rear of the vehicle, and pull up to remove.

Slide the seat forward, then disengage the tabs on the front LH/RH of the rear leg cover and tabs
engaged into the rail. Then pull the cover toward the rear of the vehicle.

2.

Slide the seat until the body mounting bolts are visible and a tool can be inserted.

NOTE:
When disassembling the driver seat after removal, set the front/rear cushion lifter to the top position.

3.

Remove the body mounting bolts.

4.

Remove the seat belt anchor bolt. Refer to 

SB-3, "Removal and Installation of Front Seat Belt"

 .

5.

Disconnect both battery cables.

6.

Remove the harness connector for the side air bag module.

7.

Remove the power seat harness connector and vehicle harness fixing clip out of the vehicle.

NOTE:
When removing and installing, using shop clothes, protect the parts from damage where it may interfere
with others.

INSTALLATION

Install in the reverse order of removal.

NOTE:
Be sure to insert the rear end tab of the rear leg cover under the rail.

Disassembly and Assembly

NIS0015K

DISASSEMBLY OF SEATBACK TRIM AND PAD

NOTE:
Be sure to set the front/rear cushion lifter to the top position.

SIIA0490E

SE-188

FRONT SEAT

1.

Remove the seatback board from the back of the seatback.

2.

Remove the retainer.

3.

From the back of the seatback, press the headrest holder tab of
the stay pipe hole to disengage. Then pull the headrest holder
up to remove.

NOTE:
Before installing the headrest holder, check its orientation (front/
rear and left/right).

4.

Remove the stay securing the inner cloth.

5.

Remove the switch finisher at the side of the seatback. (passen-
ger side seat only)

PIIA0163E

SIIA0113E

PIIA0164E

SIIA0579E

PIIA0165E

FRONT SEAT

SE-189

C

D

E

F

G

H

J

K

L

M

A

B

SE

6.

Remove the seat heater harness connector. After removing the seatback trim and pad, remove the hog
ring to separate the trim, pad, and seatback heater unit.

ASSEMBLY OF SEATBACK TRIM AND PAD

Assemble in the reverse order of disassembly.

REMOVAL OF SEATBACK ASSEMBLY

1.

 After completing the steps 1 and 2 of “SEATBACK TRIM AND PAD”, remove the harness connectors for
the reclining motor and lumbar support motor (driver seat only).

2.

Pull out the harness connector for the side air bag from the seat cushion.

3.

Remove the reclining device mounting bolts on the seatback frame, and remove the seatback assembly.

NOTE:
When assembling the seatback frame, make sure that the reclining device are locked on both sides, and
be sure to temporarily tighten the bolts, then tighten them finally.

INSTALLATION OF SEATBACK ASSEMBLY

Install in the reverse order of removal.

DISASSEMBLY OF SEAT CUSHION TRIM AND PAD

CAUTION:

Do not disassemble front passenger seat cushion assembly.
Always replace as an assembly.
For front passenger seat service parts, refer to the service part catalogue.

1.

Remove the front seat cushion finisher (front and rear).

2.

Remove the power seat switch knob.

3.

Remove the front seat cushion finisher (outer).

4.

Remove the power seat switch assembly.

5.

Partially pull off the trim at the rear of the seat cushion forward,
and remove the hog rings on the seat cushion pad.

6.

Remove the retainer on the seat cushion frame, then remove the harness connector for the seat heater.

7.

After removing the seat cushion trim and pad, remove the hog rings to separate the trim and pad and the
seat cushion heater unit.

ASSEMBLY OF SEAT CUSHION TRIM AND PAD

Assemble in the reverse order of disassembly.

SIIA0502E

SIIA0503E

SE-190

FRONT SEAT

CLIMATE CONTROLLED SEAT
Blower Filter Replacement

Put your hand behind front seat cushion, pull filter downward and
remove it. Replace filter with a new one.

NOTE:

When replacing, be sure to set the front/rear driver seat lifter to
the top position.

When installing, do not confuse up-down direction of the filter.

PIIA3242E


Content   ..  856  857  858  859   ..