Infiniti EX35. Manual - part 983


  Index      Infiniti     Infiniti EX35 - service repair manual 2008 year


Search            


Content   ..  981  982  983  984   ..


Infiniti EX35. Manual - part 983


INSTRUMENT PANEL ASSEMBLY

IP-17

< ON-VEHICLE REPAIR >

C

D

E

F

G

H

I

K

L

M

A

B

IP

N

O

P

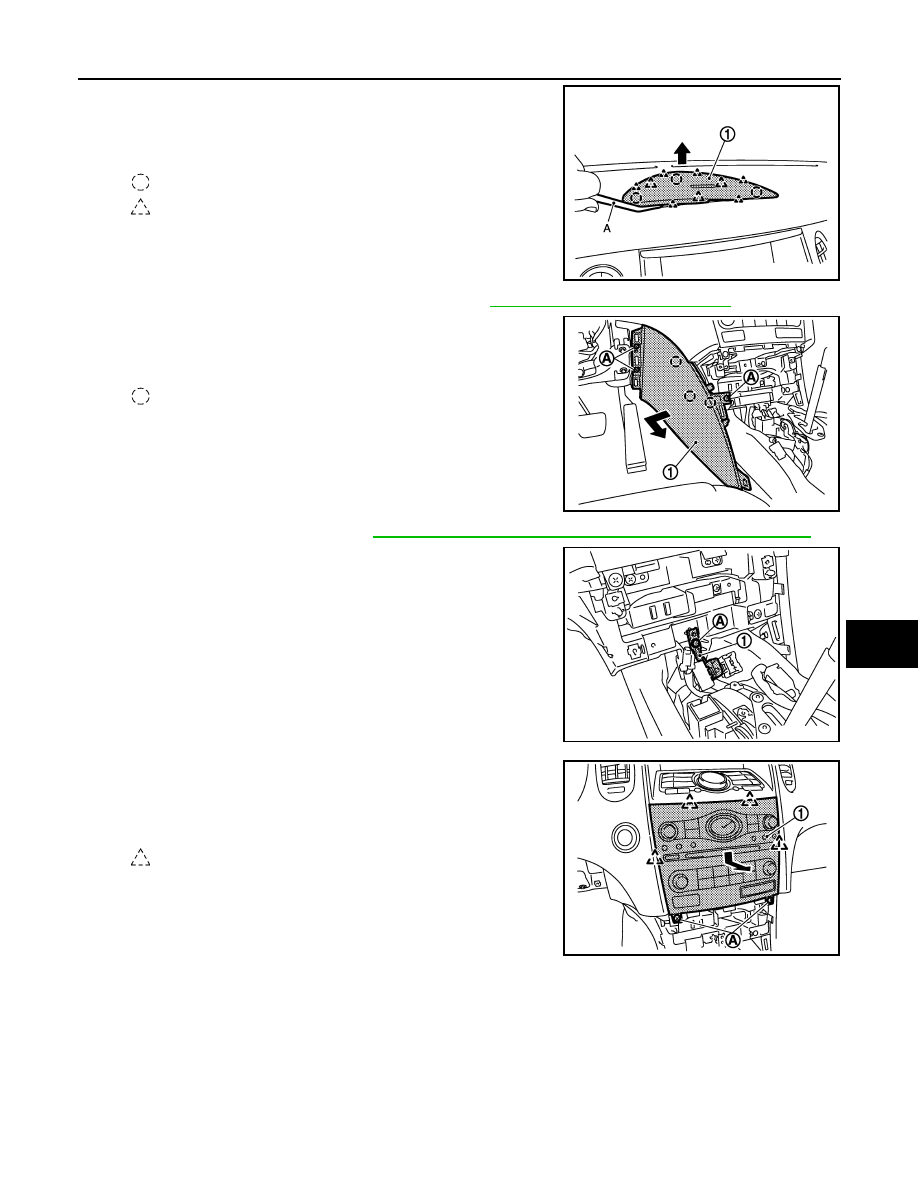
27. Remove center speaker grille.

• Disengage center speaker grille (1) fixing clips and pawls with

remover tool (A).

• Pull up center speaker grille.

28. Remove center speaker. (with BOSE AUDIO) Refer to 

AV-418, "Removal and Installation"

.

29. Remove instrument side panel LH.

• Remove instrument side panel LH (1) fixing screws (A).
• Pull toward the arrow direction.

30. Remove inside key antenna. Refer to 

DLK-258, "INSTRUMENT CENTER : Removal and Installation"

.

31. Remove harness connector bracket (1) fixing screw (A).

32. Remove cluster lid C.

• Remove cluster lid C (1) fixing screws (A).
• Pull down and back cluster lid C.
• Disconnect harness connectors.

: Clip

: Pawl

JMJIA1622ZZ

: Clip

JMJIA1623ZZ

JMJIA1624ZZ

: Pawl

JMJIA1625ZZ

IP-18

< ON-VEHICLE REPAIR >

INSTRUMENT PANEL ASSEMBLY

33. Remove cluster lid D.

• Remove cluster lid D (1) fixing screws (A).
• Pull back cluster lid D.
• Disconnect harness connectors.

34. Remove display unit.

• Remove display unit (1) fixing screws (A).
• Pull toward the arrow direction.
• Disconnect harness connectors.

35. Remove AV C/U.

Refer to 

AV-156, "Removal and Installation"

.

• Remove AV C/U (1) fixing screws (A).
• Pull back AV C/U.
• Disconnect harness connectors.

36. Remove push button ignition switch. Refer to 

SEC-205, "Removal and Installation"

.

37. Remove front defroster grille LH. Refer to 

VTL-49, "FRONT DEFROSTER GRILLE : Removal and Instal-

lation"

.

38. Remove front defroster grille RH. Refer to 

VTL-49, "FRONT DEFROSTER GRILLE : Removal and Instal-

lation"

.

39. Remove instrument side finisher RH.

• Insert a remover tool into lower space.
• Pull the instrument side finisher RH (1) crosswise.

40. Remove glove box assembly.

• Open the glove box.

: Pawl

JMJIA1626ZZ

JMJIA1627ZZ

JMJIA1628ZZ

: Clip

: Pawl

JMJIA1629ZZ

INSTRUMENT PANEL ASSEMBLY

IP-19

< ON-VEHICLE REPAIR >

C

D

E

F

G

H

I

K

L

M

A

B

IP

N

O

P

• Pull back glove box assembly (1).

• Remove damper pin (1) of left side.

41. Remove instrument lower cover.

• Pull downward, disengaged pawls.
• Pull back instrument lower cover (1).
• Disconnect illumination lamp harness connector.

42. Remove instrument lower panel RH.

• Remove instrument lower panel RH (1) fixing screws (A).
• Pull back instrument lower panel RH.
• Disconnect glove box lamp harness connector.

43. Disconnect front passenger air bag module connector. Refer to 

SR-8, "Exploded View"

.

44. Remove front passenger air bag module fixing bolt. Refer to 

SR-8, "Removal and Installation"

.

JMJIA1630ZZ

: Clip

JMJIA1631ZZ

: Pawl

JMJIA1632ZZ

: Pawl

JMJIA1633ZZ

IP-20

< ON-VEHICLE REPAIR >

INSTRUMENT PANEL ASSEMBLY

45. Remove instrument side panel RH.

• Remove instrument side panel RH (1) fixing screws (A).
• Pull toward the arrow direction.

46. Remove front body side welt RH. Refer to 

INT-20, "Removal and Installation"

.

47. Remove front pillar garnish RH. Refer to 

INT-20, "Removal and Installation"

.

48. Remove speaker grille RH.

• Pull up and back tweeter grille RH (1).
• Disconnect front squawker harness connector.

49. Remove instrument panel assembly mounting bolts (A), screws (B) and clips (C).

50. Remove instrument panel assembly.

CAUTION:

• Cover center console upper surface with a shop cloth to prevent it from being damaged.
• When removing instrument panel assembly, 2 workers are required so as to prevent it from drop-

ping.

51. Remove the following parts after removing instrument panel assembly.

• Front passenger air bag module. Refer to 

SR-8, "Removal and Installation"

.

• Center ventilator grille LH/RH. Refer to 

VTL-47, "CENTER VENTILATOR GRILLE : Removal and Instal-

lation"

.

• Side ventilator grille LH/RH. Refer to 

VTL-48, "SIDE VENTILATOR GRILLE : Removal and Installation"

.

• Ventilator duct LH/RH. Refer to 

VTL-50, "VENTILATOR DUCT : Removal and Installation"

.

• Adaptor duct. Refer to 

VTL-52, "ADAPTOR DUCT : Removal and Installation"

.

• Defroster nozzle. Refer to 

VTL-53, "DEFROSTER NOZZLE : Removal and Installation"

.

: Clip

JMJIA1634ZZ

: Clip

: Pawl

JMJIA1621ZZ

JMJIA1636ZZ


Content   ..  981  982  983  984   ..