Infiniti EX35. Manual - part 718
CAMSHAFT
EM-71
< ON-VEHICLE REPAIR >
C
D
E
F
G
H
I
J
K
L
M
A
EM
N
P
O
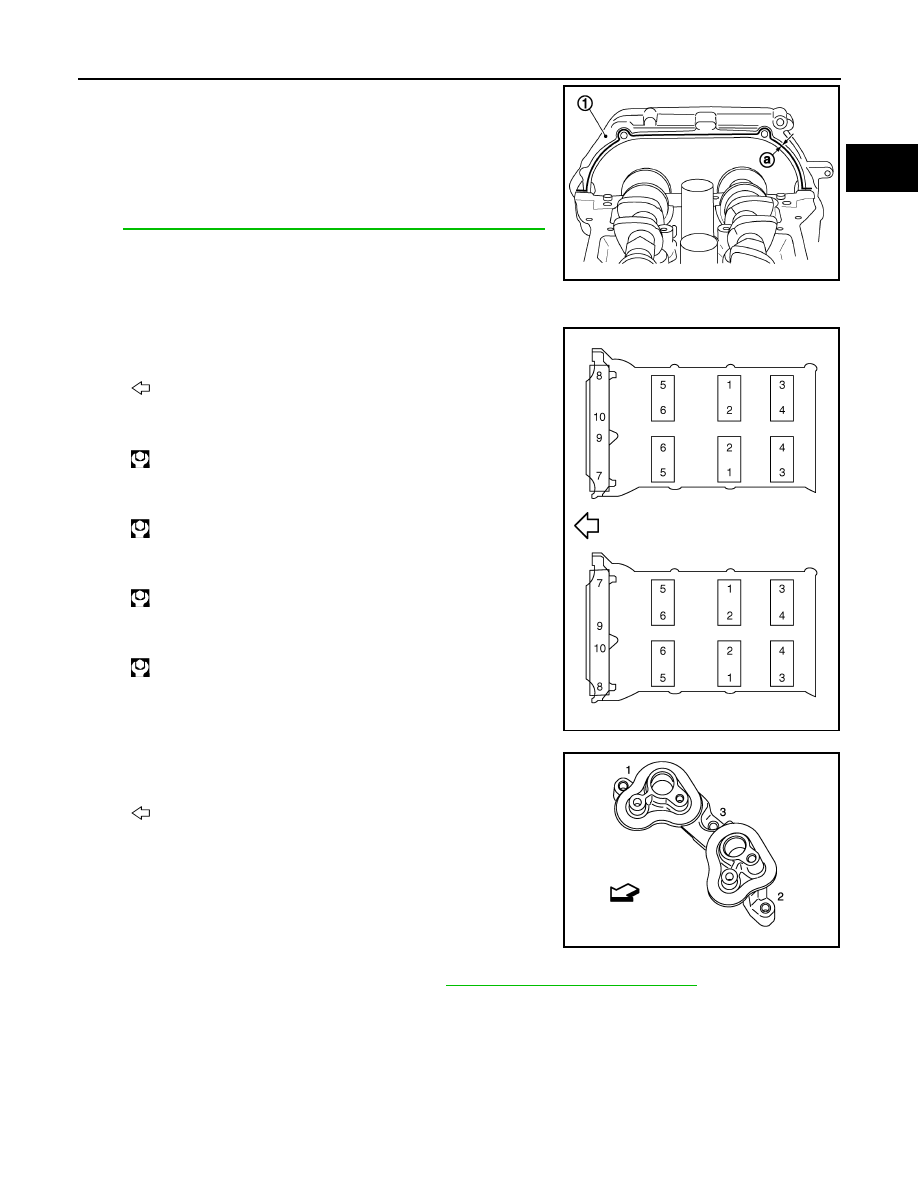
• Apply liquid gasket to camshaft bracket (No. 1) contact surface
on the rear timing chain case backside as shown on both bank
1 and bank 2.
Use Genuine RTV Silicone Sealant or equivalent. Refer to
GI-15, "Recommended Chemical Products and Sealants"
.
CAUTION:
For camshaft bracket (No. 1) near installation position,
and install it without disturbing the liquid gasket applied
to the surfaces.
5.
Tighten camshaft bracket bolts in the following steps, in numeri-
cal order as shown in the figure.
a.
Tighten No. 7 to 10 in numerical order as shown.
b.
Tighten No. 1 to 6 in numerical order as shown.
c.
Tighten No. 1 to 10 in numerical order as shown.
d.
Tighten No. 1 to 10 in numerical order as shown.
6.
Tighten camshaft sensor bracket bolts in numerical order as
shown in the figure.
NOTE:
The order of tightening bolts is the same for bank 1 and bank 2.
7.
Inspect and adjust the valve clearance. Refer to
EM-18, "Inspection and Adjustment"
.
8.
Install in the reverse order of removal after this step.
Inspection
INFOID:0000000003139121
INSPECTION AFTER REMOVAL
Camshaft Runout
1
: Rear timing chain case
a
:
φ
3.9 mm (0.154 in)
JPBIA0881ZZ
: Engine front
: 1.96 N·m (0.20 kg-m, 1 ft-lb)
: 1.96 N·m (0.20 kg-m, 1 ft-lb)
: 5.88 N·m (0.60 kg-m, 4 ft-lb)
: 10.4 N·m (1.1 kg-m, 8 ft-lb)
JPBIA0257ZZ
: Engine front
JPBIA1960ZZ